11. GPS HUD
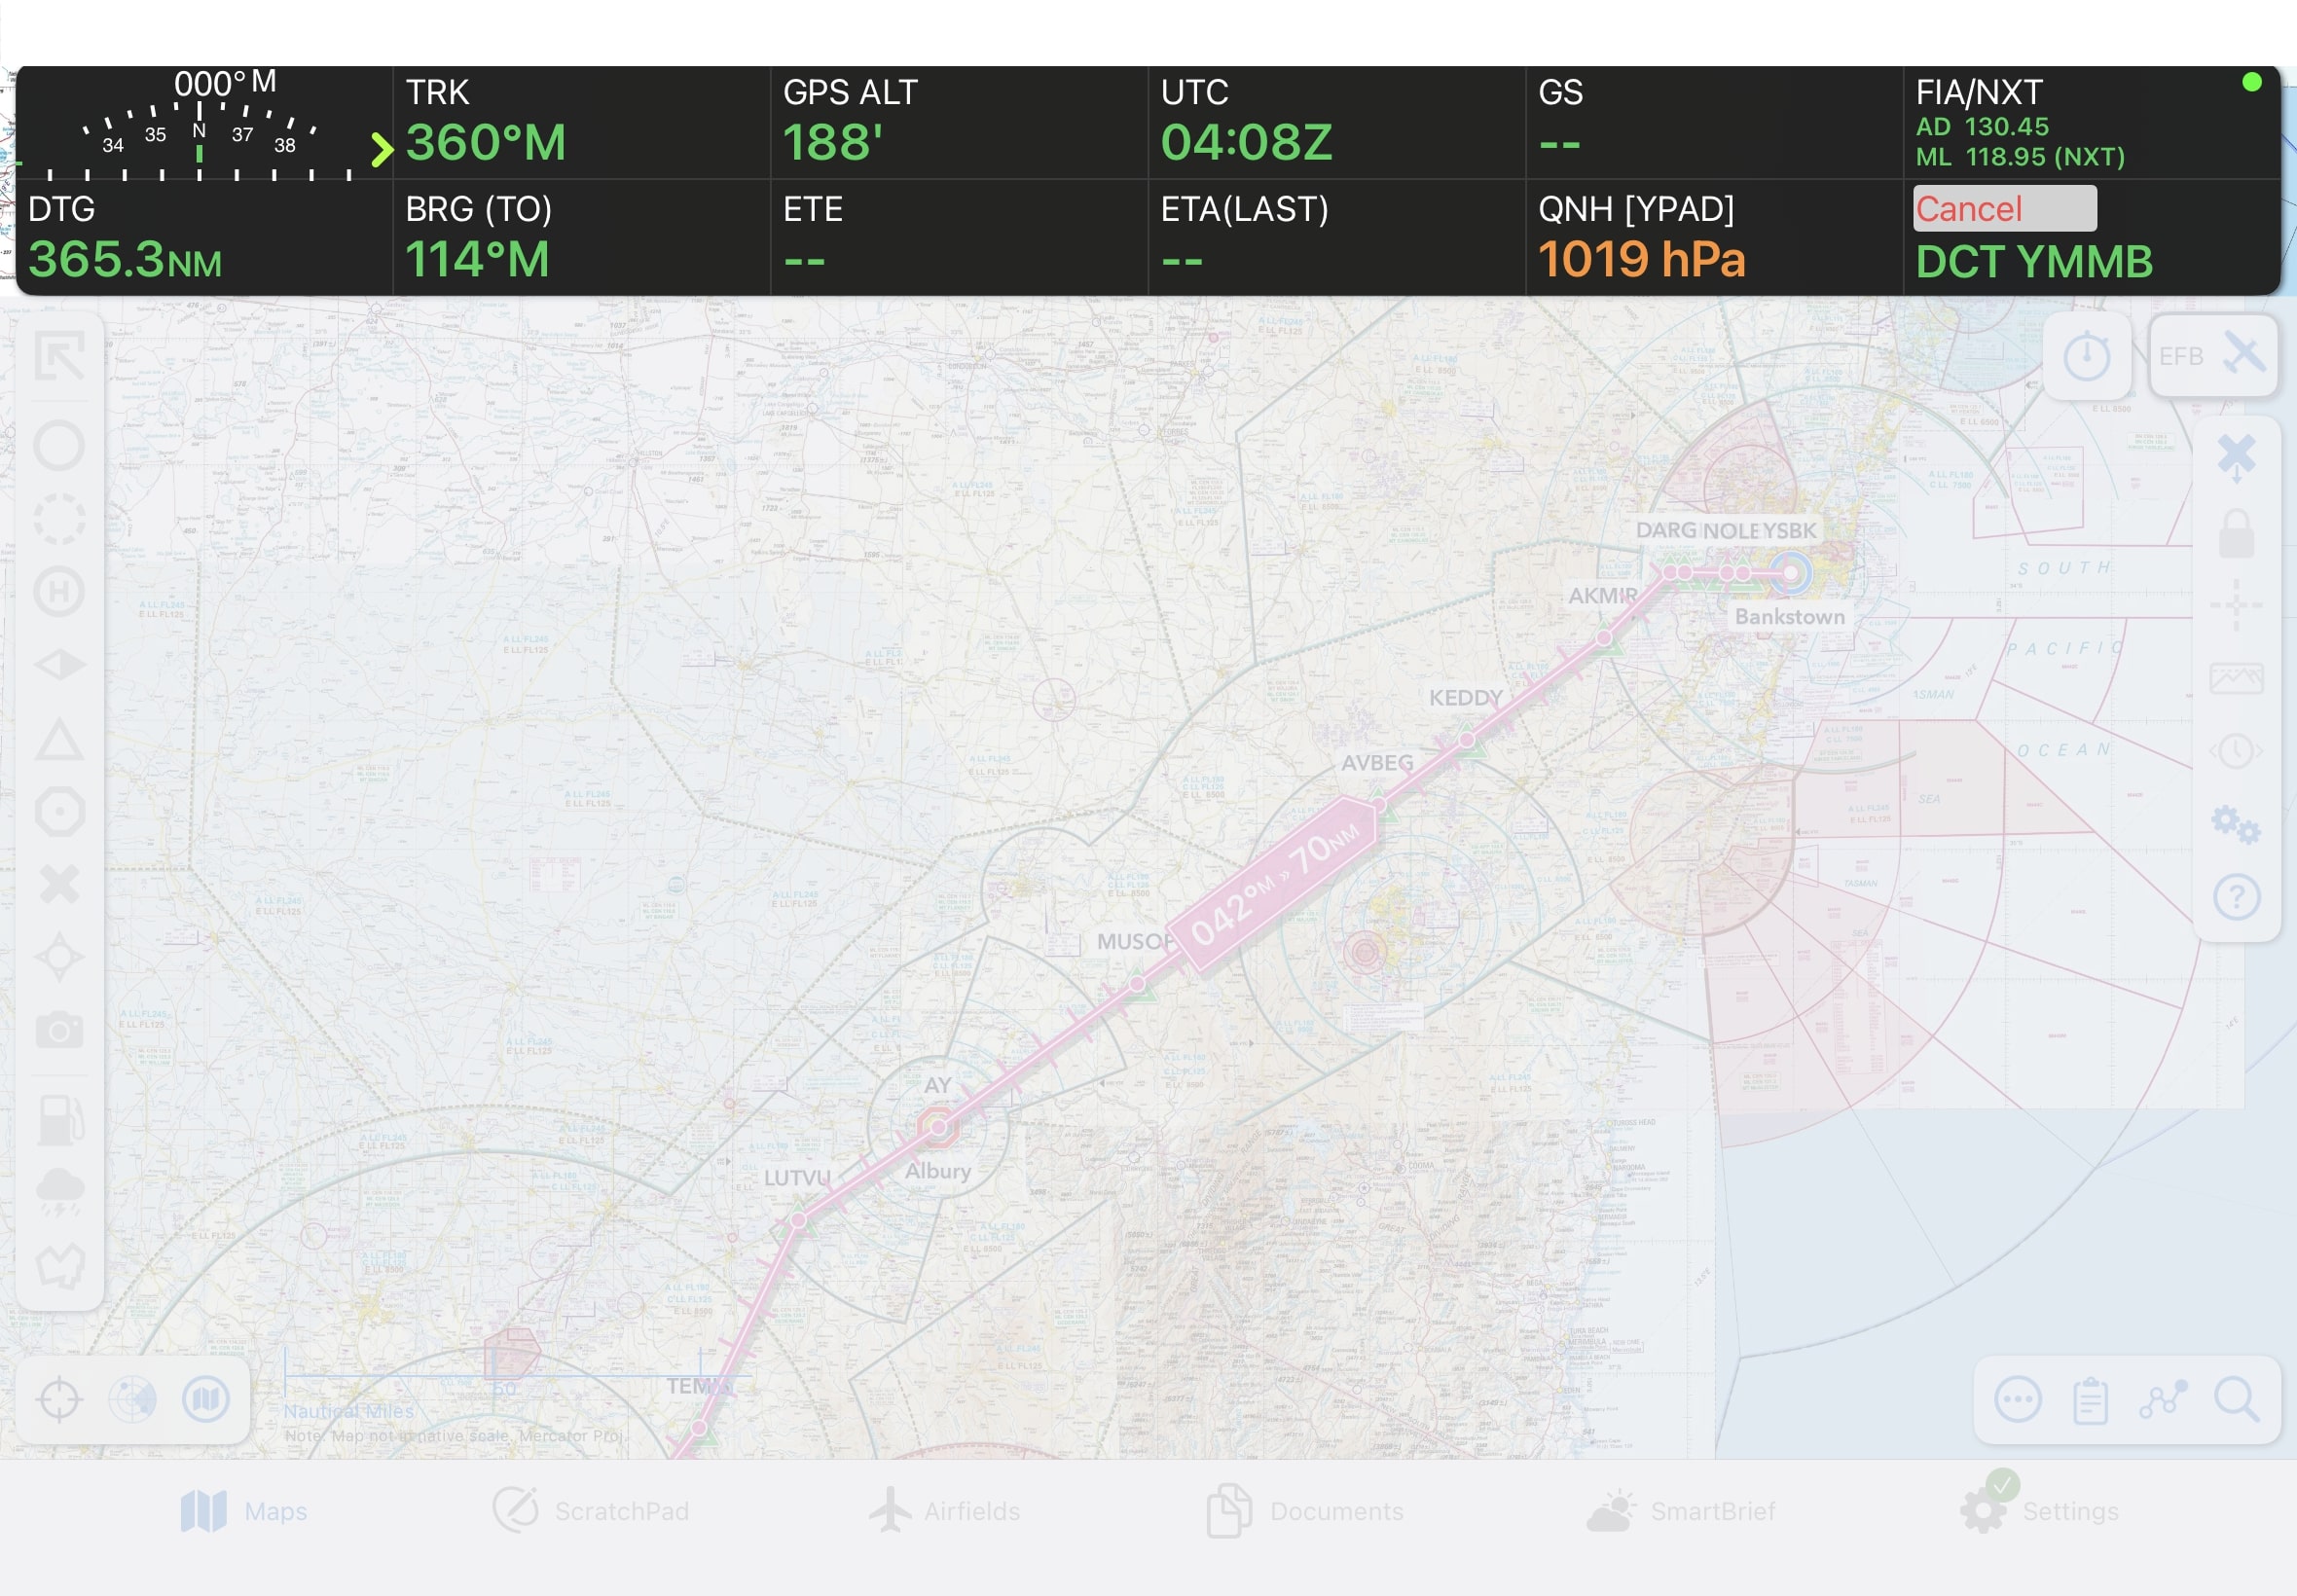
Image 11.1 GPS HUD
The GPS HUD appears across the top of the Map Page. With no plan selected there is only one row of fields (6 on the iPad or 3 on the iPhone.)
When you begin to plan, the GPS HUD converts to a two row display. The plan is now active and if desired can track your position on the map and update the GPS HUD fields with information such as Track, Ground Speed, Distance To Go, etc. The far right bottom box is the ‘Cancel’ box which, if tapped, will exit the current plan. By default only a single tap is required, however there is an option in the Preferences section of the Settings page called ‘Double-tap HUD’ which when enabled requires a double tap on the Cancel button. This can be handy for turbulent conditions.
If you don’t want the GPS HUD displayed tap the Map View Options button and turn off ‘Show GPS HUD’. A long press on any of the GPS HUD boxes will bring up a list of available fields. Tap an item in the list to switch the GPS HUD box to the selected data option.
A single tap (or double tap if that setting is enabled) on one of the HUD boxes will open a larger popup showing that field on the main map display. That popup may be dragged around to reposition it, and is retired with a double tap or by tapping the red cross in the top right. These boxes remain on the map until dismissed even if the GPS HUD is turned off.
Some data requires an accurate GPS signal (think GS, ETA etc.), or an internet connection (QNH, TMP). If data is not available due to lack of GPS signal or internet connection then ` - - ` will be displayed.
In the top right corner of the GPS HUD there is a small coloured dot. This is explained below in GPS Accuracy Dot
11.1. HUD box options
Tap and hold (long press) on any GPS HUD field and a popup will result displaying various option as described below:
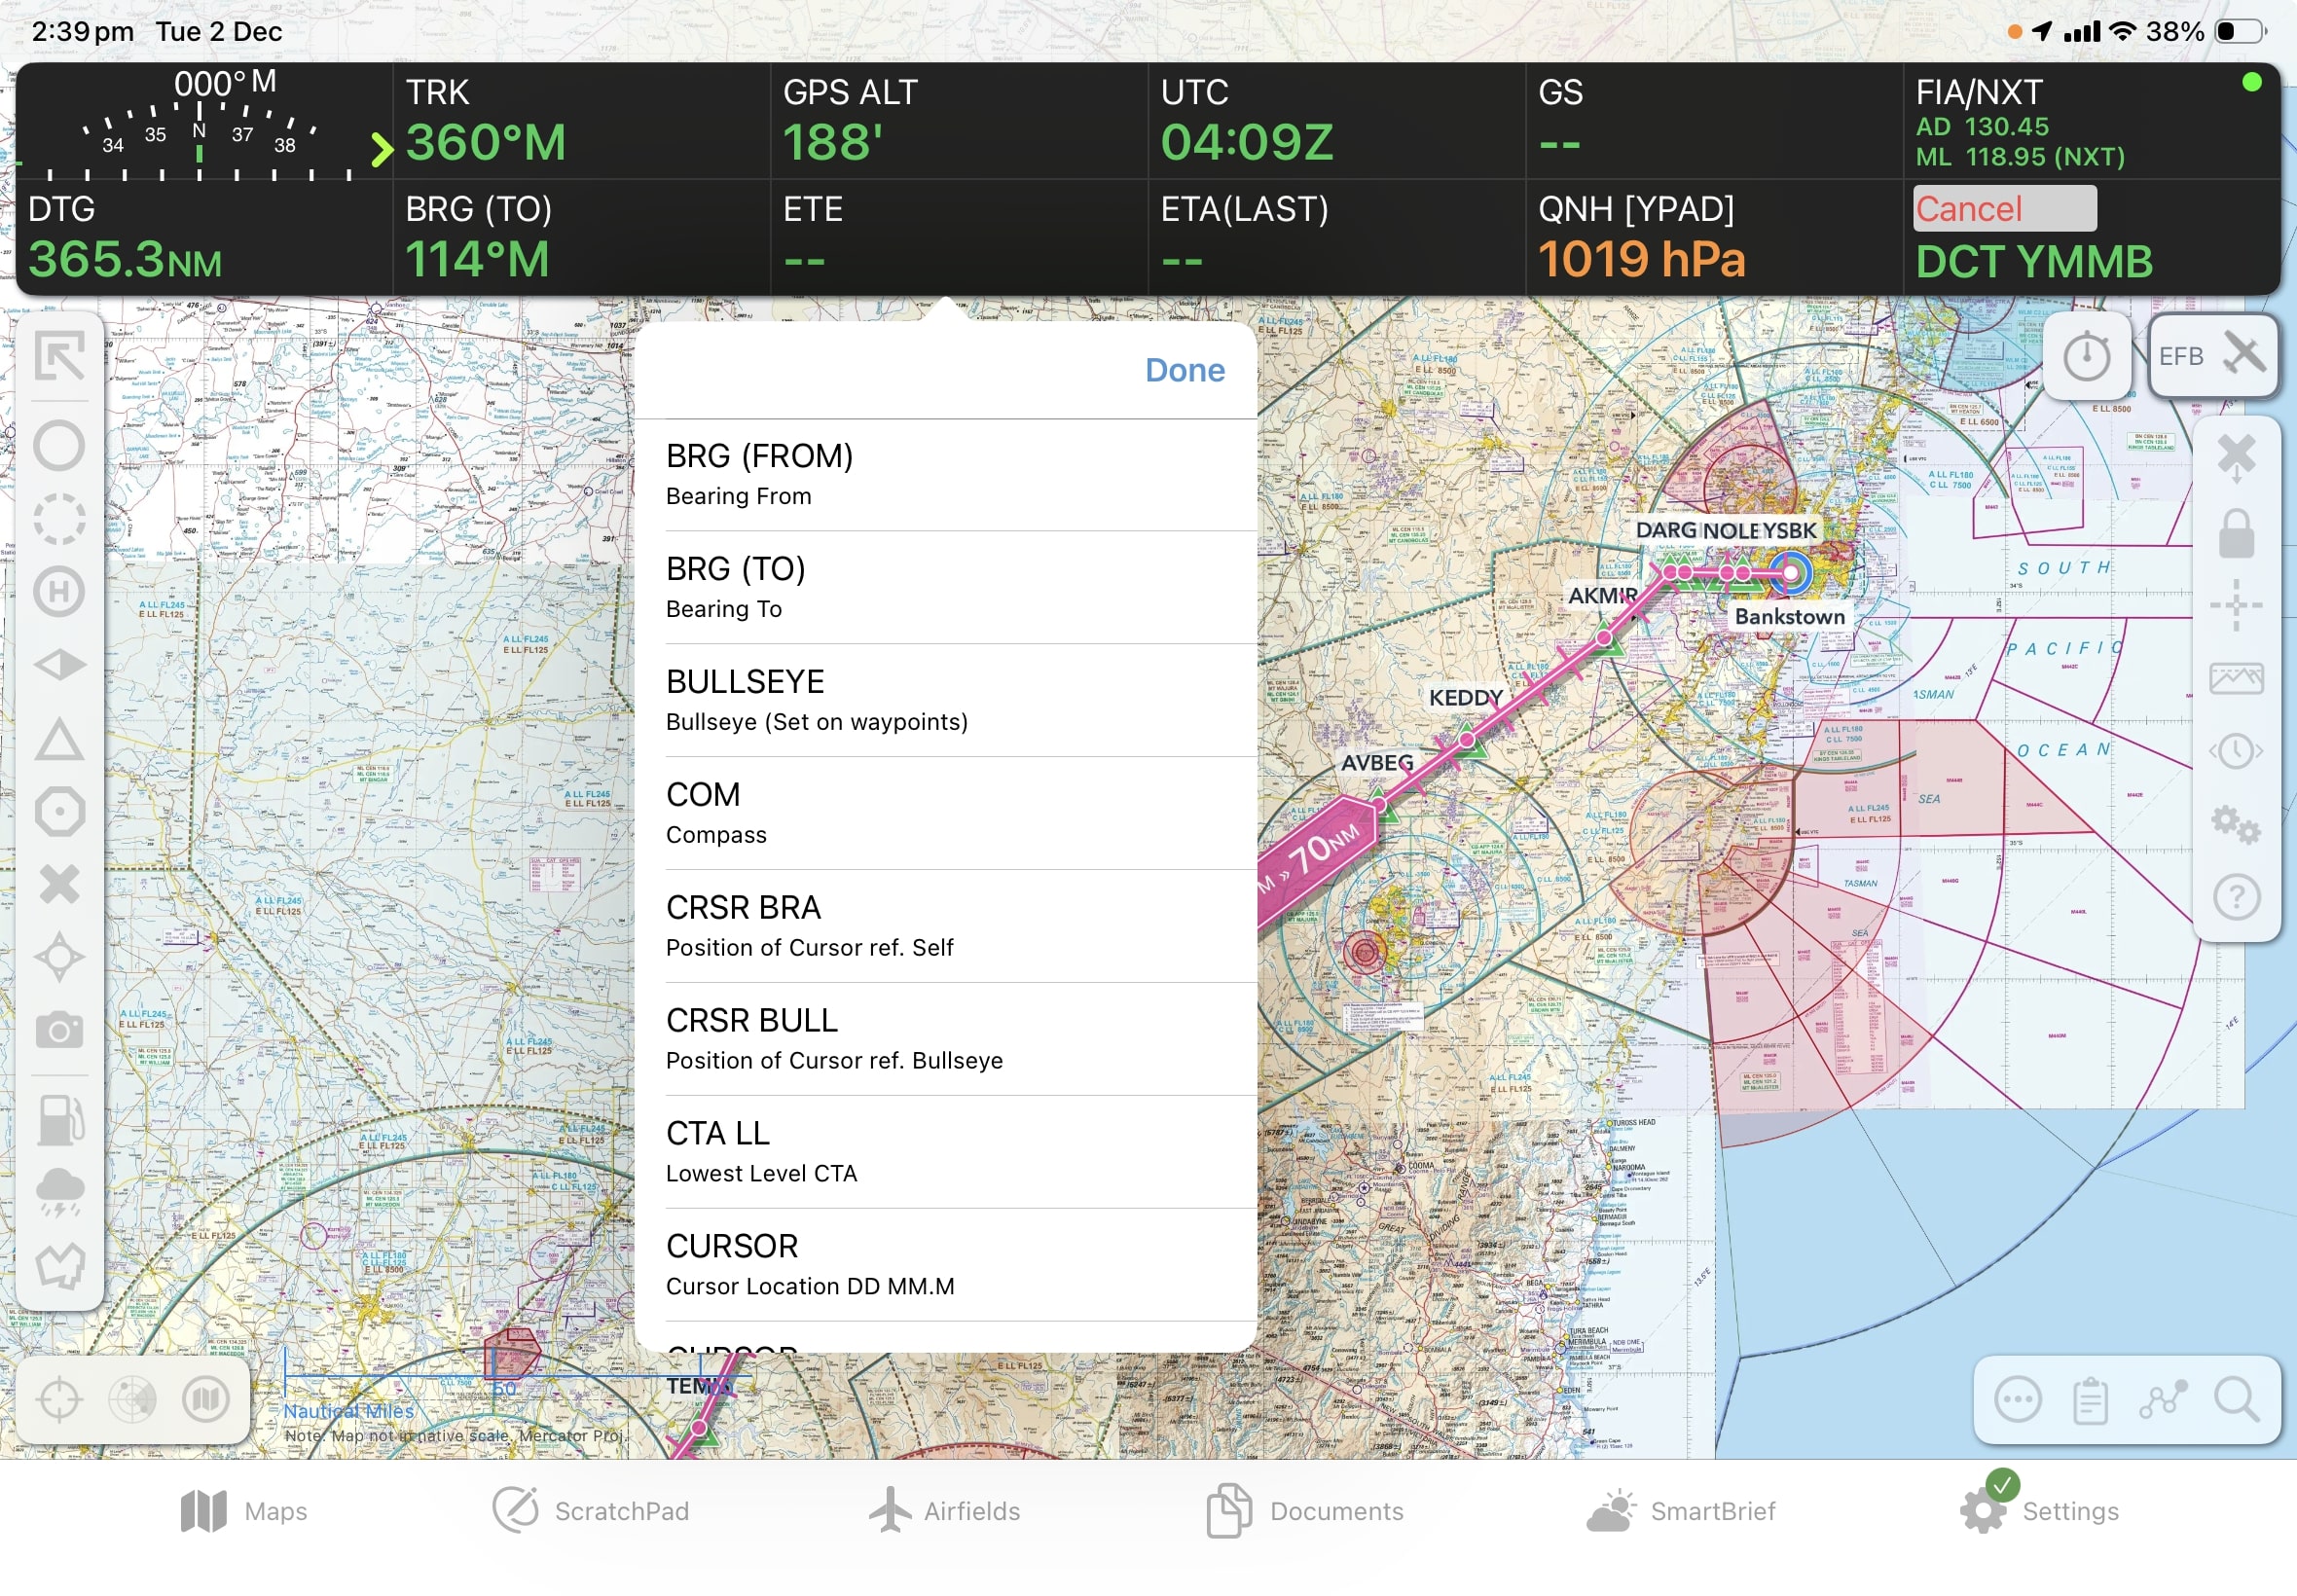
Image 11.2 GPS HUD Options
- BRG (FROM)
Bearing from the last waypoint
- BRG(TO)
Bearing to next waypoint
- BULLSEYE
Bullseye set on waypoints. The Bullseye feature is described in Special Features chapter
- COM
Compass. Note: Tapping the compass HUD box does not bring up a map overlay version
- CRSR BRA
When the cursor is enabled, this will display the position of the cursor location in reference to your current position
- CRSR BULL
When the cursor is enabled, this will display position of cursor in reference to the set Bullseye
- CTA LL
Lowest Level CTA step for current GPS position (CTA must be ticked in Map View Options → Airspace)
- CURSOR
Shows the coordinates of the cursor position in either Degrees Decimal Minutes (DD MM.M), or Degrees Minutes Second (DD MM SS) format
- DA
Relative Density Altitude at nearest aerodrome
- DFW
Distance from last Waypoint
- DTG
Distance remaining until reaching next waypoint (great circle distance)
- ETA
Estimated Time of Arrival at next waypoint
- ETA(DEVICE)
Estimated Time of Arrival at next waypoint, displayed in local time (as per the device timezone)
- ETA(LAST)
Estimated Time of Arrival for the final waypoint in the plan
- ETE
Estimated Time Enroute
- FIA
Area frequency (Class G) based on your current GPS position
- FIA E
Class E airspace area frequency based on current GPS position
- FIA NEXT
Next Class G area frequency based on your current heading
- FIA/NXT
Current and next Class G area frequency combined into one box
- FL
First Light at your current position
- GCB(TO)
Great Circle Bearing to the next waypoint. When this option is selected the app will display the Great Circle (curved) track for your plan as a grey dotted line, in addition to the standard magenta track.
- GPS ALT
Altitude according to the device GPS source
- GPS Error
Displays the current GPS error as calculated by the device. The lower this is, the better fix you have. Normally it is around 10m. It can be used to give you an indication of the best place to position your iPad in the aircraft.
- GS
Ground Speed in the units selected for the aircraft profile in use
- HAG
Height Above Ground based on GPS altitude and the current terrain altitude to estimate your height rather like a synthetic ground radar. As the terrain data is on a 900 metre grid, this can be in error for rapidly changing terrain (i.e. a cliff face)
- HSI
Horizontal Situation Indicator. A mini version of the HSI is displayed. At the bottom of the mini-HSI a ‘t’ bar indicates deviation left or right of track. The arrow indicates the bearing to the waypoint to which you are tracking. Tap once to see full sized HSI display on map page which is described in further detail below.
- LAT
Current GPS latitude
- LAT/LON
Current GPS latitude/longitude consolidated in one box
- LCL
Local Time (device timezone)
- LL
Last Light for your current GPS position
- LON
Current GPS longitude.
- LSALT
Lowest Safe Altitude. Displays the Airservices Grid Lowest Safe Altitude for your current GPS position
- NZ FREQ
Displays the relevant New Zealand OCTA MBZ/CFZ/FISCOM frequency for your current GPS position
- NZ FREQ NXT
Displays the next relevant New Zealand OCTA MBZ/CFZ/FISCOM frequency based on your current heading
- QNH
Displays the SmartBrief QNH for the nearest airport with a METAR service. If the SmartBrief database is more than 1 hour old ‘– –’ will be displayed.
Warning
OzRunways HUD box QNH is not an approved source of actual QNH.
- SELF BULL
Displays the bearing from your current position to the set Bullseye
- SUNSET
Sunset time at your current GPS position
- TDR
Total Distance remaining to the next landing point in your plan
- TMP
Temperature at closest METAR location
- TRK
Current GPS track
- TRN
Turn Indicator
- UTC
UTC (Zulu) Time
- VS
Vertical Speed
- XTK
Cross Track Error
11.2. Horizontal Situation Indicator (HSI)
The HSI is a special case, in that when selected as a GPS HUD field, a small display is shown. A single tap (or double tap if that setting is enabled) on a HUD box containing the HSI results in a fully fledged HSI being displayed on the map as shown on the left in Image 11.3
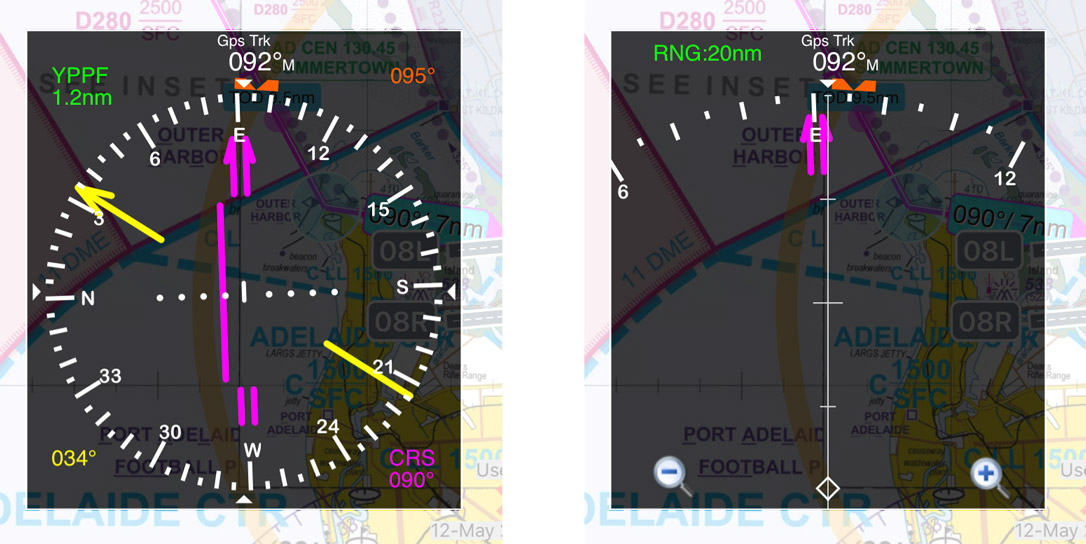
Image 11.3 (Left) traditional HSI view (Right) HSI range view
The yellow arrow (and text) is the GPS track. The purple arrow is the course to the next waypoint. There is an orange bug that can be tapped, held and moved to set a direction (i.e. a runway direction for situational awareness). The green text is the destination name and distance. The figure above shows a view of the HSI where the aircraft has drifted right of track. This is indicated by the misalignment of the arrows and indeed the values reported on the HSI. The dots in the centre of the HSI represent 2 degrees per dot.
Tap three times on the HSI to see a 70 degree view ahead of your track (as shown on the right in Image 11.3). Range buttons in the bottom left and right (+/-) can be used to increase or decrease the range, which is shown in green at the top left. ADs and ALAs are shown in their relative position and distance. Three taps gets you back to the original HSI display.
11.3. GPS Accuracy Dot
In the top right corner of the GPS HUD there is a small coloured dot. The colour of the dot gives a quick visual indication of horizontal GPS accuracy as follows:
Green: Good accuracy, 50m or less
Yellow: Poor accuracy, between 50m and 200m
Magenta/purple: Very poor accuracy, between 200m and 5km
Red: No GPS signal
If horizontal GPS accuracy is worse than 200m (i.e. a magenta or red dot) OzRunways will no longer display your location on the map, other data in the HUD that relies on GPS position may no longer function. If this happens, check that OzRunways has the approproiate permissions to access location services in the device settings. You may need to move the device to a different location in the aircfaft away from any obstructions.