10. Aircraft
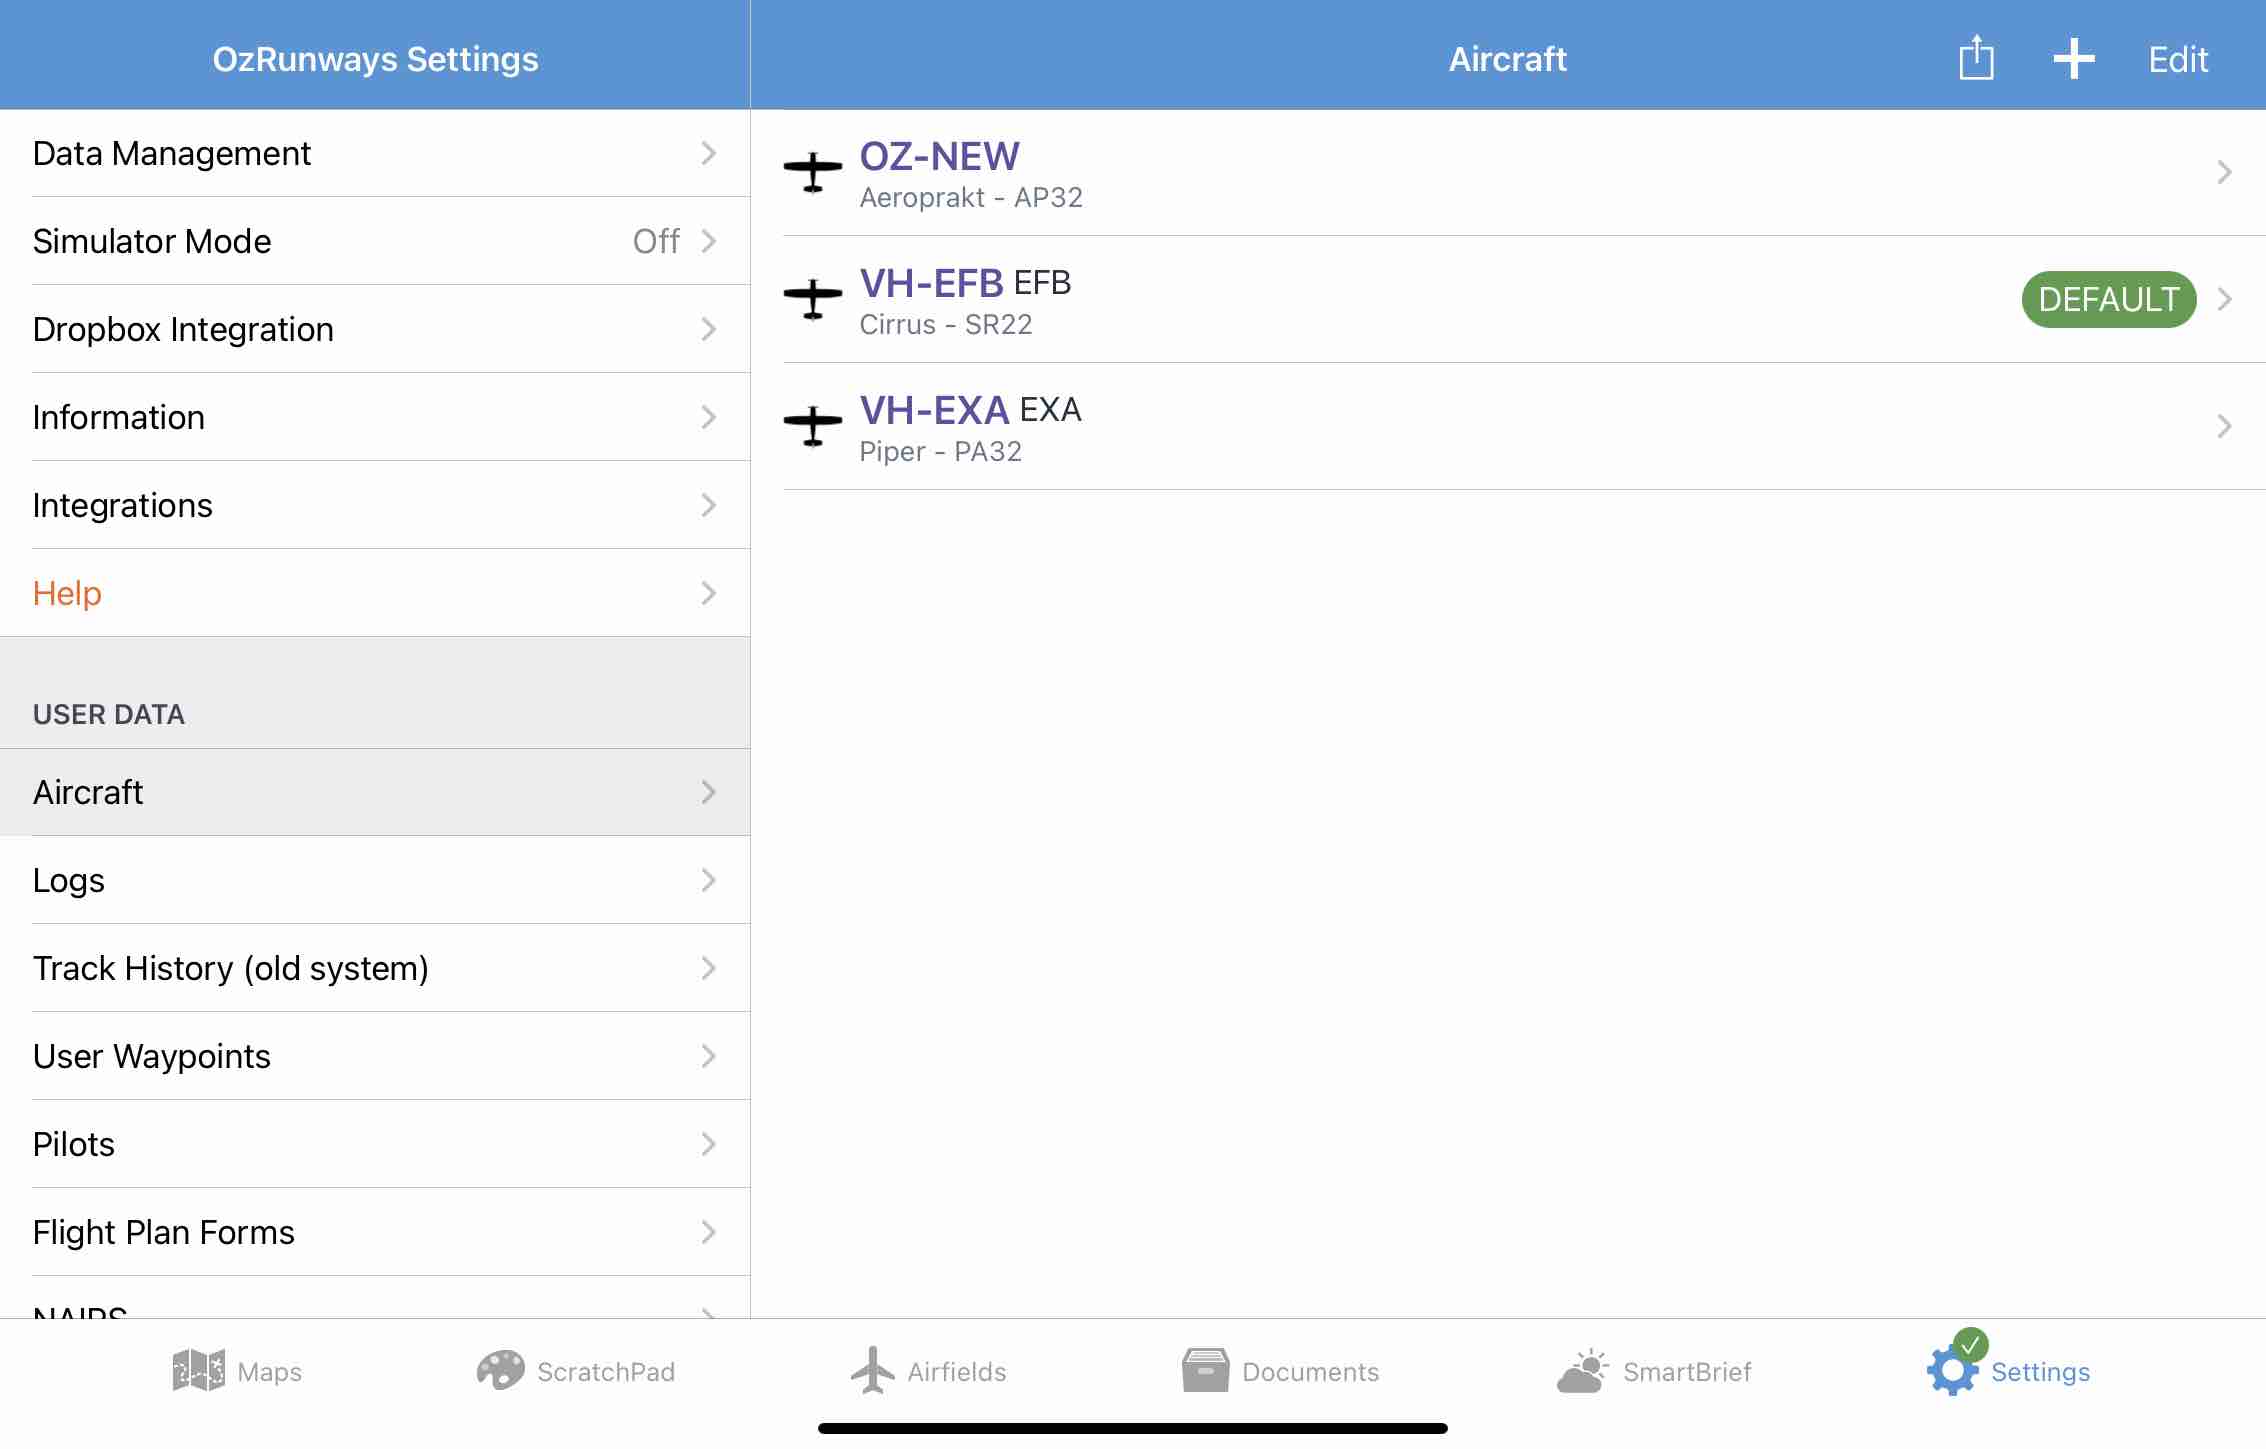
Image 10.1 Settings → Aircraft
Any aircraft profiles you have setup appear here. Use the buttons in the top right corner to add new aircraft profiles, or duplicate or export existing ones. These options are described below.
If you are just starting out with OzRunways you will see one aircraft already in the list named OZ-RWY, a Cessna C172.
10.1. Creating a new Aircraft Profile
Tap the ‘+’ to create a new aircraft profile using one of the following options:
New Blank
Create and setup an aircraft profile from scratch (i.e. all fields will be empty).
New Aircraft From Library
Our aircraft library contains profiles for many common aircraft types. Some of these profiles have been provided to us by OzRunways users, and some we have manually created using the POH for the aircraft type. It’s important when using a profile from the library that you go through and make sure the details in the profile match your POH/AFM. To use this option, tap on New from Library, then tap on the profile you want to add in the resulting list, and finally tap Import in the top right corner You will be returned to the main Aircraft screen and the selected profile will appear in the list.
10.2. Viewing/Editing an existing Aircraft Profile
Tap on an aircraft profile in the list to view and/or edit the details. The following screen results (Image 10.2).
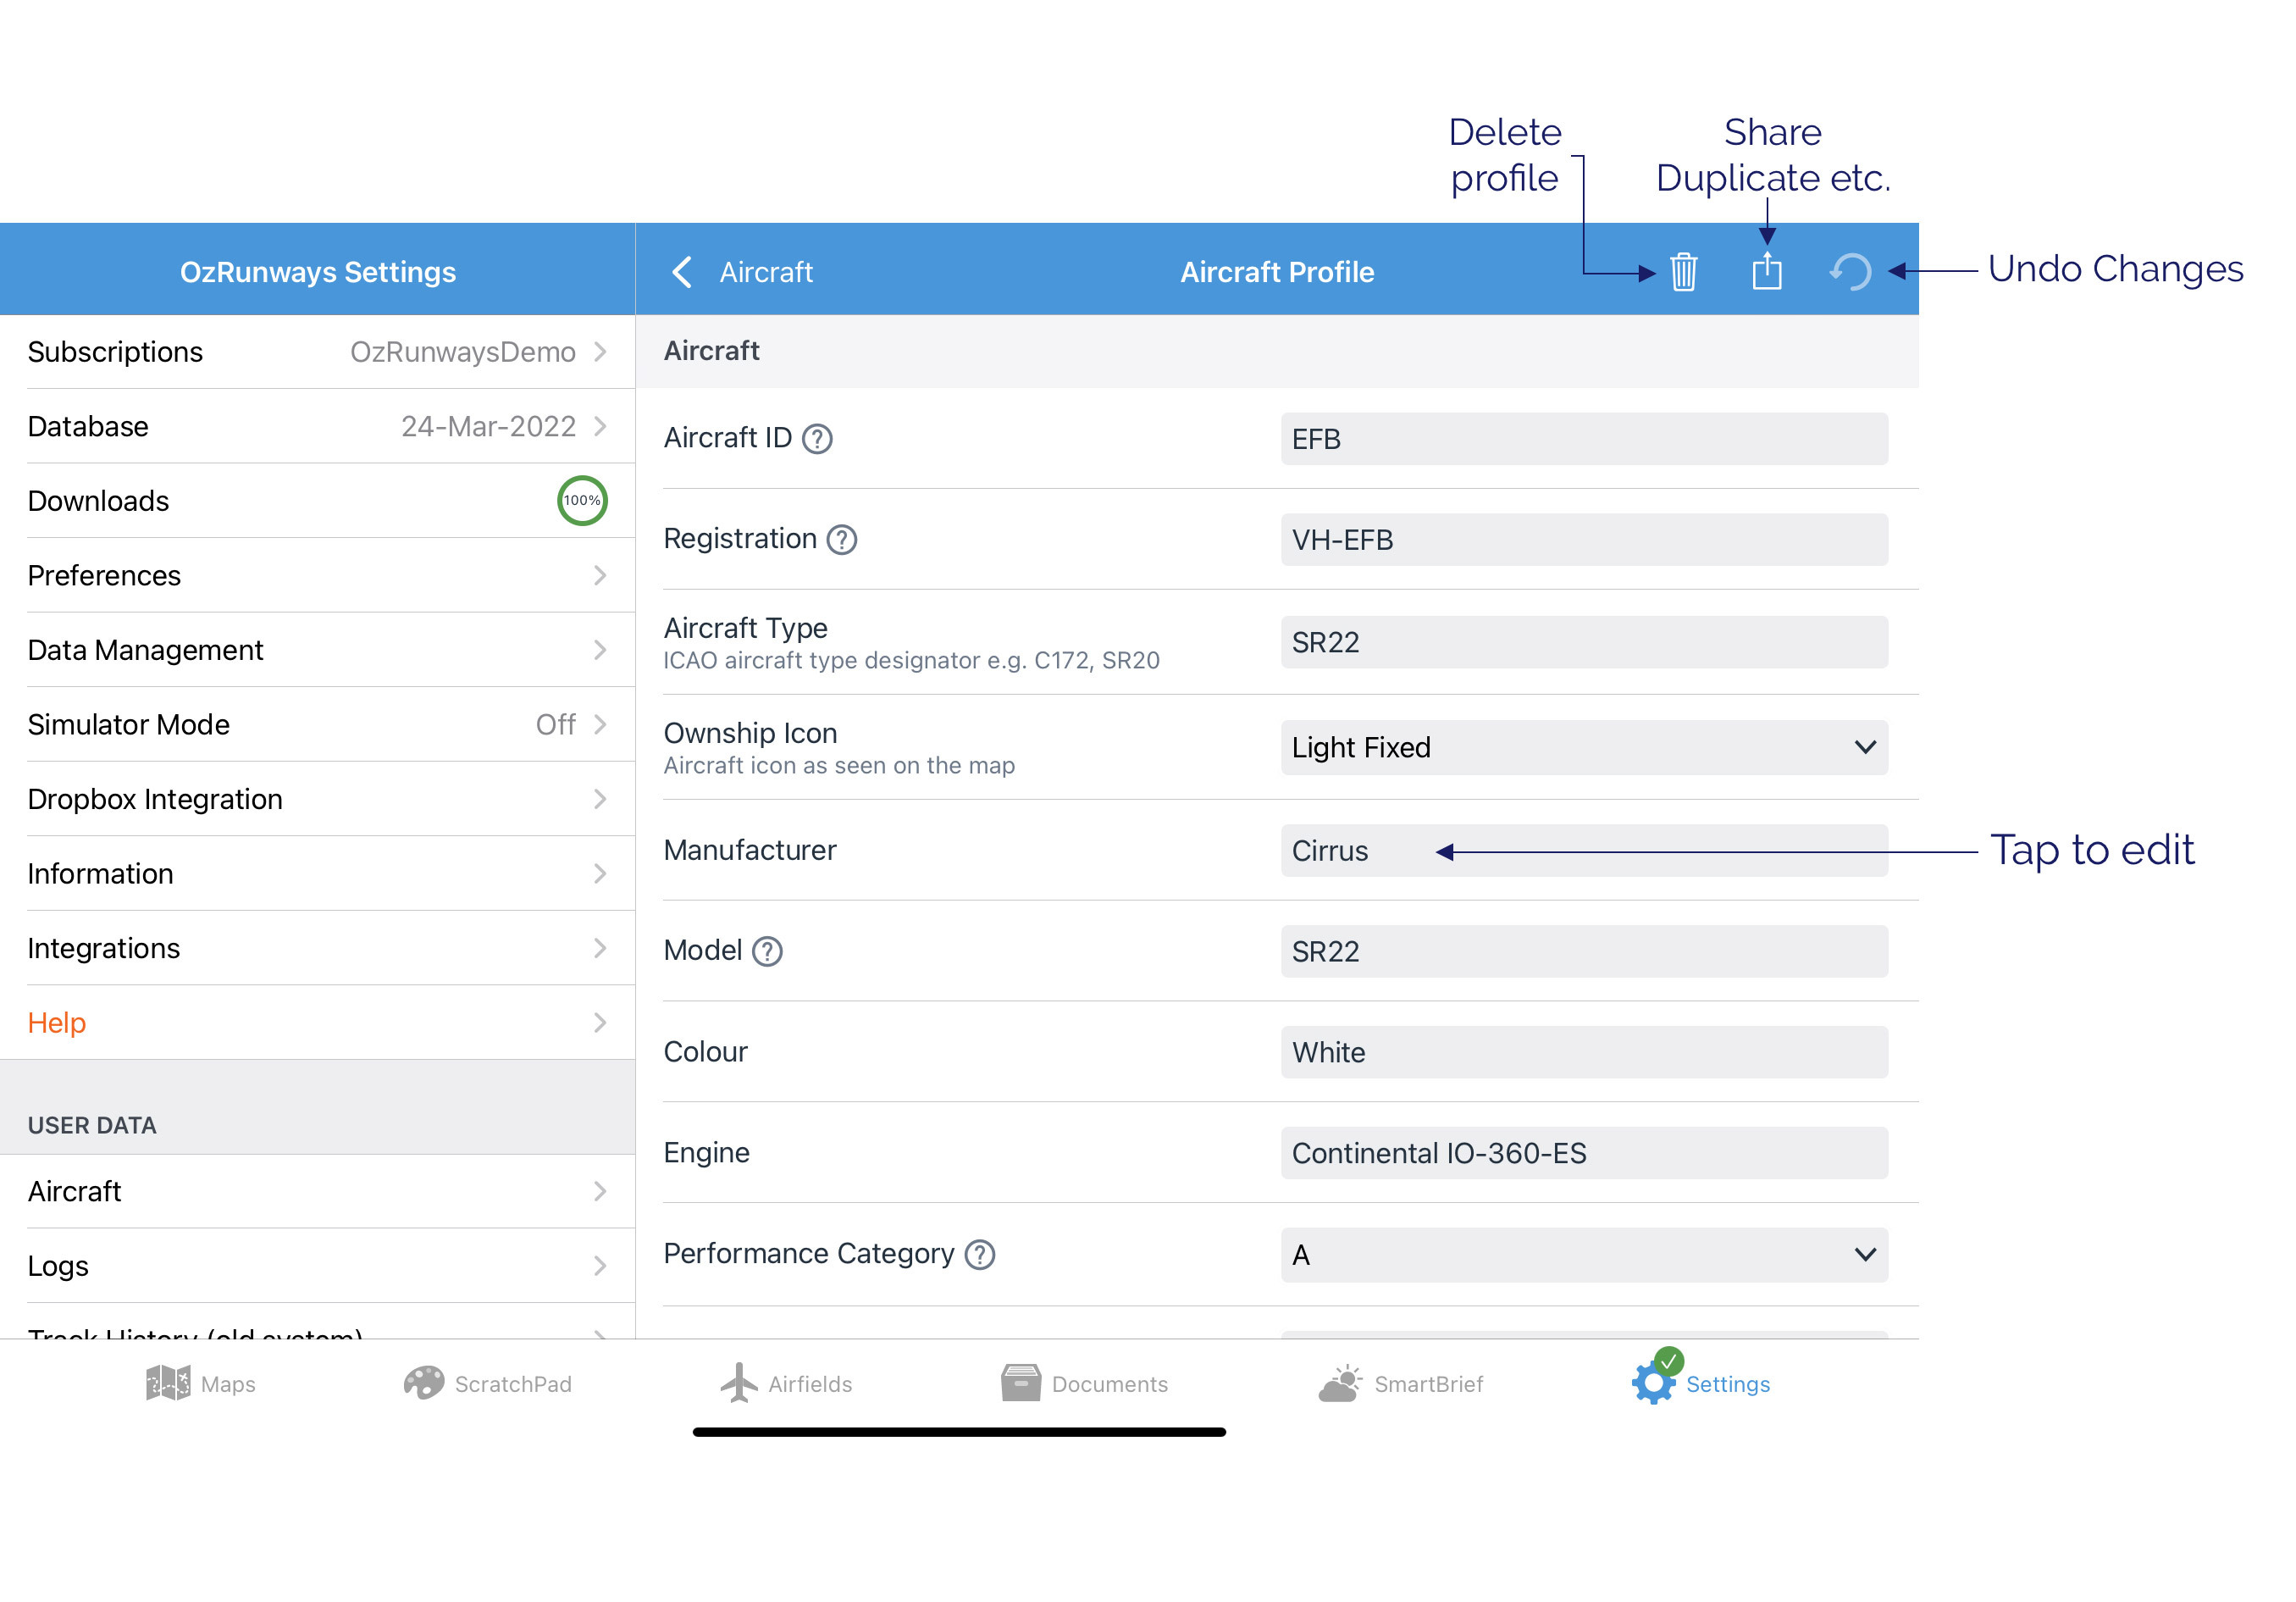
Image 10.2 Aircraft edit view
For more information on a particular field tap the ‘?’ icon next to the field name.
Tapping Undo will revert any changes that have been made since opening the aircraft profile.
When editing fuel and performance values further down the page (Image 10.3) you can tap the blue unit label to change the unit type, this will also perform a conversion to the newly selected unit.
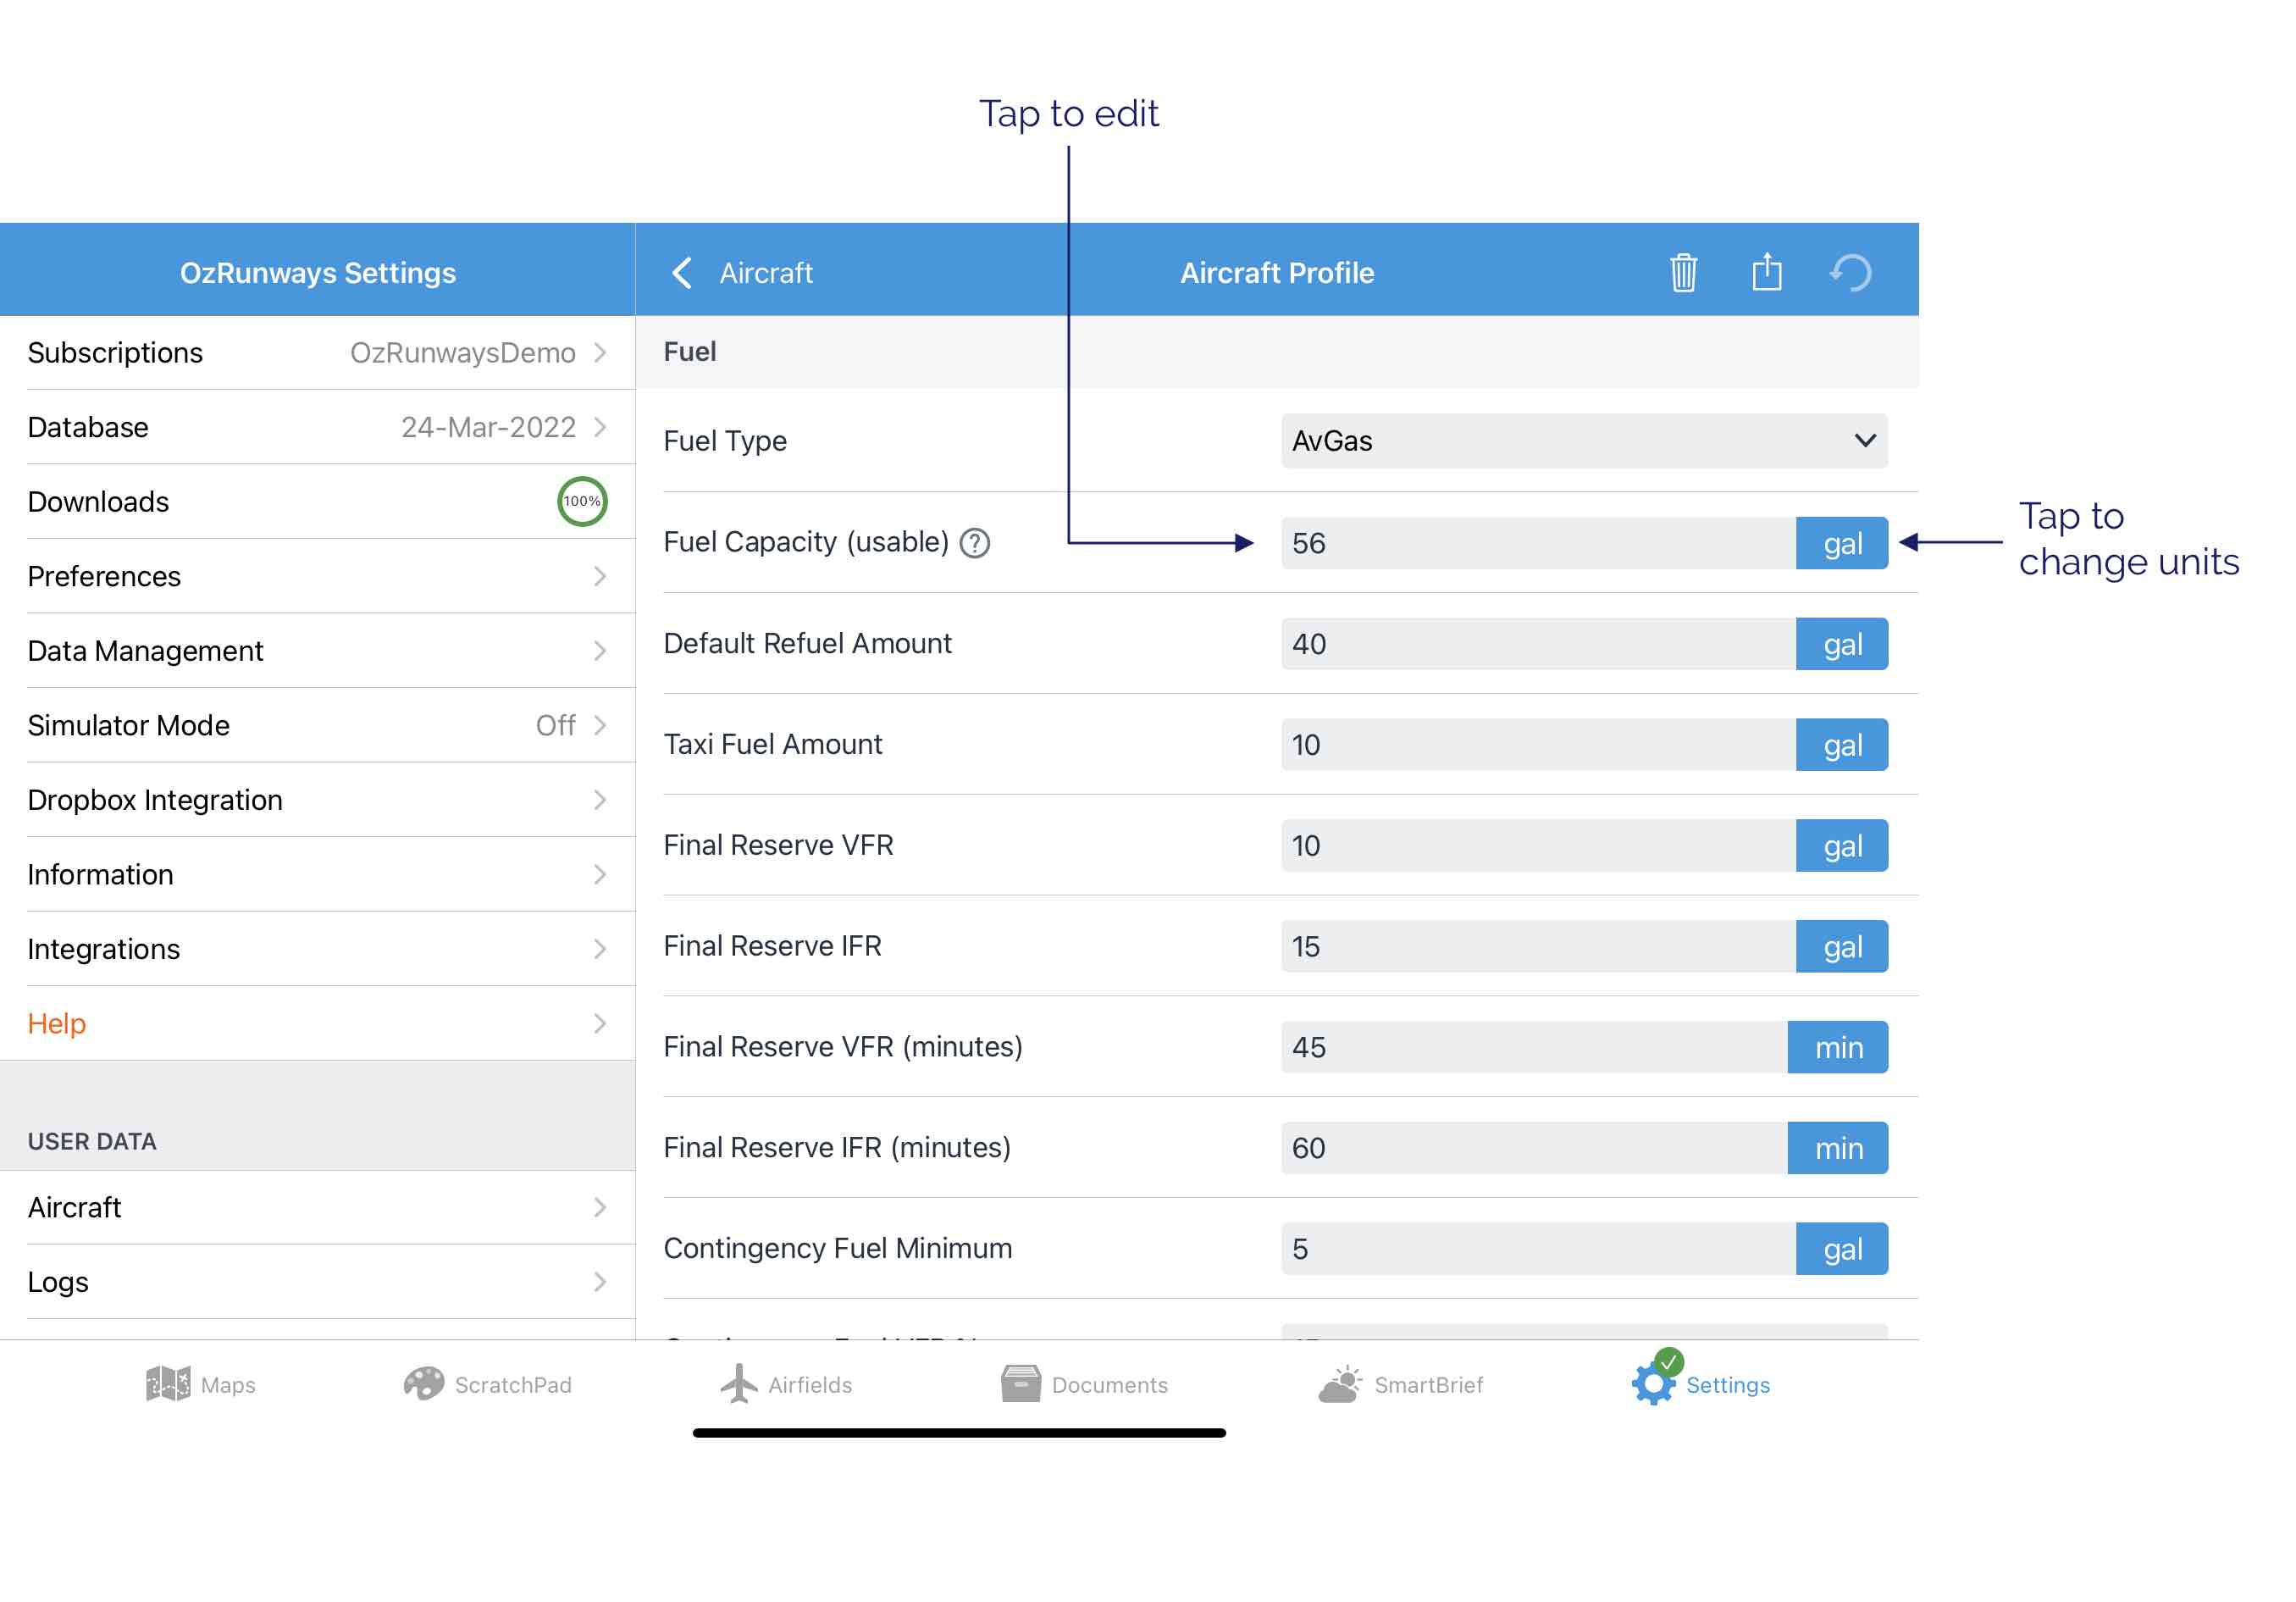
Image 10.3 Aircraft edit view, changing units
10.3. Detailed Performance Editor
Be careful when setting Detailed Performance figures as they override any values you have entered back on the main aircraft setup page. Frequently users have ‘played around’ with Detailed Performance details and then forgotten they did this. With rubbish values in the Detailed Performance table, you get rubbish results. The easiest thing is to just enter the default values in the Performance section and leave Detailed Performance figures until you have mastered the app. Detailed Performance figures yield more accurate results for higher performance aircraft (e.g. Bombardier LR45).
The Detailed Performance Editor presents a table where you can enter performance details for your aircraft at specific altitudes. The performance at any altitude is then calculated by interpolation from the values you entered int he table. In the time and fuel calculations for any plan, during climb the values are calculated every 100 feet.
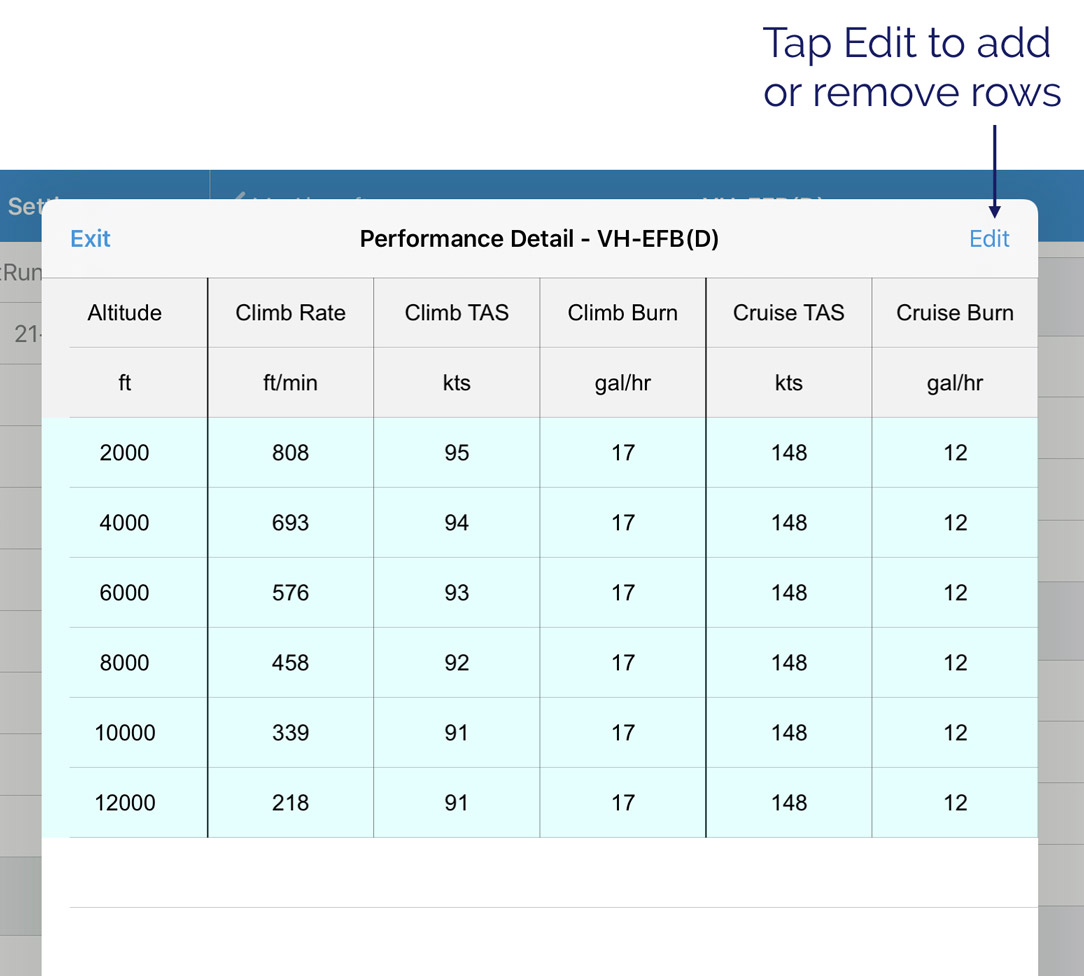
Image 10.4 Detailed performance table
Tap the top right ‘Edit’ button, then tap the green plus ‘+’ at the left of the screen in the row that has just been created. If values have already been set back in the standard ‘Performance’ section then they will appear after pressing the ‘+’. Tap on a value to change it. Start at 0 ft. Make adjustments and then press the green plus again to add another row. The altitude will automatically increment by 5000 feet, which can be edited, and the previous values repeated. Edit the fields as necessary. When creating a new row the altitude will always increment by 5000’ e.g. if you enter 1000’ the next row created will be at 6000’. Tap to edit if necessary.
When you have finished entering all values, tap ‘Done’ in the top right corner
You now have a table of performance values for your aircraft. The performance at any intermediate altitude is interpolated.
To remove a row tap ‘Edit’, then the red minus ‘-‘ sign on any rows which you wish to delete. When finished tap ‘Done’ in the top right corner.
Note
Values in the Detailed Performance Table override any details entered in the standard Performance section. Incorrect details here will result in incorrect performance calculations (rubbish in = rubbish out). If you are not comfortable with using Detailed Performance, delete any values in the table and use the standard Performance section instead.
10.4. Weight and Balance Setup
First a word of explanation. This is where you create and setup the Weight and Balance (W&B) configuration for your aircraft. This includes details such as Basic Empty Weight (BEW), Moment & Arm, and defining the envelope and stations. Once the information has been entered here you should only need to return if there are any changes to the aircraft’s basic basic information or stations. The actual W&B calculation is made during planning using the Weight and Balance Planner.
Multiple W&B configurations can be created for each aircraft. For example, if your aircraft has removable doors you might have one configuration for doors on, and another for doors off. Configuration is selected on a per plan basis in the Weight and Balance Planner.
Note
Be sure to set the correct units in the aircraft profile before you start editing W&B configurations.
Tap the ‘+’ to create a new configuration, or tap on an existing configuration in the list to edit it as per Image 10.5 below.
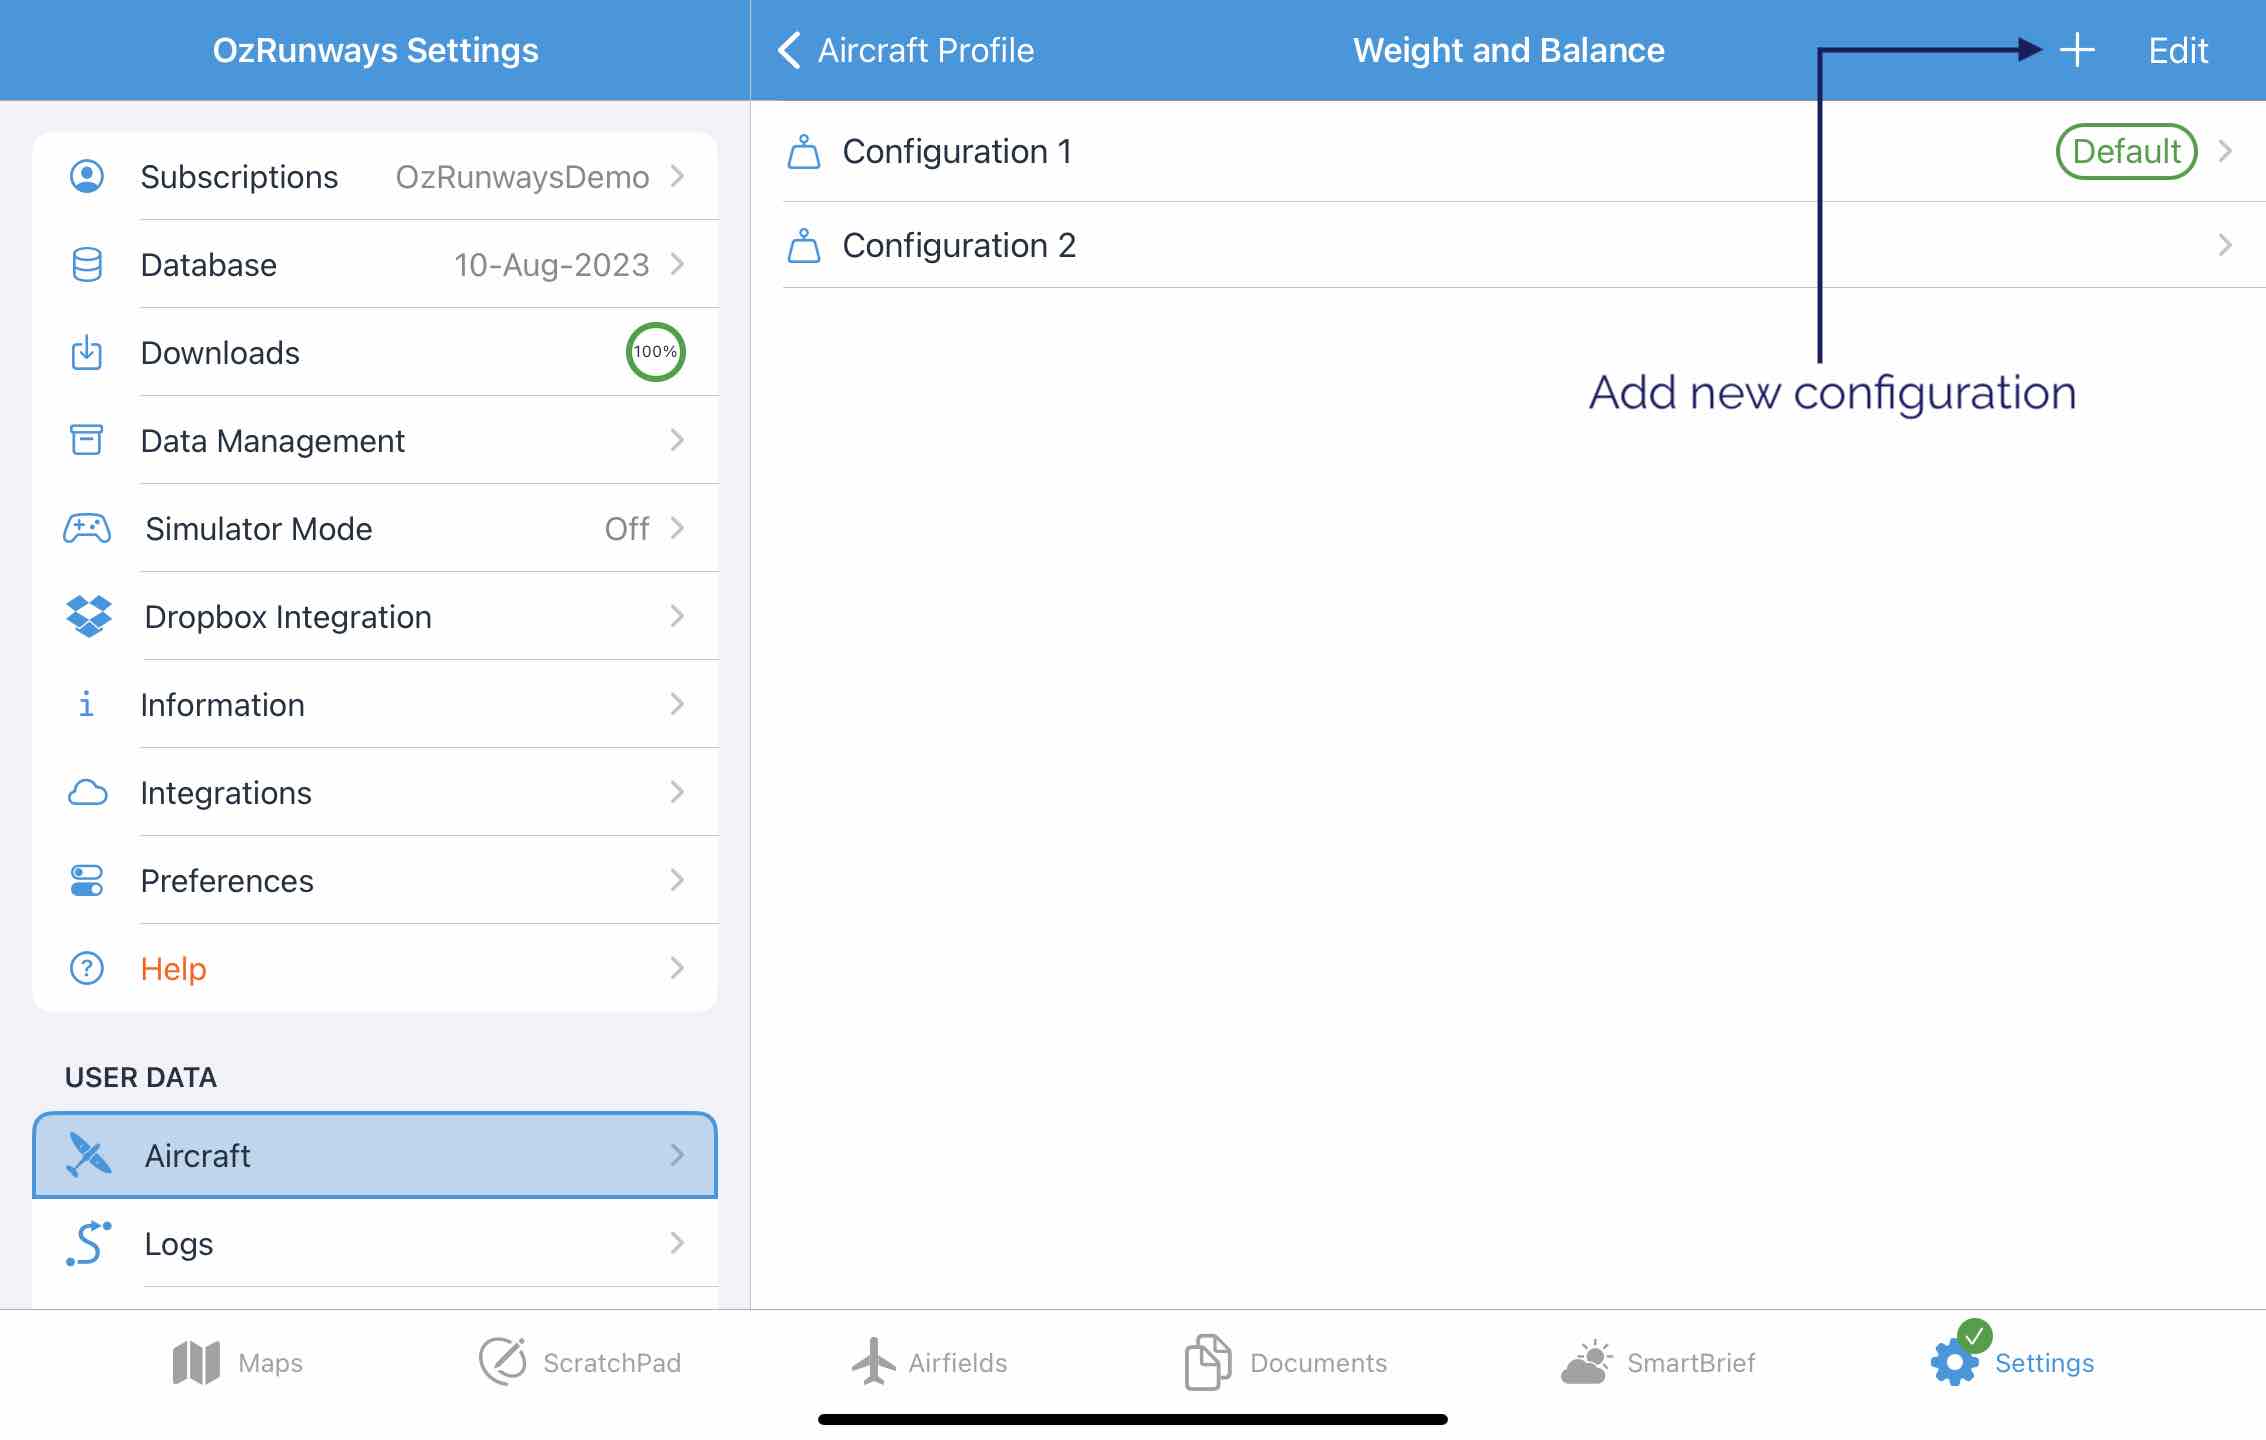
Image 10.5 W&B setup - configuration selection
Base
Inside the configuration editor there are 3 section toggles at the top of the screen: Base | Stations | Envelopes, as shown in Image 10.6 below. Use these toggles to switch between sections to edit the respective data.
The anti-clockwise arrow in the top right corner is used to undo all changes since opening the configuration.
Enable Lateral Entry can be turned on if you need to define a lateral envelope and associated lateral arms. If you are unsure what this does, you probably don’t need to enable it!
In the Base Data section you must enter your aircraft’s Basic Empty Weight and either the arm or the moment. After entering BEW and either arm or moment, OzRunways will calculate the other value. Tap the blue unit lables to change units. When changing units OzRunways will automatically convert any entered value into the new unit.
Scroll down the page to enter aircraft weight limitations if desired. The limitation options are: Zero Fuel Weight (ZFW), Max Landing Weight, and Max Ramp Weight. These fields are optional. If limitation data is entered the Weight and Balance Planner will display these limitations as horizontal lines on top of the envelope/graph so that you can quickly see if the plot is exceeding these limitations at any point.
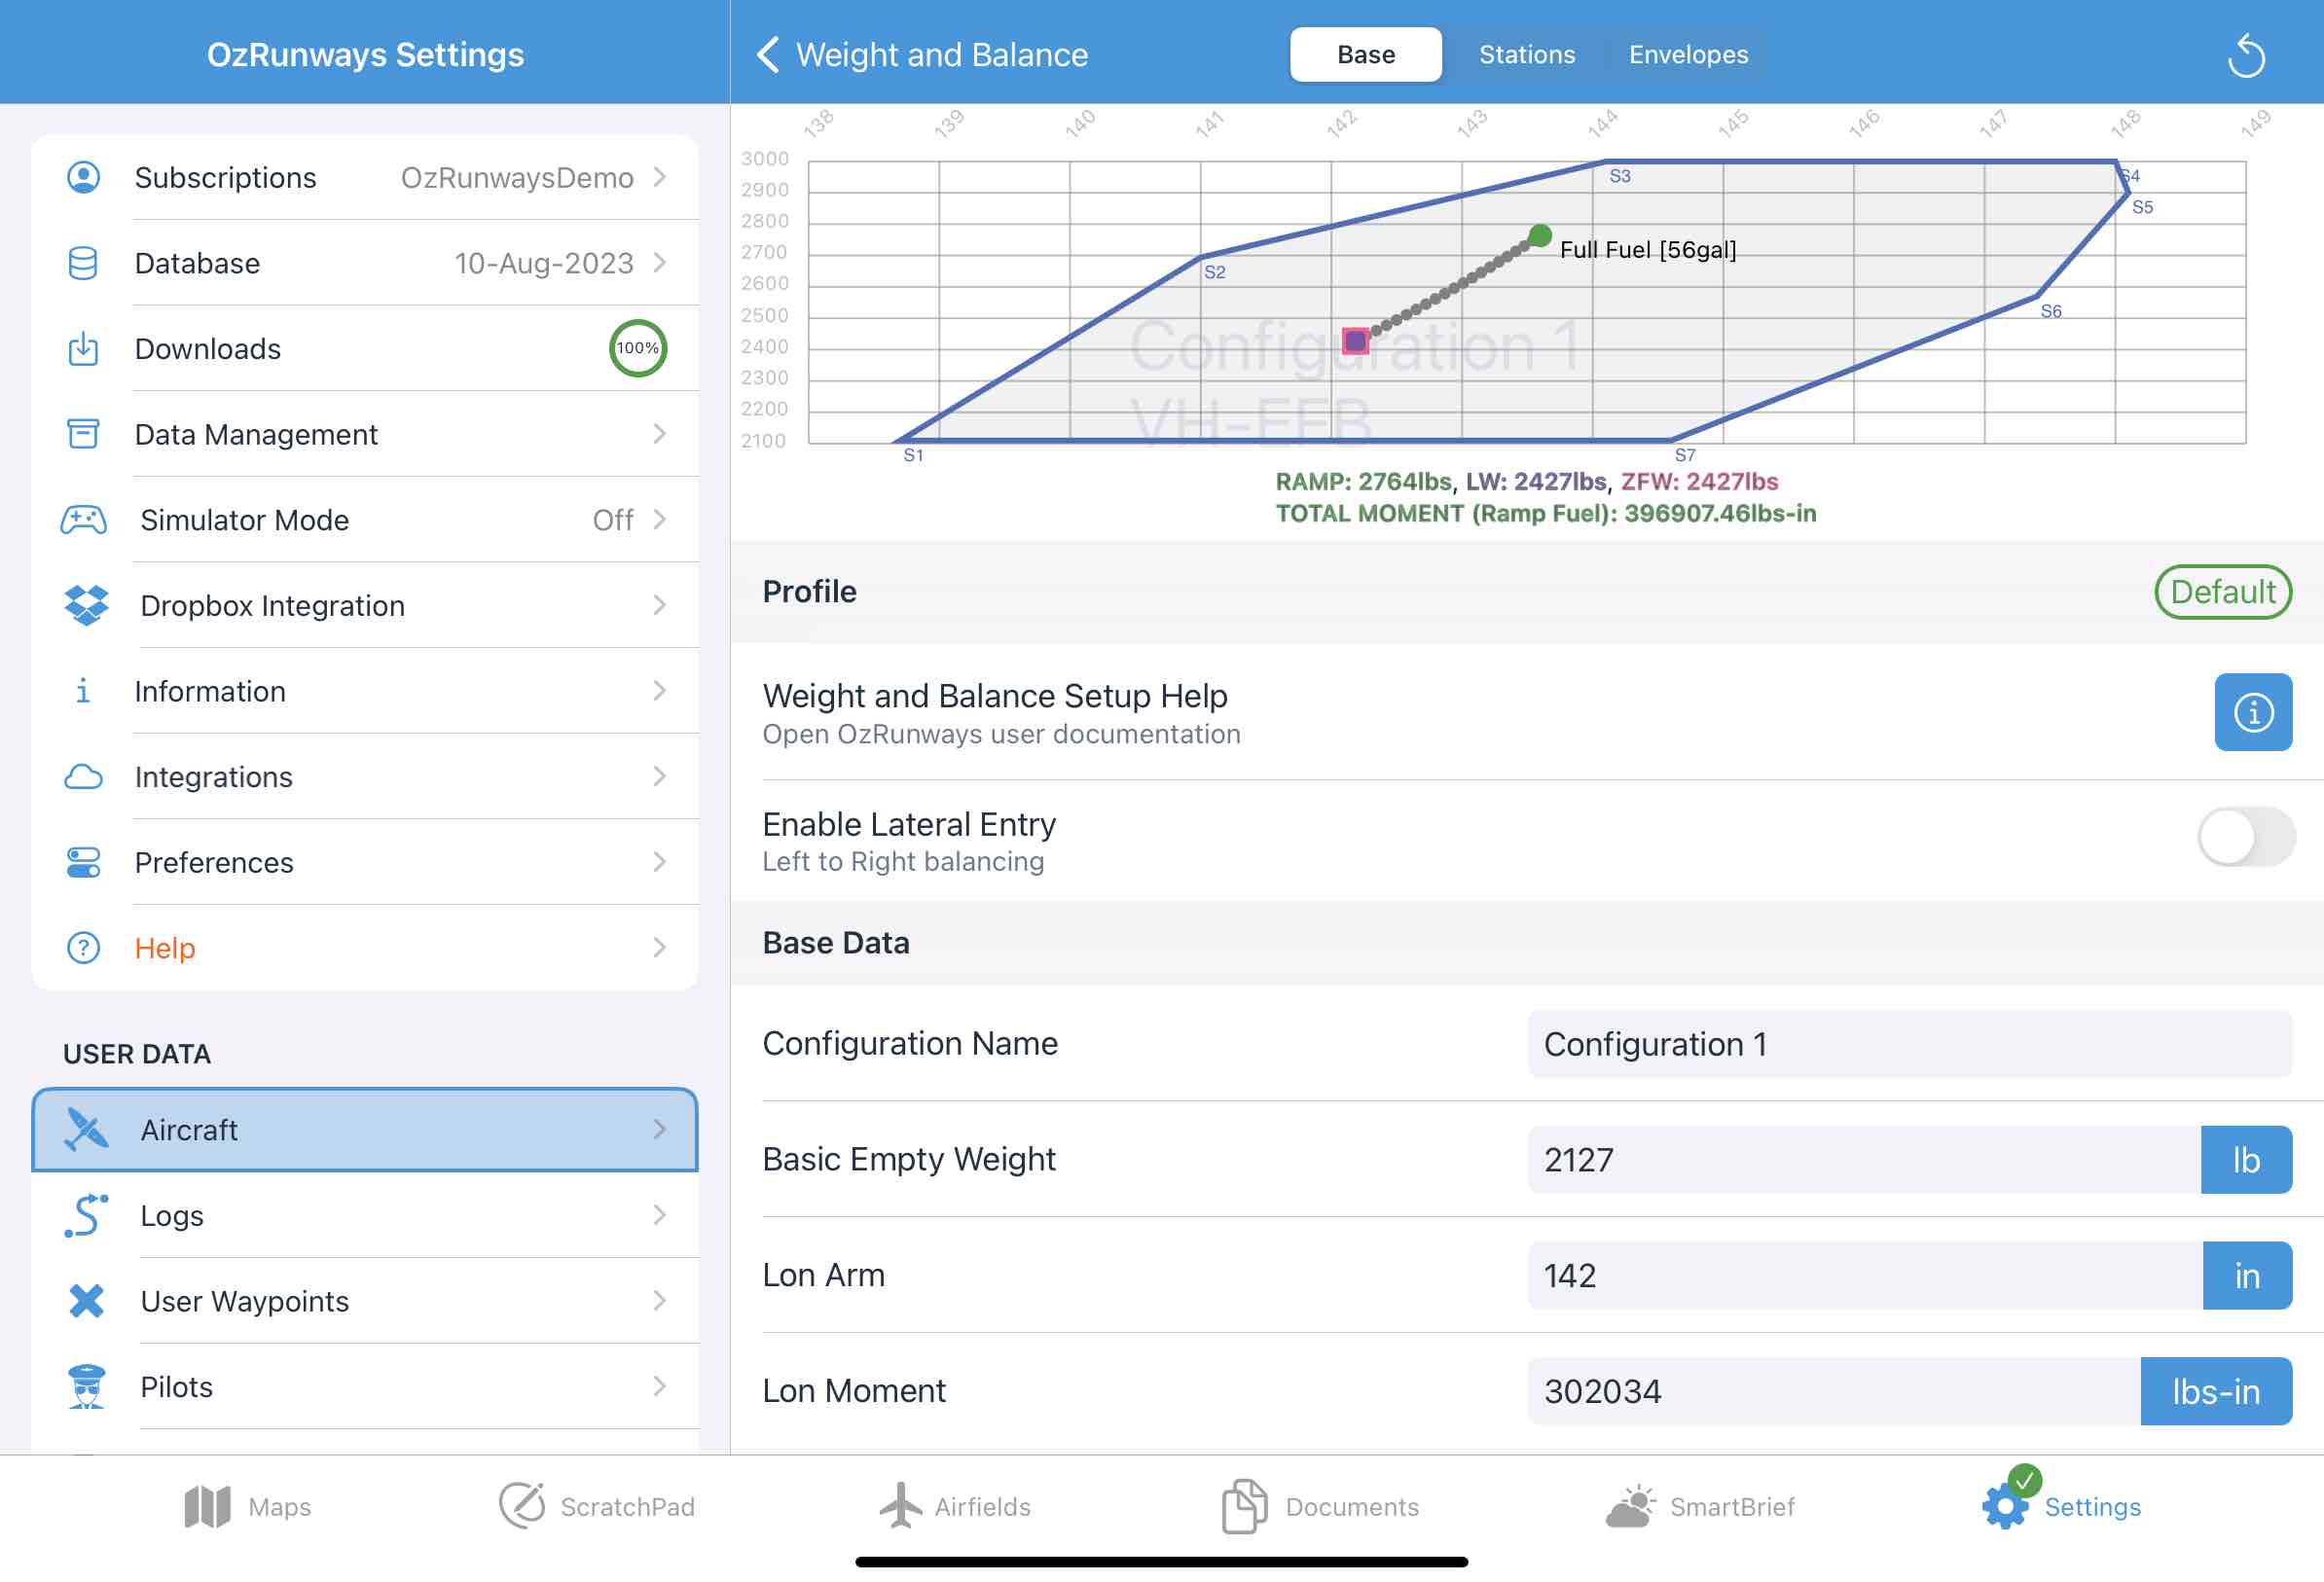
Image 10.6 W&B setup - editing ‘Base’ data in a configuration
Stations
Stations (e.g. seats, baggage compartments, fuel tanks etc.) are defined in the Stations section, as shown in Image 10.7.
Any weights entered here will be used as the default weight for that station. For example if you are always the pilot you can enter your own weight next to the applicable station and the Weight and Balance Planner will always default that station to that weight. This can of course be changed on a case by case basis in the Weight and Balance Planner.
Any station entry with the word ‘Fuel’ in it is assumed to be a fuel tank. You cannot alter the weight for this station, it is based on the fuel capacity and specified fuel type back in the aircraft profile. For more complex fuel scenarios, such as multiple fuel tanks with different arms, you will need to use Fuel Tables.
The checkbox on the left of each station decides if the station is selected ON by default in the Weight and Balance Planner. Again, this can easily be changed on a case by case basis.
Defining a max weight for a station will cause a red message to appear in the Weight and Balance Planner should the entered weight exceed the defined max.
Tap the padlock to ‘lock’ a station. When a station is locked the weight cannot be changed in the Weight and Balance Planner.
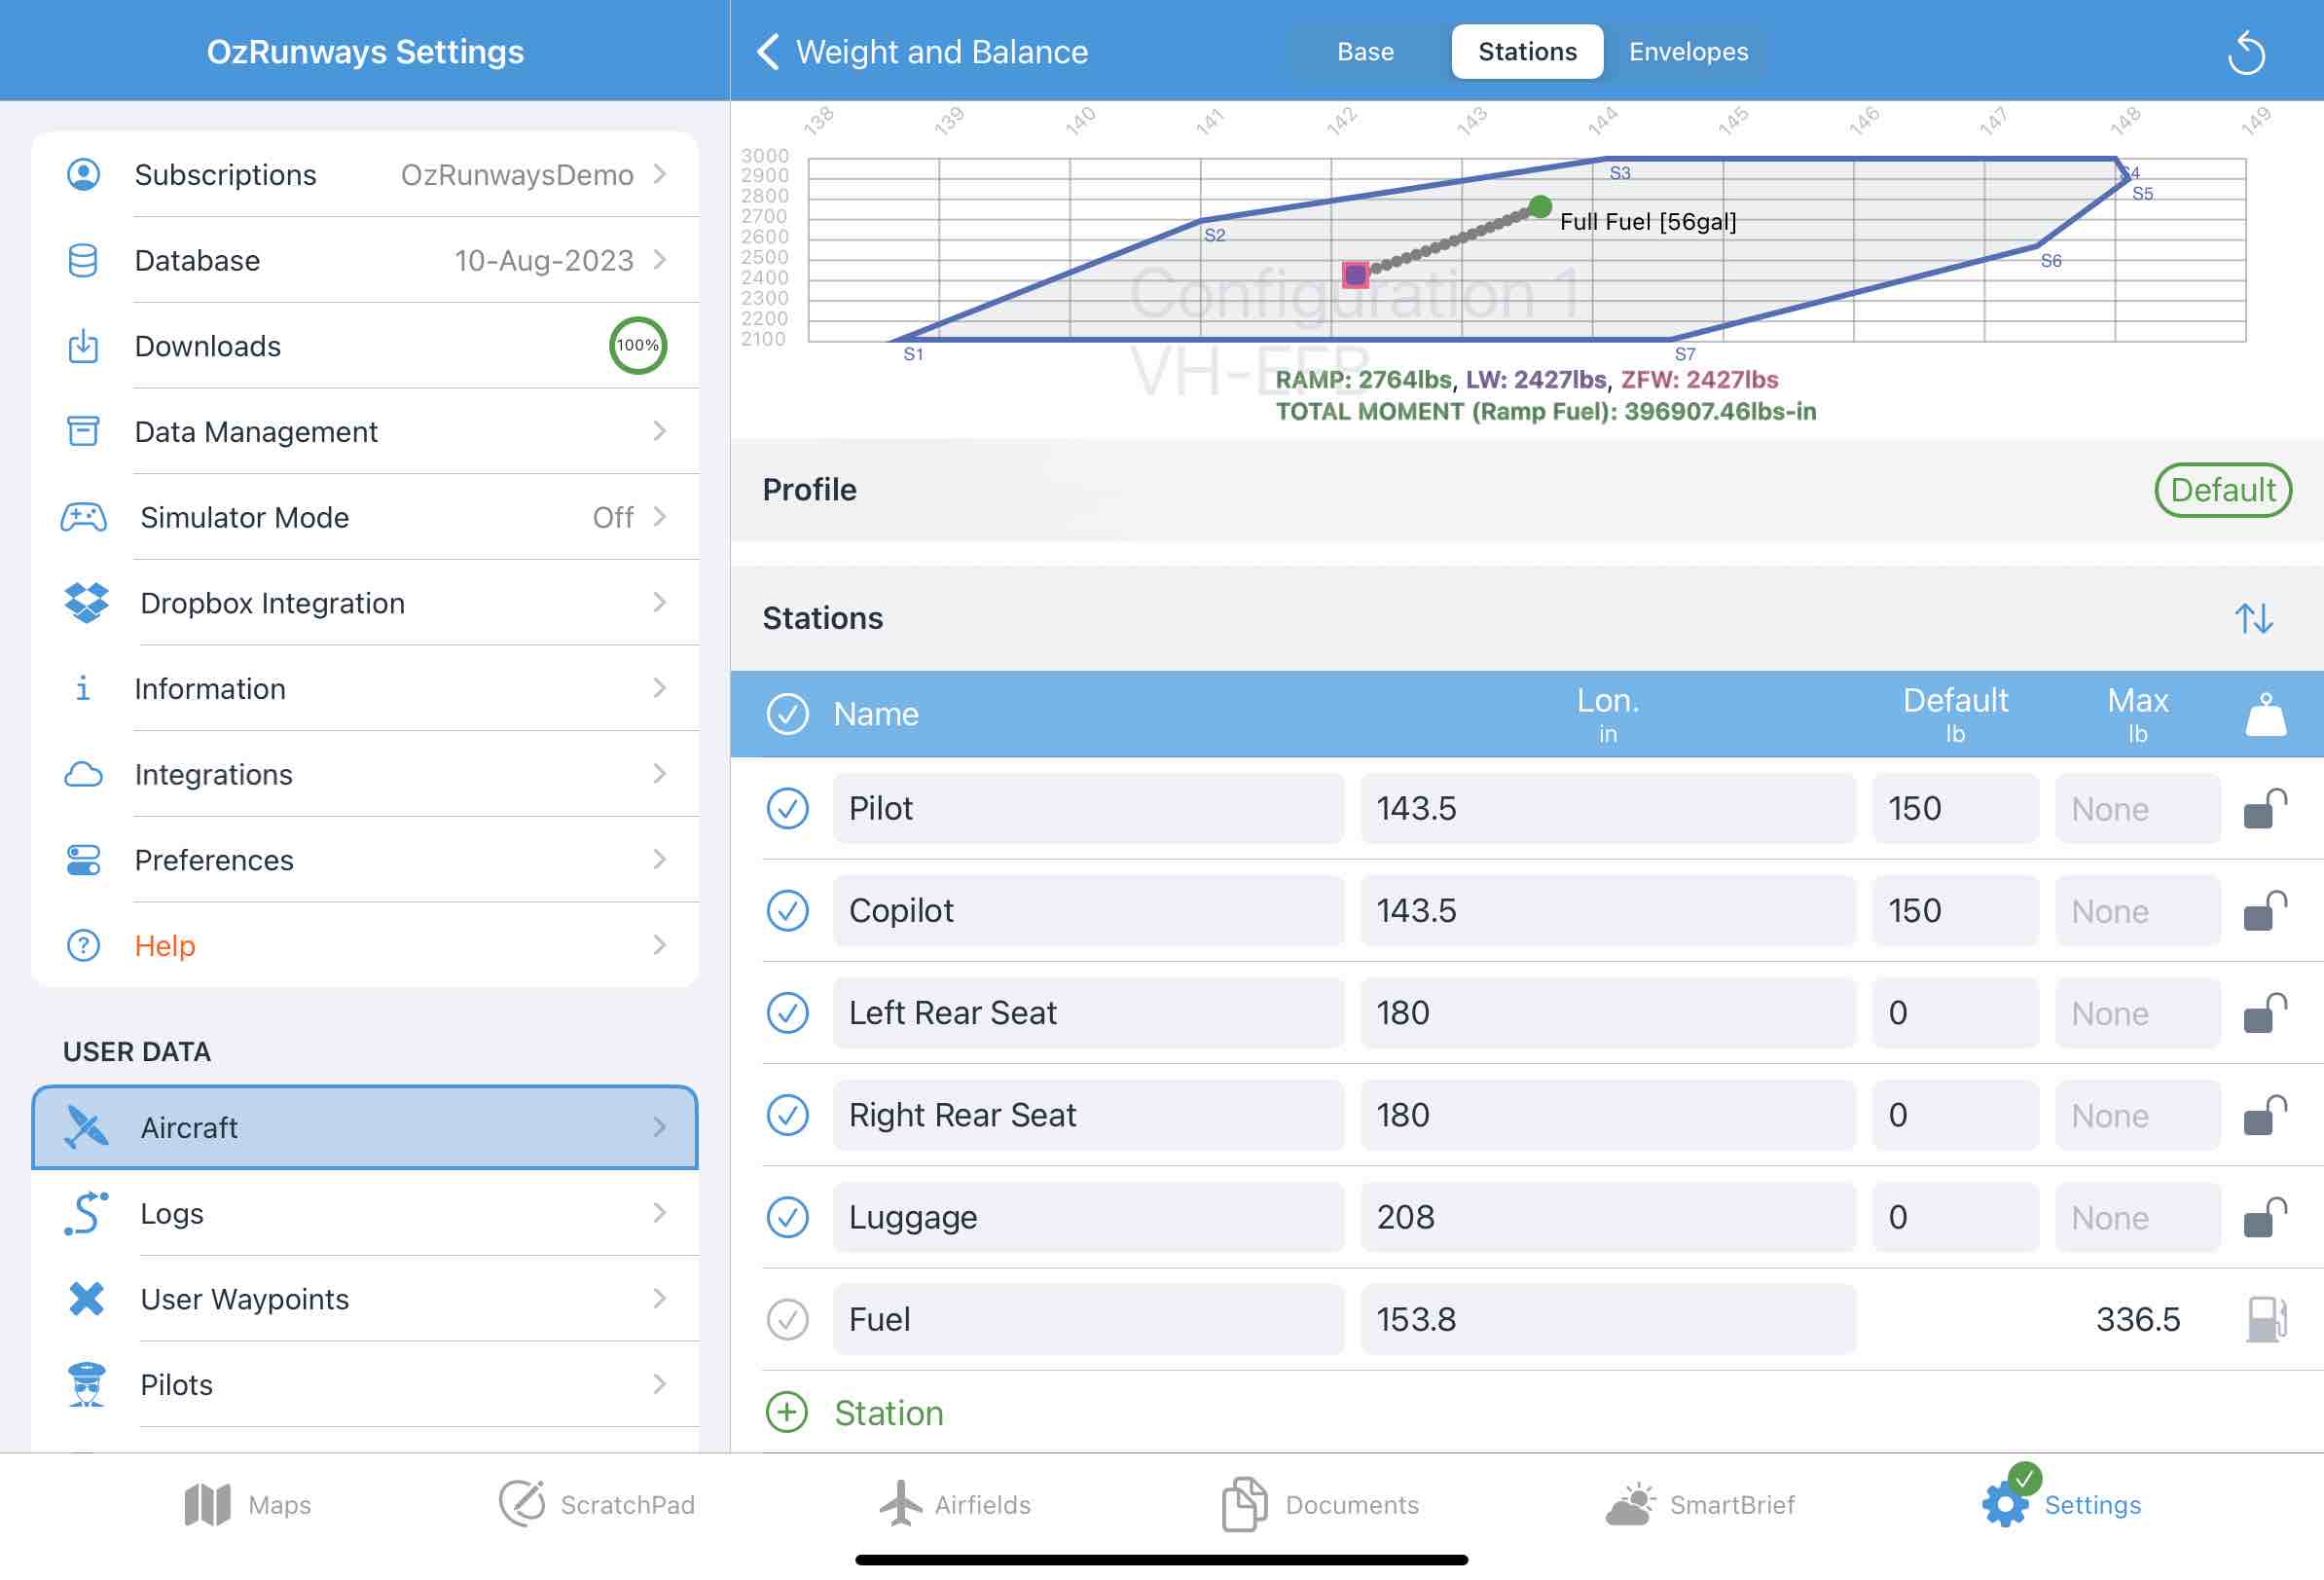
Image 10.7 W&B setup - editing ‘Stations’ data in a configuration
Envelopes
Define the limitation envelope/s in the Envelopes section as per Image 10.8
The W&B envelope/graph is shown at the top of the screen. It plots weight on the vertical axis and arm on the horizontal axis, also known as a Charlie loading system.
Note
Some aircraft POH/AFM specify moment on the horizontal axis (loading system Bravo). To convert from a Bravo to Charlie loading system you must divide the moment by the weight for that data point to get the arm value to enter in OzRunways.
Take the values from the relevant section in your POH/AFM. It doesn’t matter which point of the envelope you start at, but you must work sequentially clockwise or anti-clockwise thereafter.
You can define more than one envelope if desired. For example, many aircraft have a separate envelope for the ‘utility’ category, which can be defined by adding an extra envelope.

Image 10.8 W&B setup - editing ‘Envelopes’ data in a configuration
10.5. Fuel Tables
Fuel tables provide a means of specifying the weight and corresponding movement of the fuel arm for complex aircraft - typically this will be aircraft with fuel tanks located at different arms. In essence a Fuel Table is used to specify the fuel arm for a particular weight and how this arm changed based on your burn profile. You cannot simply specify each individual tank and its arm, as OzRunways will not be able to calculate your W&B from this information alone.
The first step in using fuel tables is to turn the feature on. This is achieved by turning on Use Fuel Tables under the Weight and Balance heading in your aircraft profile.
Warning
If you inadvertently turn on Fuel Tables, you’ll be in a world of hurt as your fuel calculations will cease to work unless you enter a fuel table. Only turn on fuel tables if you know what you are doing.
When ‘Use Fuel Tables’ is switched on the ‘Fuel Capacity’ for the aircraft back in the Fuel section will display [Table] next to the capacity. The capacity can no longer be changed there as it must be defined in the Fuel Table.
Image 10.9 shows a simple fuel table. It indicates full fuel of 56galat an arm of 153.8in, then from there fuel is burned down to 40gal where the arm is now 148.2in. The arm remains at 148.2in while the remainder of the fuel is burned down to 0gal.
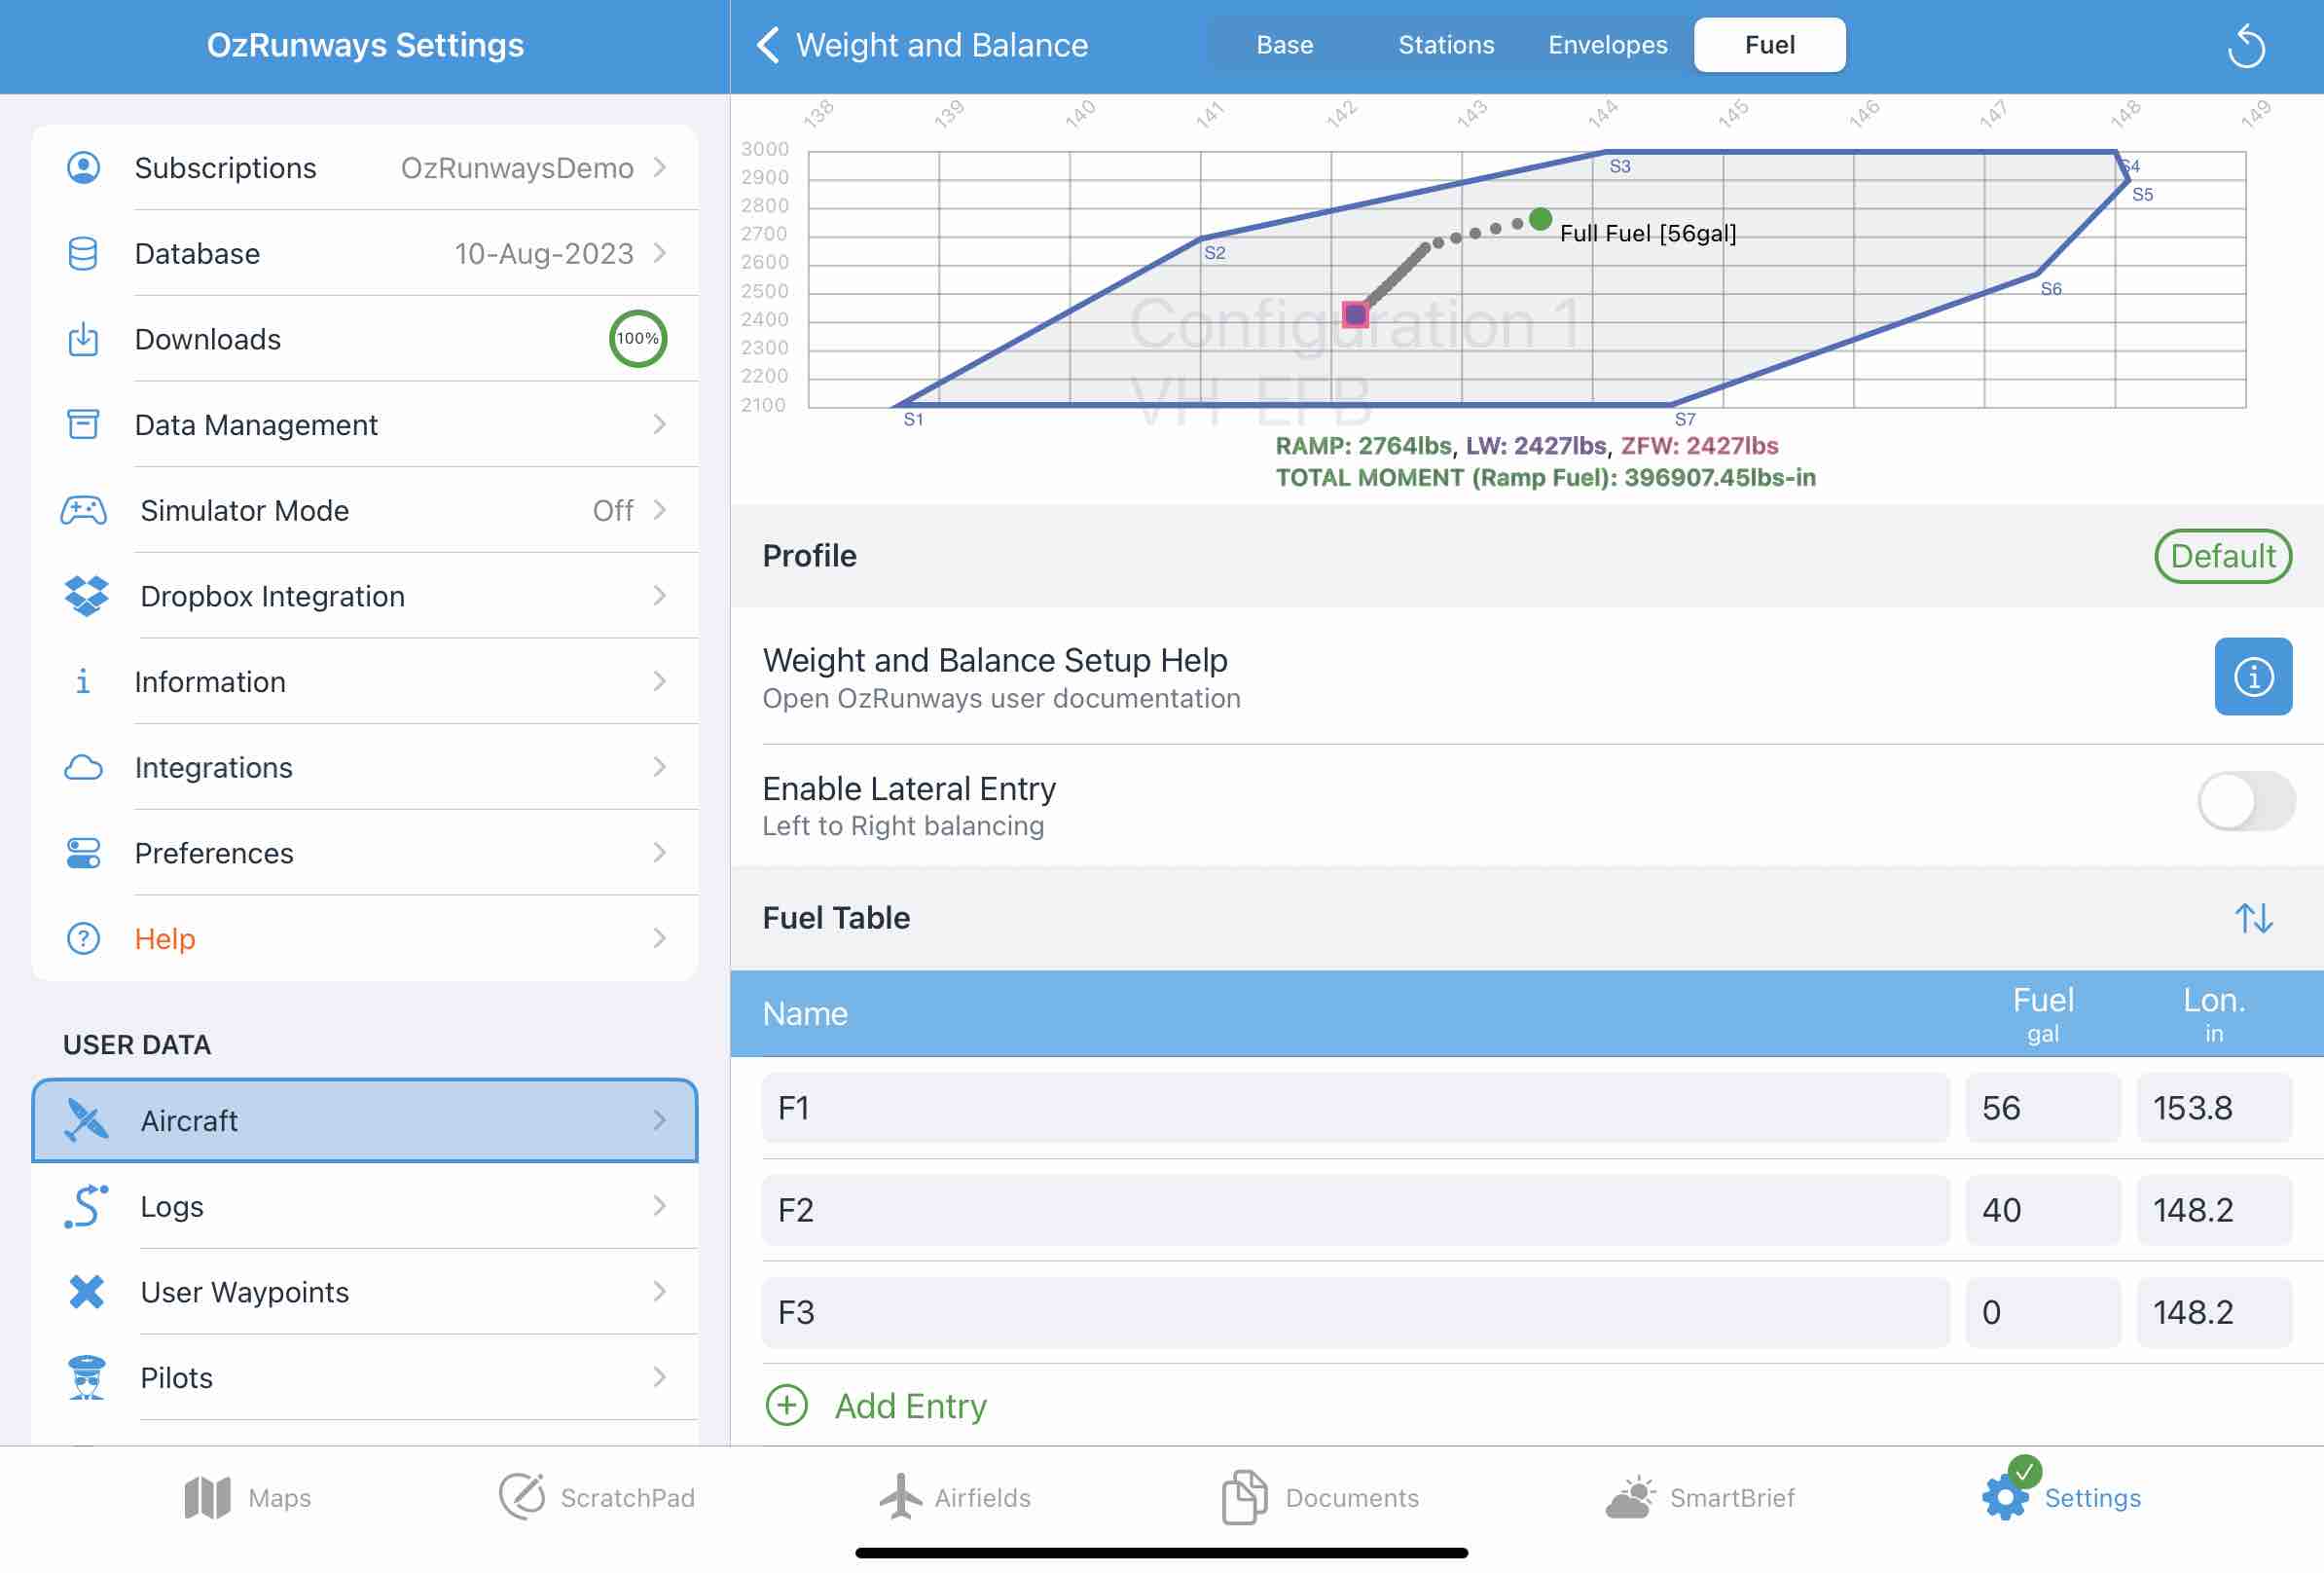
Image 10.9 Fuel table defined in W&B editor
Note
If you are having issues or are uncertain on how to create your fuel table, please get in touch with us and we can provide an explanatory document with a worked example.
10.6. Importing & Exporting
To export/share an aircraft, tap the profile in the list then tap the action button in the top right corner (square/arrow icon). The share sheet will appear and you can choose to export via a variety of options including AirDrop, Email, Dropbox, and others.
Aircraft Profiles can be imported in various ways. If somebody is sharing an Aircraft Profile with you via AirDrop then a prompt will appear with an option to ‘Open with OzRunways’. If an Aircraft Profile file has been shared with you via some other method (email, dropbox etc.) tap and hold the file icon until the share sheet appears, then choose ‘Copy to OzRunways’.
10.7. Duplicate
To copy/duplicate an aircraft profile, tap on the action button in the top right corner, then choose Duplicate. The new aircraft profile will appear in the list with ‘-1’ appended to the registration.