12. Terrain and Airspace
12.1. LSALT assistant
Note
Available in Australia & New Zealand only
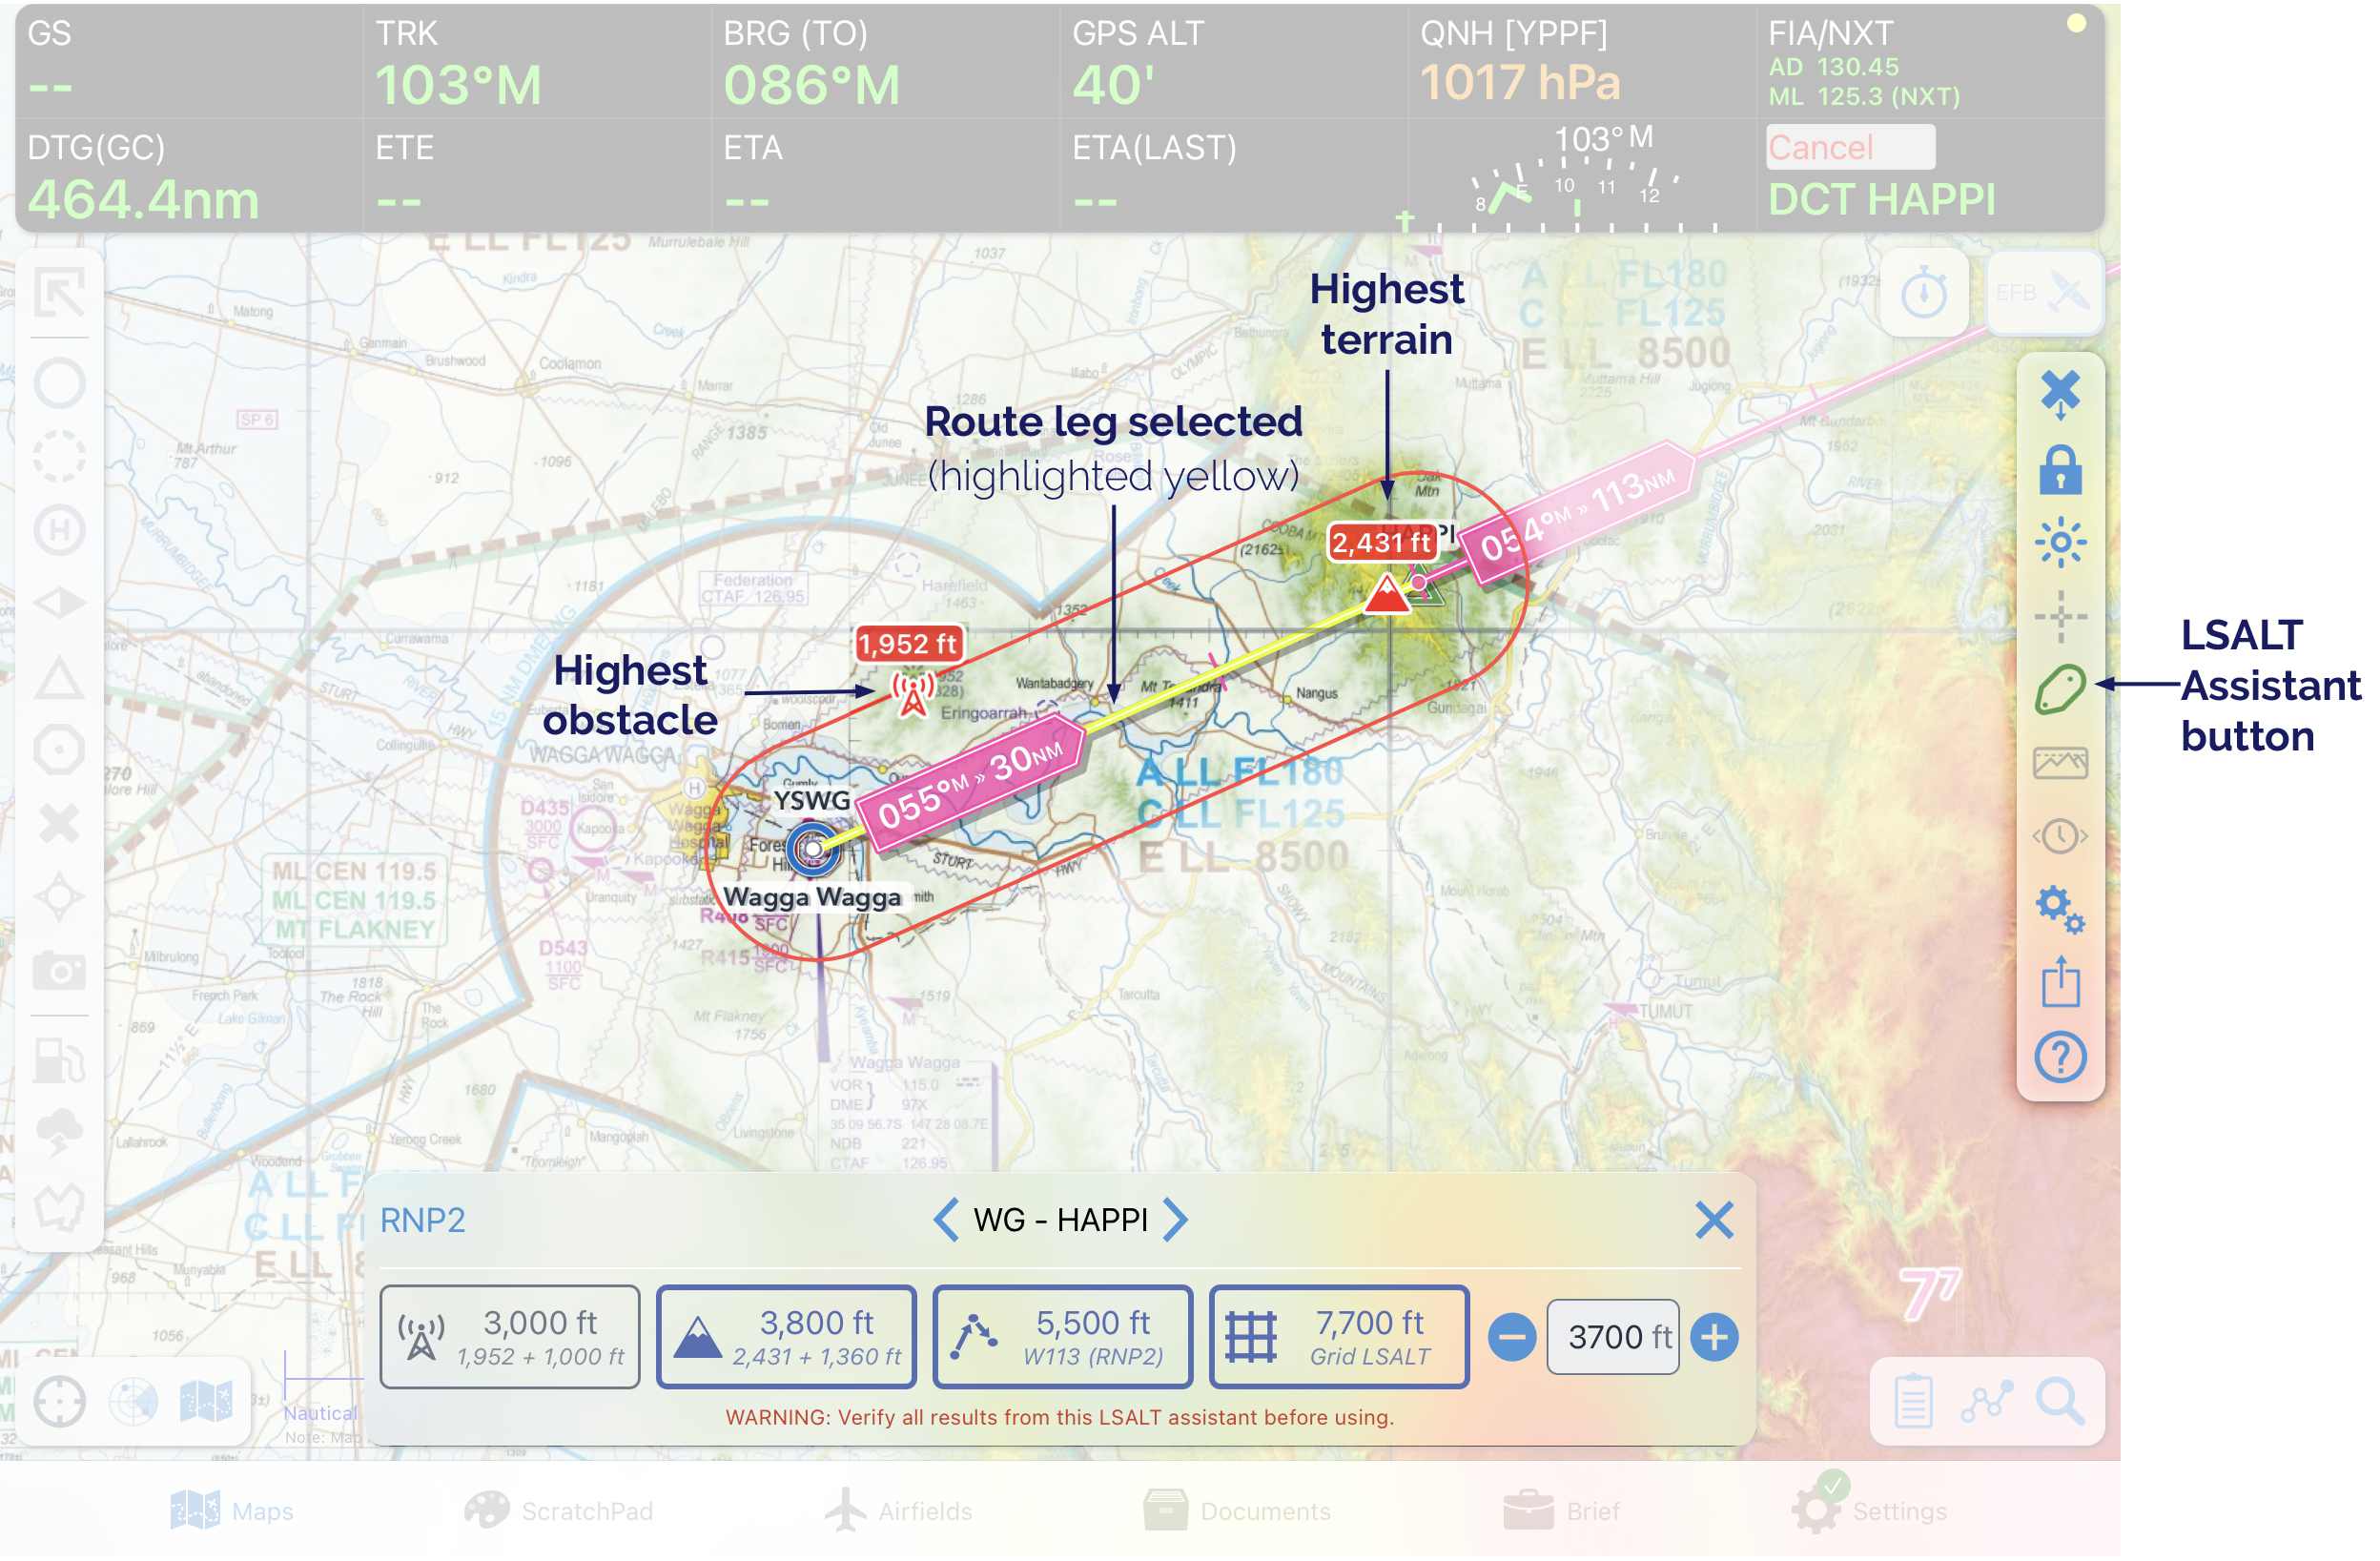
Image 12.1 LSALT assistant
To open the LSALT assistant make a plan and select (tap) a leg, the leg will highlight yellow and the LSALT assistant button will appear on the Right Sidebar as in Image 12.1
The LSALT assistant uses the obstacle dataset from Airservices Australia, and terrain data from NASA. The assistant will find the highest obstacle and terrain, within the selected splay, for each leg of your plan and overlay these on the map. The assistant will then provide LSALT options based on this information with appropriate buffers, as well as route and grid LSALT options as applicable (as shown in Image 12.2). Opening the LSALT assistant also turns on the Terrain Overlay. The function of the Terrain Overlay when using the LSALT assistant is described below.
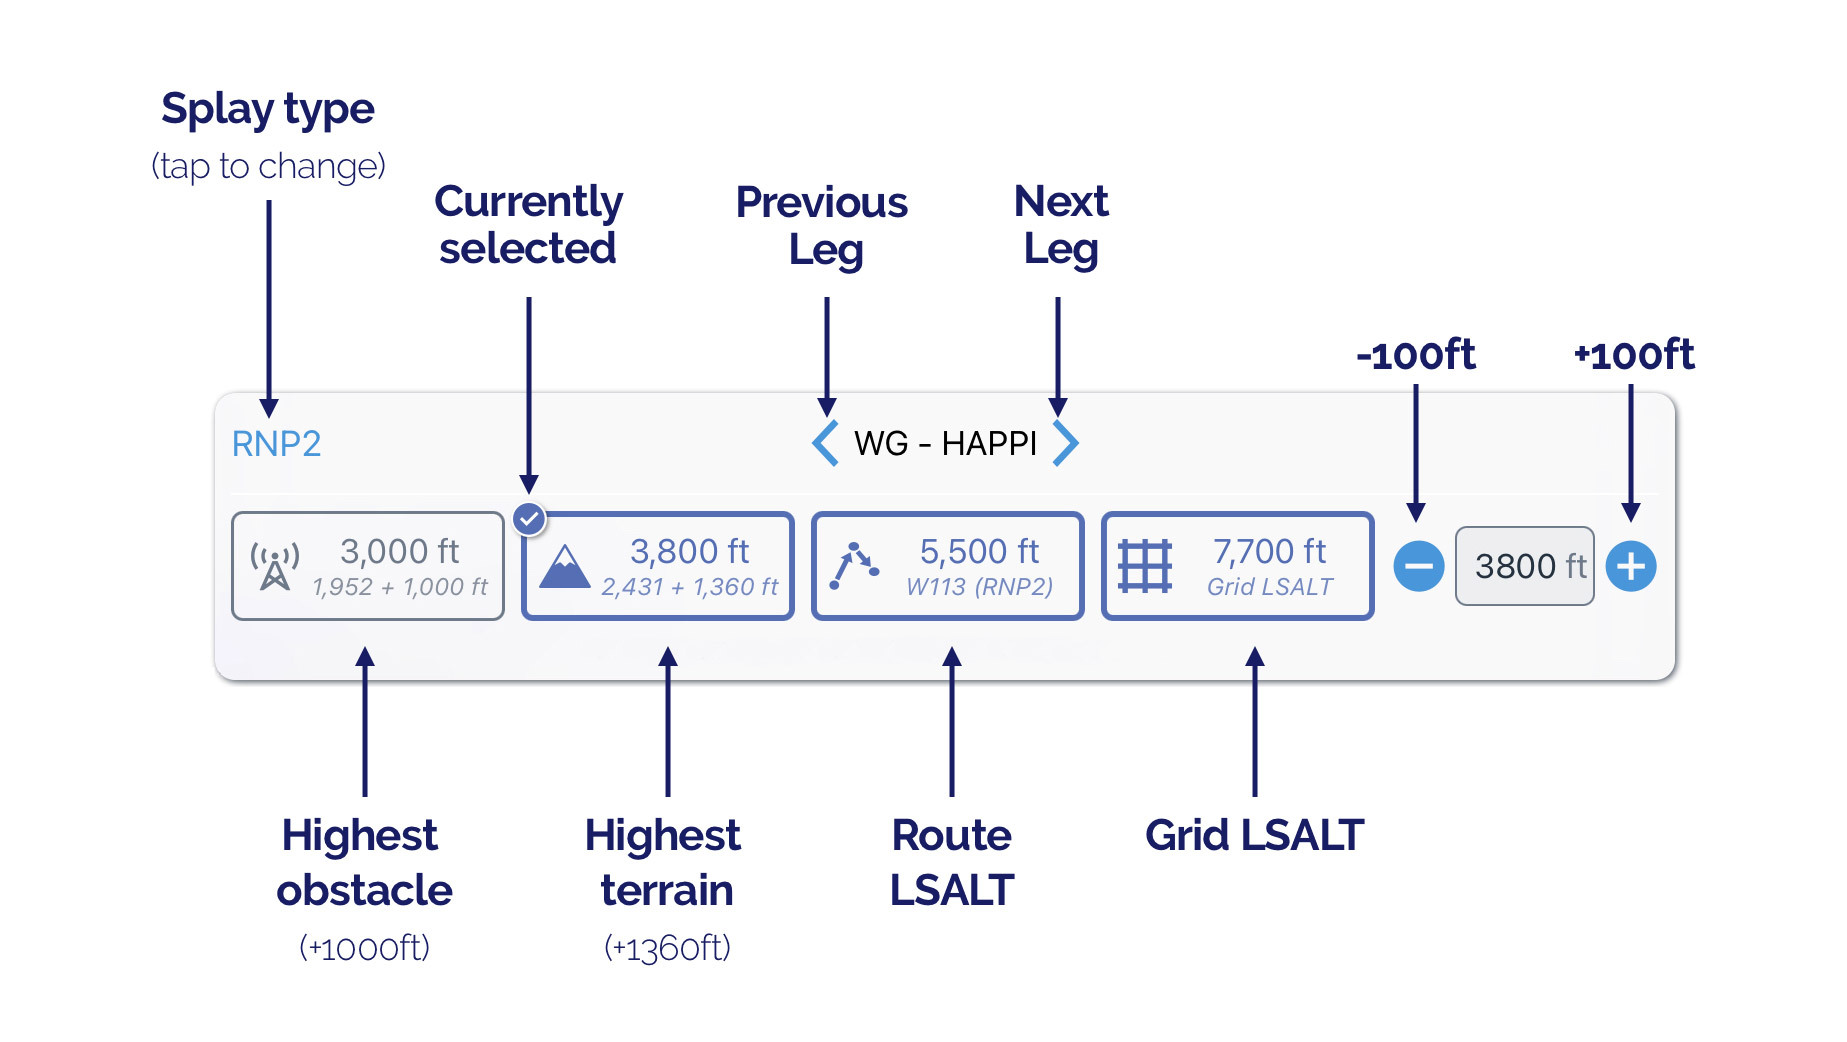
Image 12.2 LSALT assistant legend
Tap on the desired LSALT option, or manually set the LSALT for that leg using the ‘–’ and ‘+’ buttons. You can also tap and type into the text field. The value set here will follow through into the plan sheet.
As you adjust the LSALT the Terrain Overlay updates to give you an indication of terrain height relative to the selected LSALT. Yellow shades show terrain that is approximately 1360ft below the selected LSALT. Anything red indicates less than 1360ft buffer between terrain and the selected LSALT. The Terrain Overlay is a tool to help you visualise terrain and should not be used for terrain avoidance.
A video demonstration of the LSALT assistant is available on our YouTube channel.
12.2. Terrain Overlay
Note
Available in Australia, New Zealand, and Papua New Guinea only
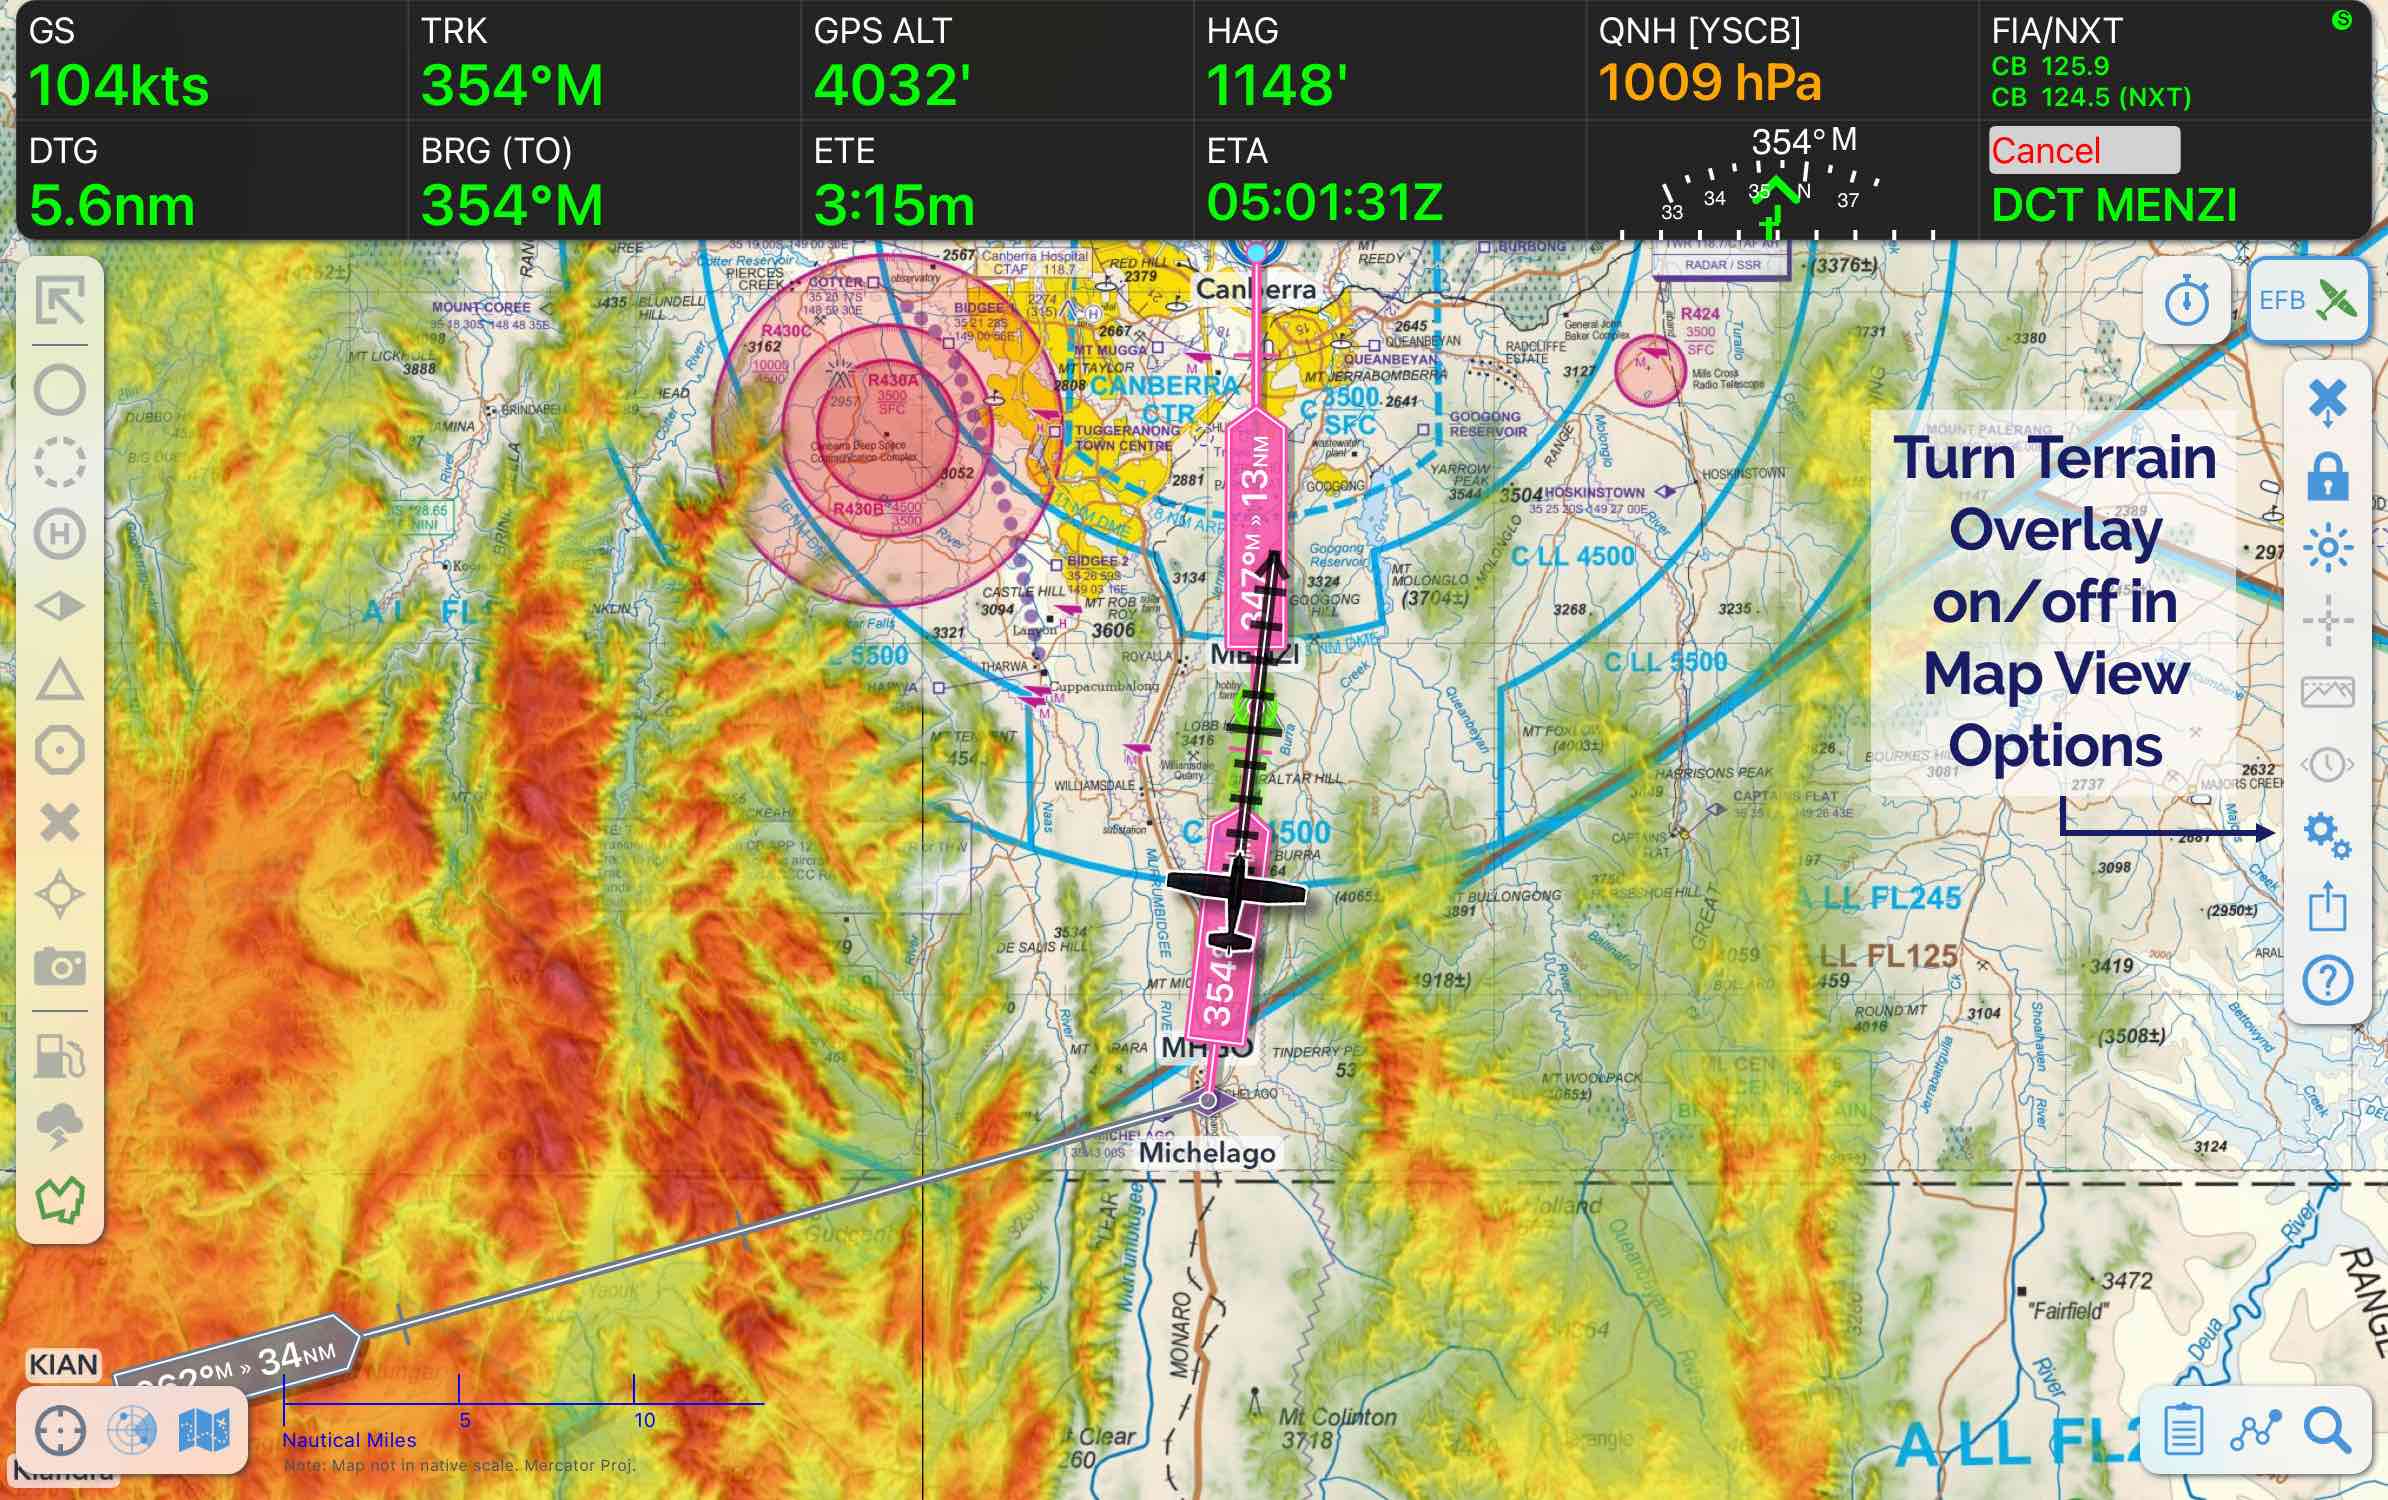
Image 12.3 Terrain Overlay
The Terrain Overlay can be turned on/off in Map View Options (Cogs)
The Terrain Overlay is an aid to visualise surrounding terrain. In flight, yellow shades indicate terrain that is close to your altitude. Red is anything above you. When on the ground, and for 1 minute after takeoff, the Terrain Overlay will use airfield elevation + 1500ft to prevent you seeing a ‘sea of red’. As you descend to land the Terrain Overlay will stop adjusting once it recognises you are ‘on final’ (i.e. passing 3NM straight-in, or lining up on 500ft). If a missed approach or go around is detected the Terrain Overlay will immediately resume until it detects you are on final again.
When used in combination with the LSALT assistant the function of the Terrain Overlay is slightly different, see LSALT assistant above.
The Terrain Overlay is a tool to help you visualise terrain and should not be used for terrain avoidance.
12.3. Horizontal Terrain
Prior to using the Horizontal Terrain feature you should check that your airspace display list is configured correctly. You will find this in Map View Options → Airspace. In general you will want CTA, CTR and PRD selected. This will result in the cleanest display and also show the most important airspace from the point of view of infringement. You should also ensure that you have the terrain data downloaded in Settings → Downloads.
The Terrain and Airspace display has two modes, Plan and Fly.
Plan Mode
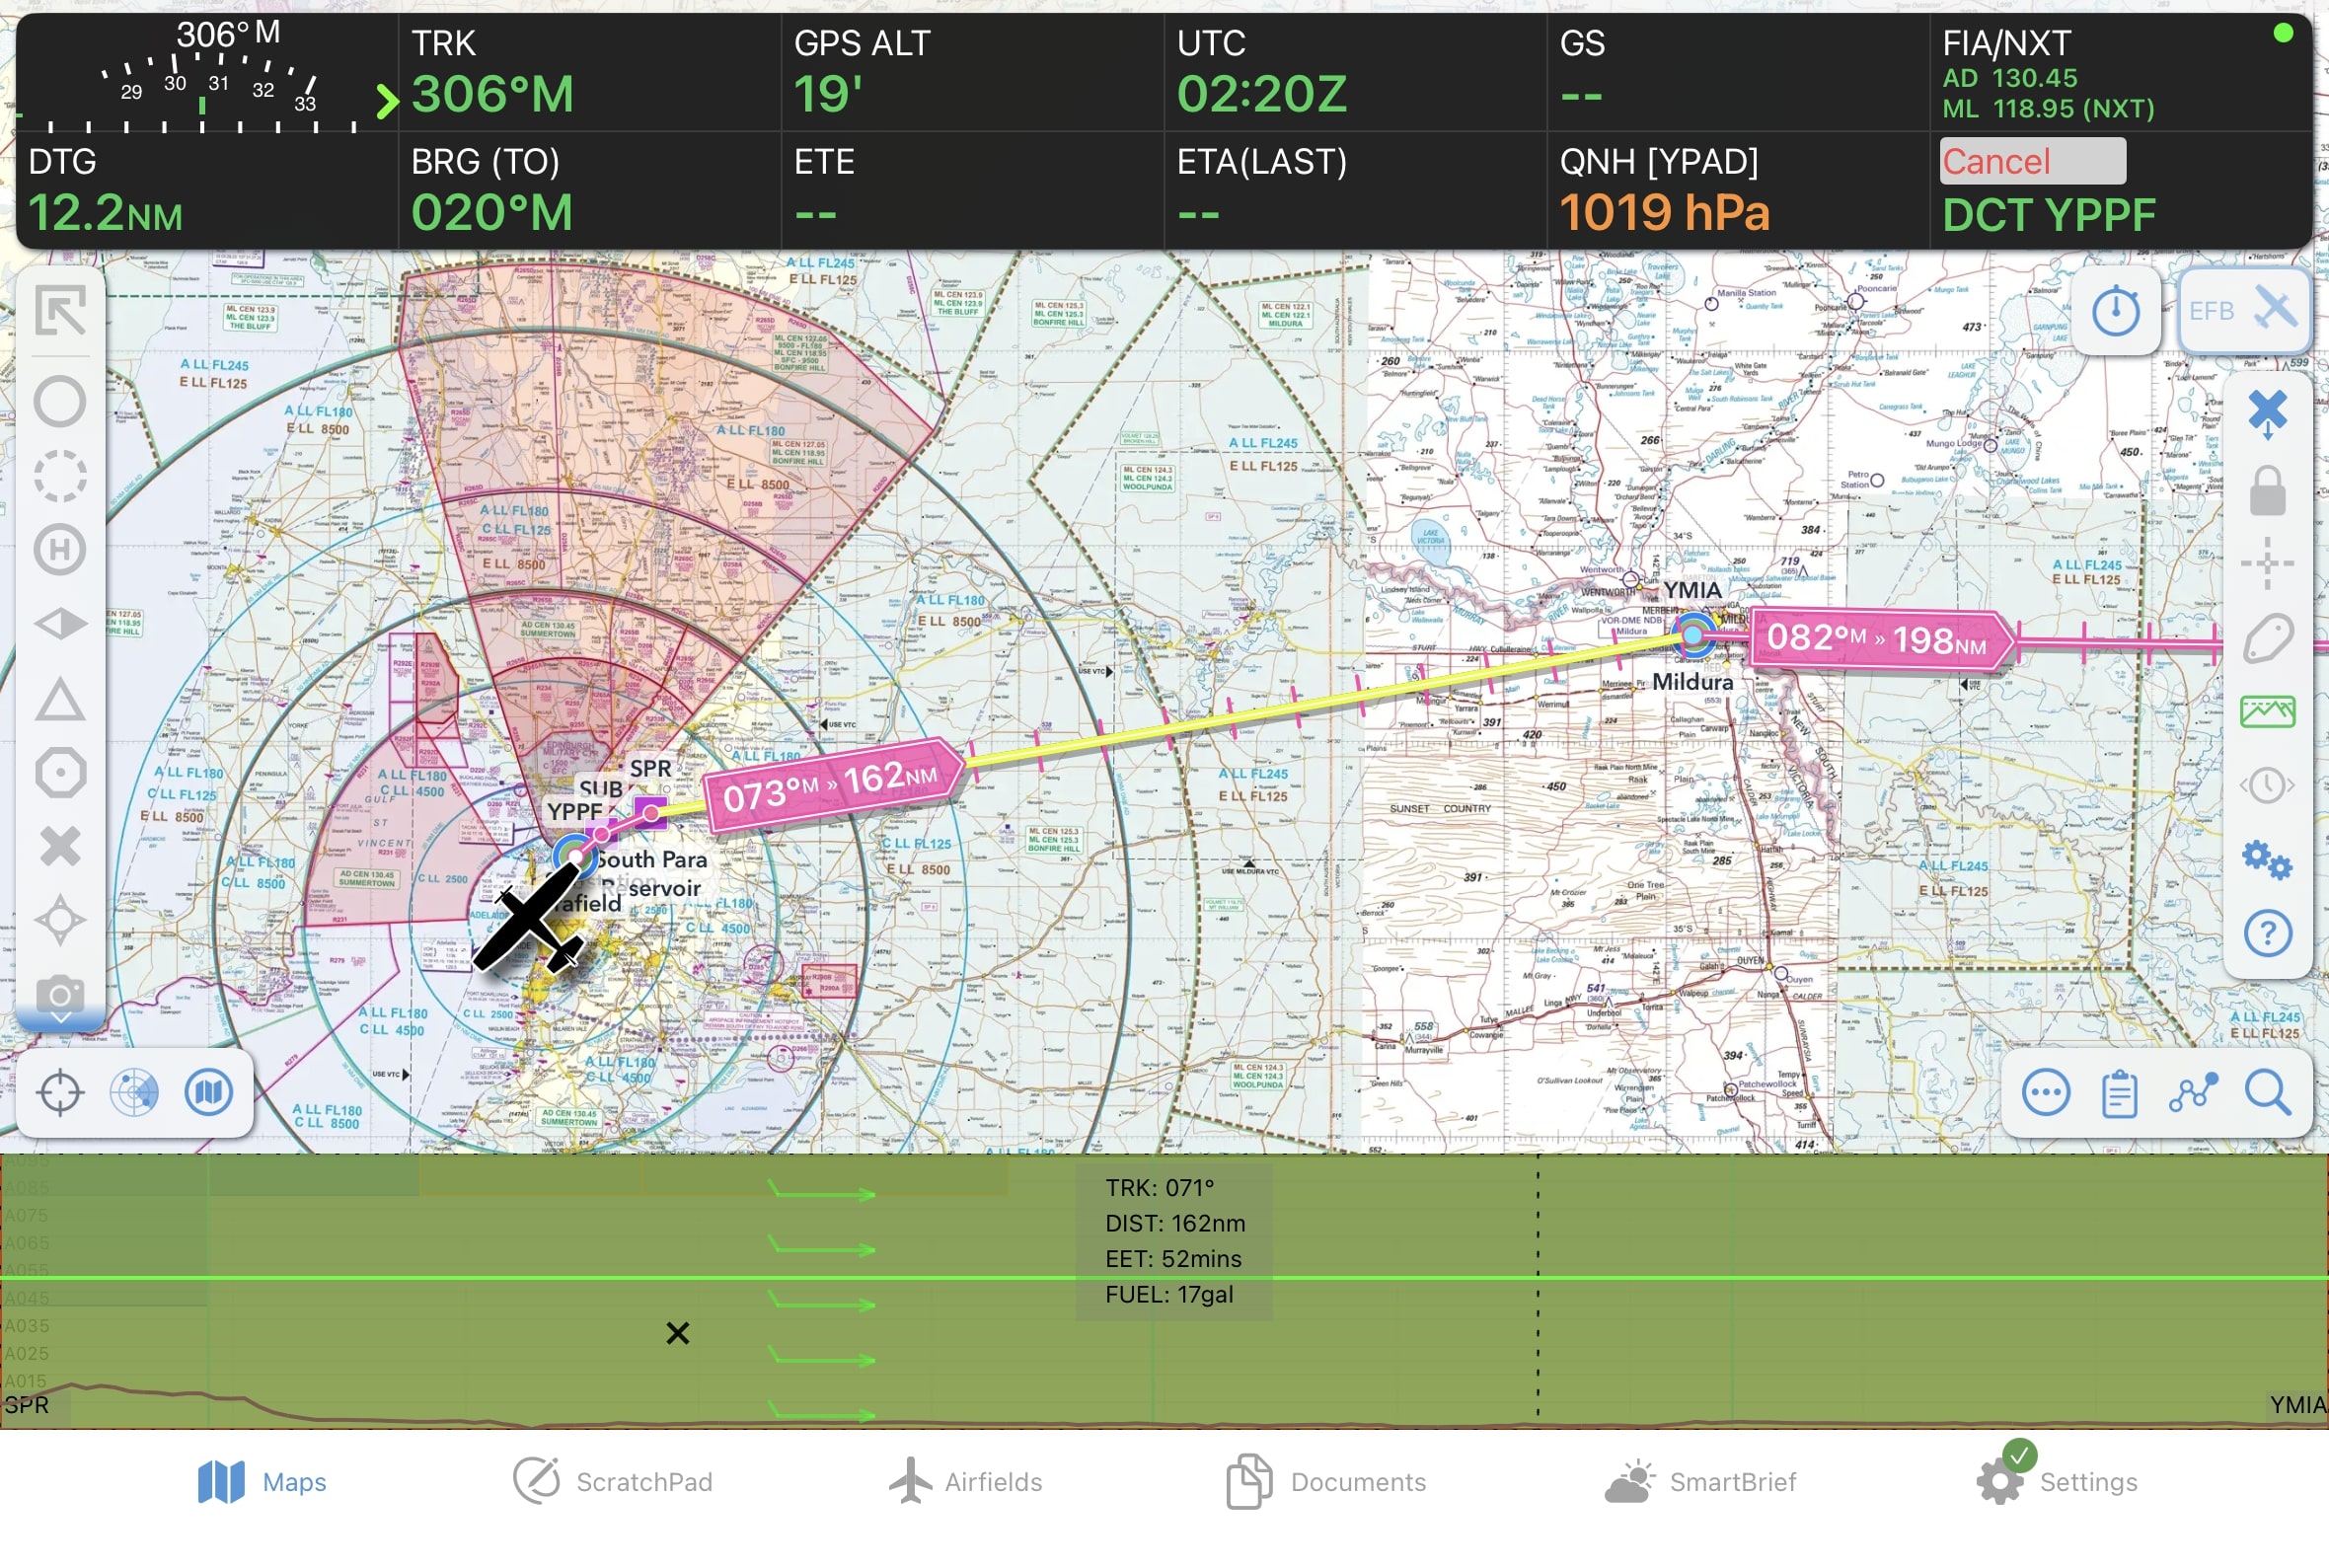
Image 12.4 Horizontal Terrain - Plan Mode
In Plan mode the terrain and airspace along the selected segment (a segment is defined as takeoff to landing) will be shown. You use this mode in conjunction with the map and by reference to the ground, to determine altitudes to avoid infringing airspace and terrain.
To enter Plan mode, tap on a track segment on the map (the magenta line). The selected track segment will turn yellow, and the terrain and airspace details will be displayed in the Terrain and Airspace viewer. In Image 12.4 we have selected the SPR to YMIA segment.
You can swipe your finger sideways to move between segments. The selected segment is reflected on the Map Page as a yellow track line. You can swipe your finger up and down to increase or decrease your altitude for that segment, the new altitude is then reflected on the Plan Sheet.
Double tap inside the Terrain and Airspace window and the mode will switch to an overview of all segments. You can still swipe your finger to change between segments and adjust altitudes in this view.
The wind (if wind is entered in the Plan Sheet) is depicted by wind arrows every 2000’. The arrows are red if the wind is a headwind and green if the wind is a tailwind. Wind barbs indicate wind speed with every full length barb representing 10 knots and the fractional barbs proportionately.
Flight levels are displayed across the entire width of the window. They are colour coded i.e. green if it conforms to the recommended hemispherical levels (for VFR or IFR) or orange otherwise.
Fly Mode
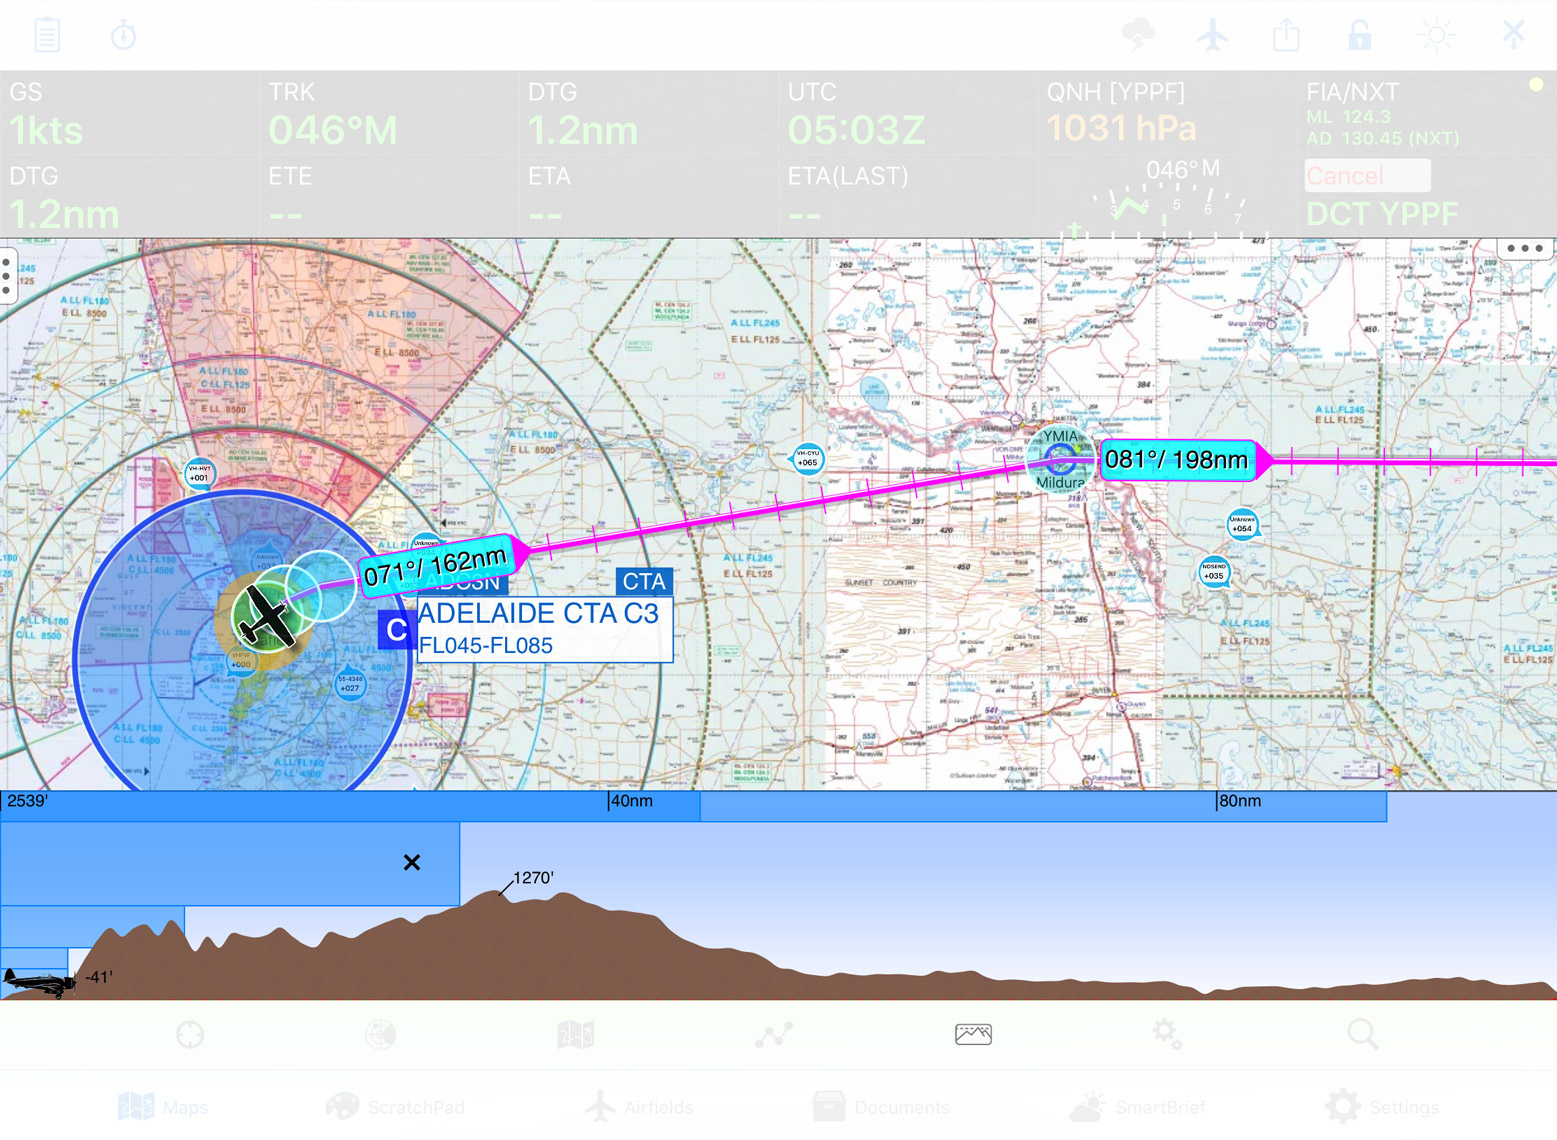
Image 12.5 Horizontal Terrain - Fly Mode
When you are in Fly mode (no track segment selected) the display shows the terrain and airspace in front of you at a scalable range up to 80NM. Adjust the range by swiping left or right in the window.
The height of the highest point in front of the aircraft for the range shown is labelled. Your GPS altitude is shown at the top left of the display. Any ADs or ALAs in front of the aircraft are displayed along with their altitude and distance from the aircraft’s track with an offset left or right.
If you tap somewhere within the display any airspace under the tap point will be displayed on the main map page and noted in the terrain/airspace display. For example, in Image 12.5 we can see ‘Adelaide CTA C3’ is highlighted on the map, and the corresponding tap point in the Terrain & Airspace viewer is denoted by an ‘X’.
12.4. Active Restricted Airspace System
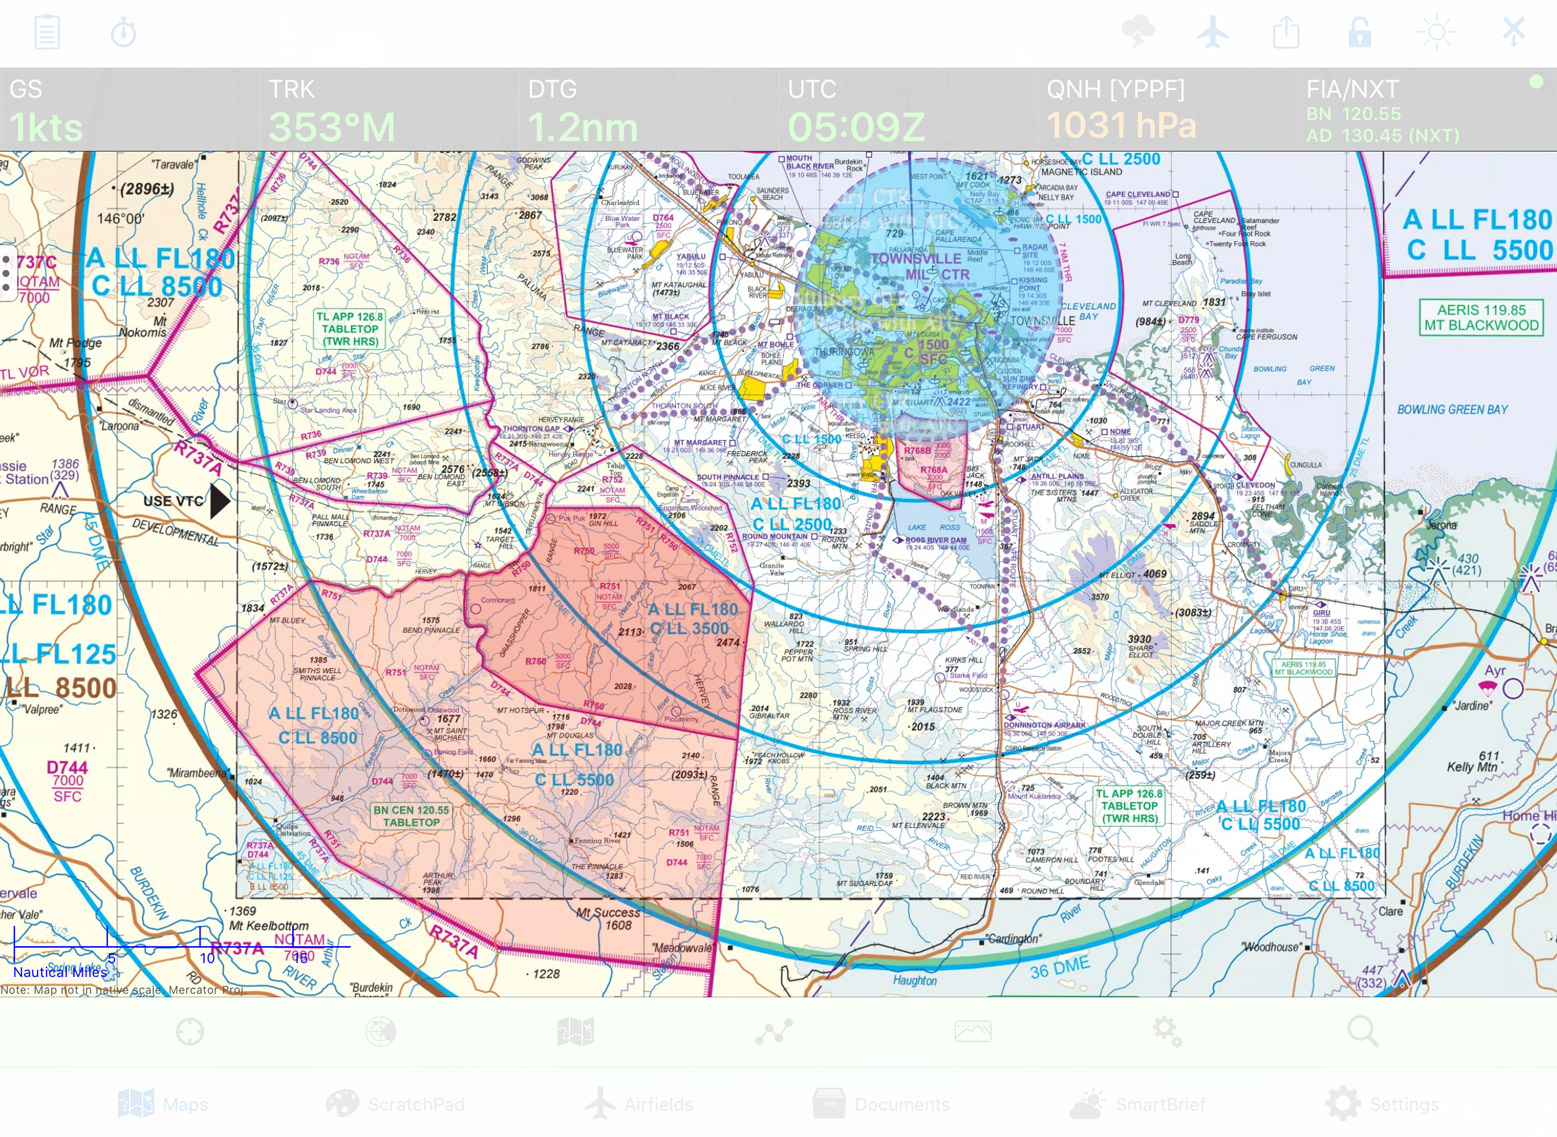
Image 12.6 Active restricted airspace
The option to highlight active restricted areas is found in Map View Options → Airspace. When enabled, currently active restricted airspace is shaded red. Airspace that will be active soon (within 1 hour) is shaded orange.
The status of restricted airspace is determined using the NAIPS Restricted Area Briefing and by interpereting NOTAMs. OzRunways requests the NAIPS restricted area briefing every 10 minutes and updates the shading accordingly.
Note
Your device requires an internet connection in order to receive updated Restricted Area briefings
In some cases we may manually add Temporary Restricted Areas (TRAs) from AIP SUPs to the map. If activation times are clearly defined in the SUP, or triggered by a NOTAM, the area will be shaded red while active. If activation times aren’t defined we may permanently shade the area red to bring it to the attention of pilots. In all cases, please confirm the status of airspace activation before entry.
Military CTRs (e.g. Townsville MIL CTR displayed in Image 12.6) are Class C airspace, not restricted areas, and so they are shaded blue when active.