7. Planning
7.1. Initiating a plan
There are a few ways to create flight plans in RWY:
- Map Planning
Tap near the starting point on the map, tap the location in the resulting Closest Points popup, and then select Add To Plan. See Map Planning below for more information.
- Quick Plan
Create a flight plan by typing a succesive list of waypoints. See Quick Plan below.
- Search Planning
Tap the ‘Search’ button in the bottom right corner of the map page, search for the waypoint, select it and then select ‘Set waypoint As Origin of Plan’. See Search Planning below for more information.
7.2. Map Planning
To create a flight plan on the map page, first tap near the waypoint that you would like to set as the origin of the plan. After tapping on the map the Closest Points popup will appear (Image 7.1). From here you can either use the ‘Add to Plan’ or ‘Direct To’ shortcut buttons, or, tap on the desired waypoint and select ‘Add to Plan’
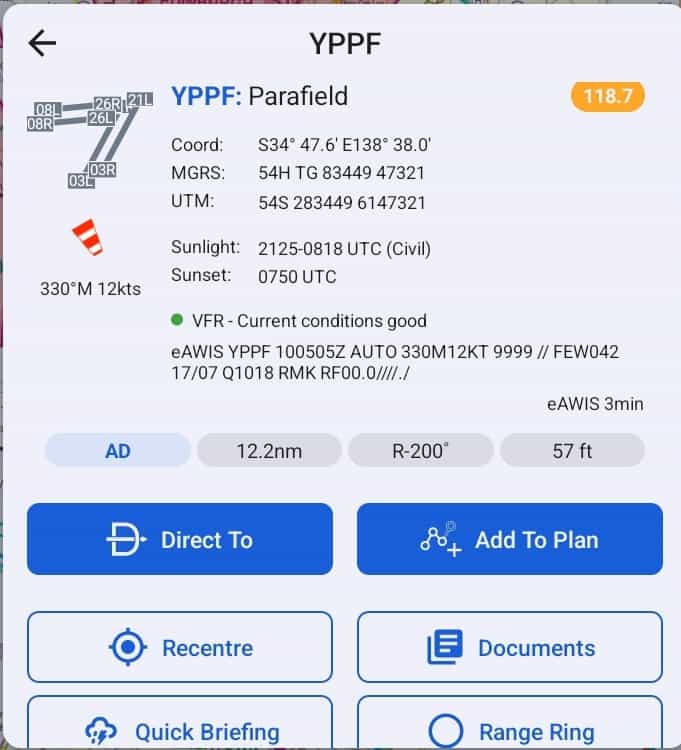
Image 7.1 Planning shortcuts on the Closest Points popup
You can continue adding waypoints to the plan using the method described above.
You can also insert waypoints into the middle of a plan as described below:
Identify the segment where you wish to insert a waypoint
Tap and hold the magenta track line until a yellow outline appears
While keeping your finger on the screen, drag the track over to the waypoint you wish to insert
Take your finger off the screen
The Closest Points popup will appear, listing nearby waypoints
Tap on the waypoint you wish to insert
The plan will redisplay with the new waypoint inserted
7.3. Quick Plan
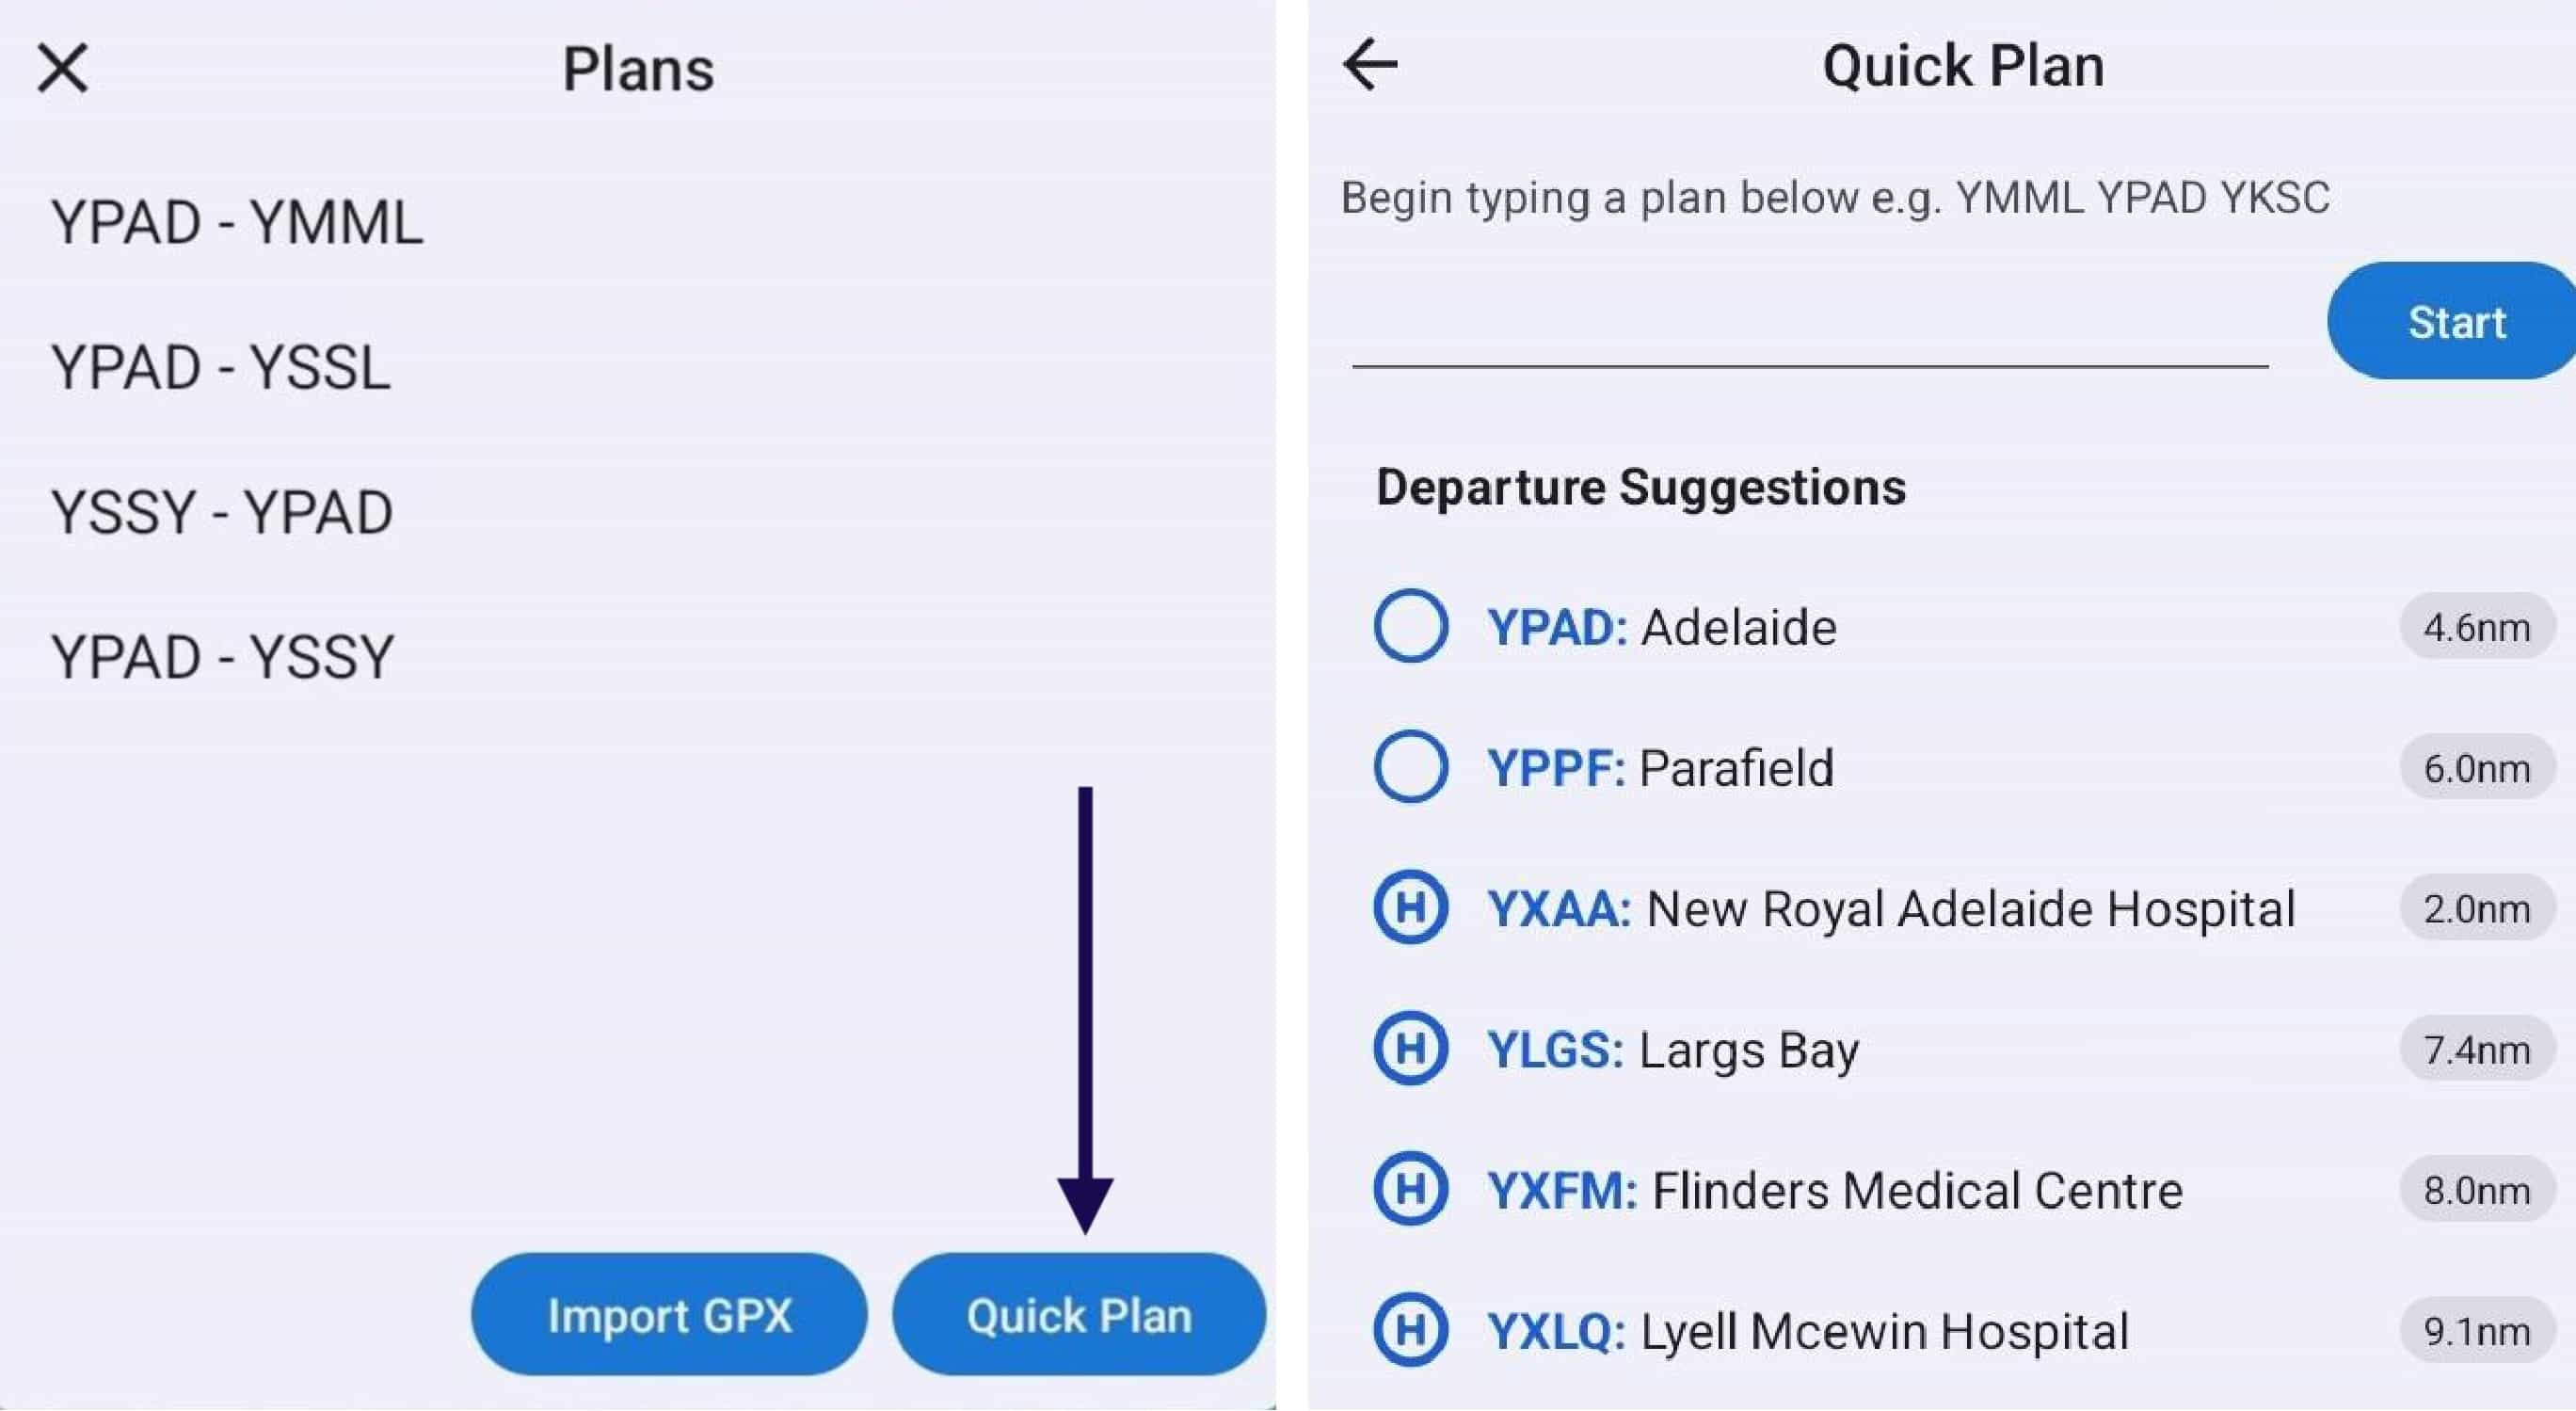
Image 7.2 Quick Plan button in Plans list
Quick Plan is accessed by tapping the ‘Plans’ button on the Map page. If a plan is already active you will need to cancel it to return to the Plans list where the Quick Plan button can be found, as per Image 7.2
Begin typing a waypoint name or code, the suggestion list will update as you type. Tap your desired waypoint in the list to fill it into Quick Plan, or press space to fill the top suggestion automatically. Keep entering waypoints in this fashion, then once all desired waypoints have been entered press ‘Start’ to construct the plan.
- Import GPX
To learn more about Import GPX check out Sharing Flight Plans
7.4. Search Planning
A flight plan can be created using the Search fucntion on the Maps Page. Search for the desired waypoint, tap on the waypoint in the list of results and select ‘Add to Plan’. Repeat for remaining waypoints.
7.5. Plans List
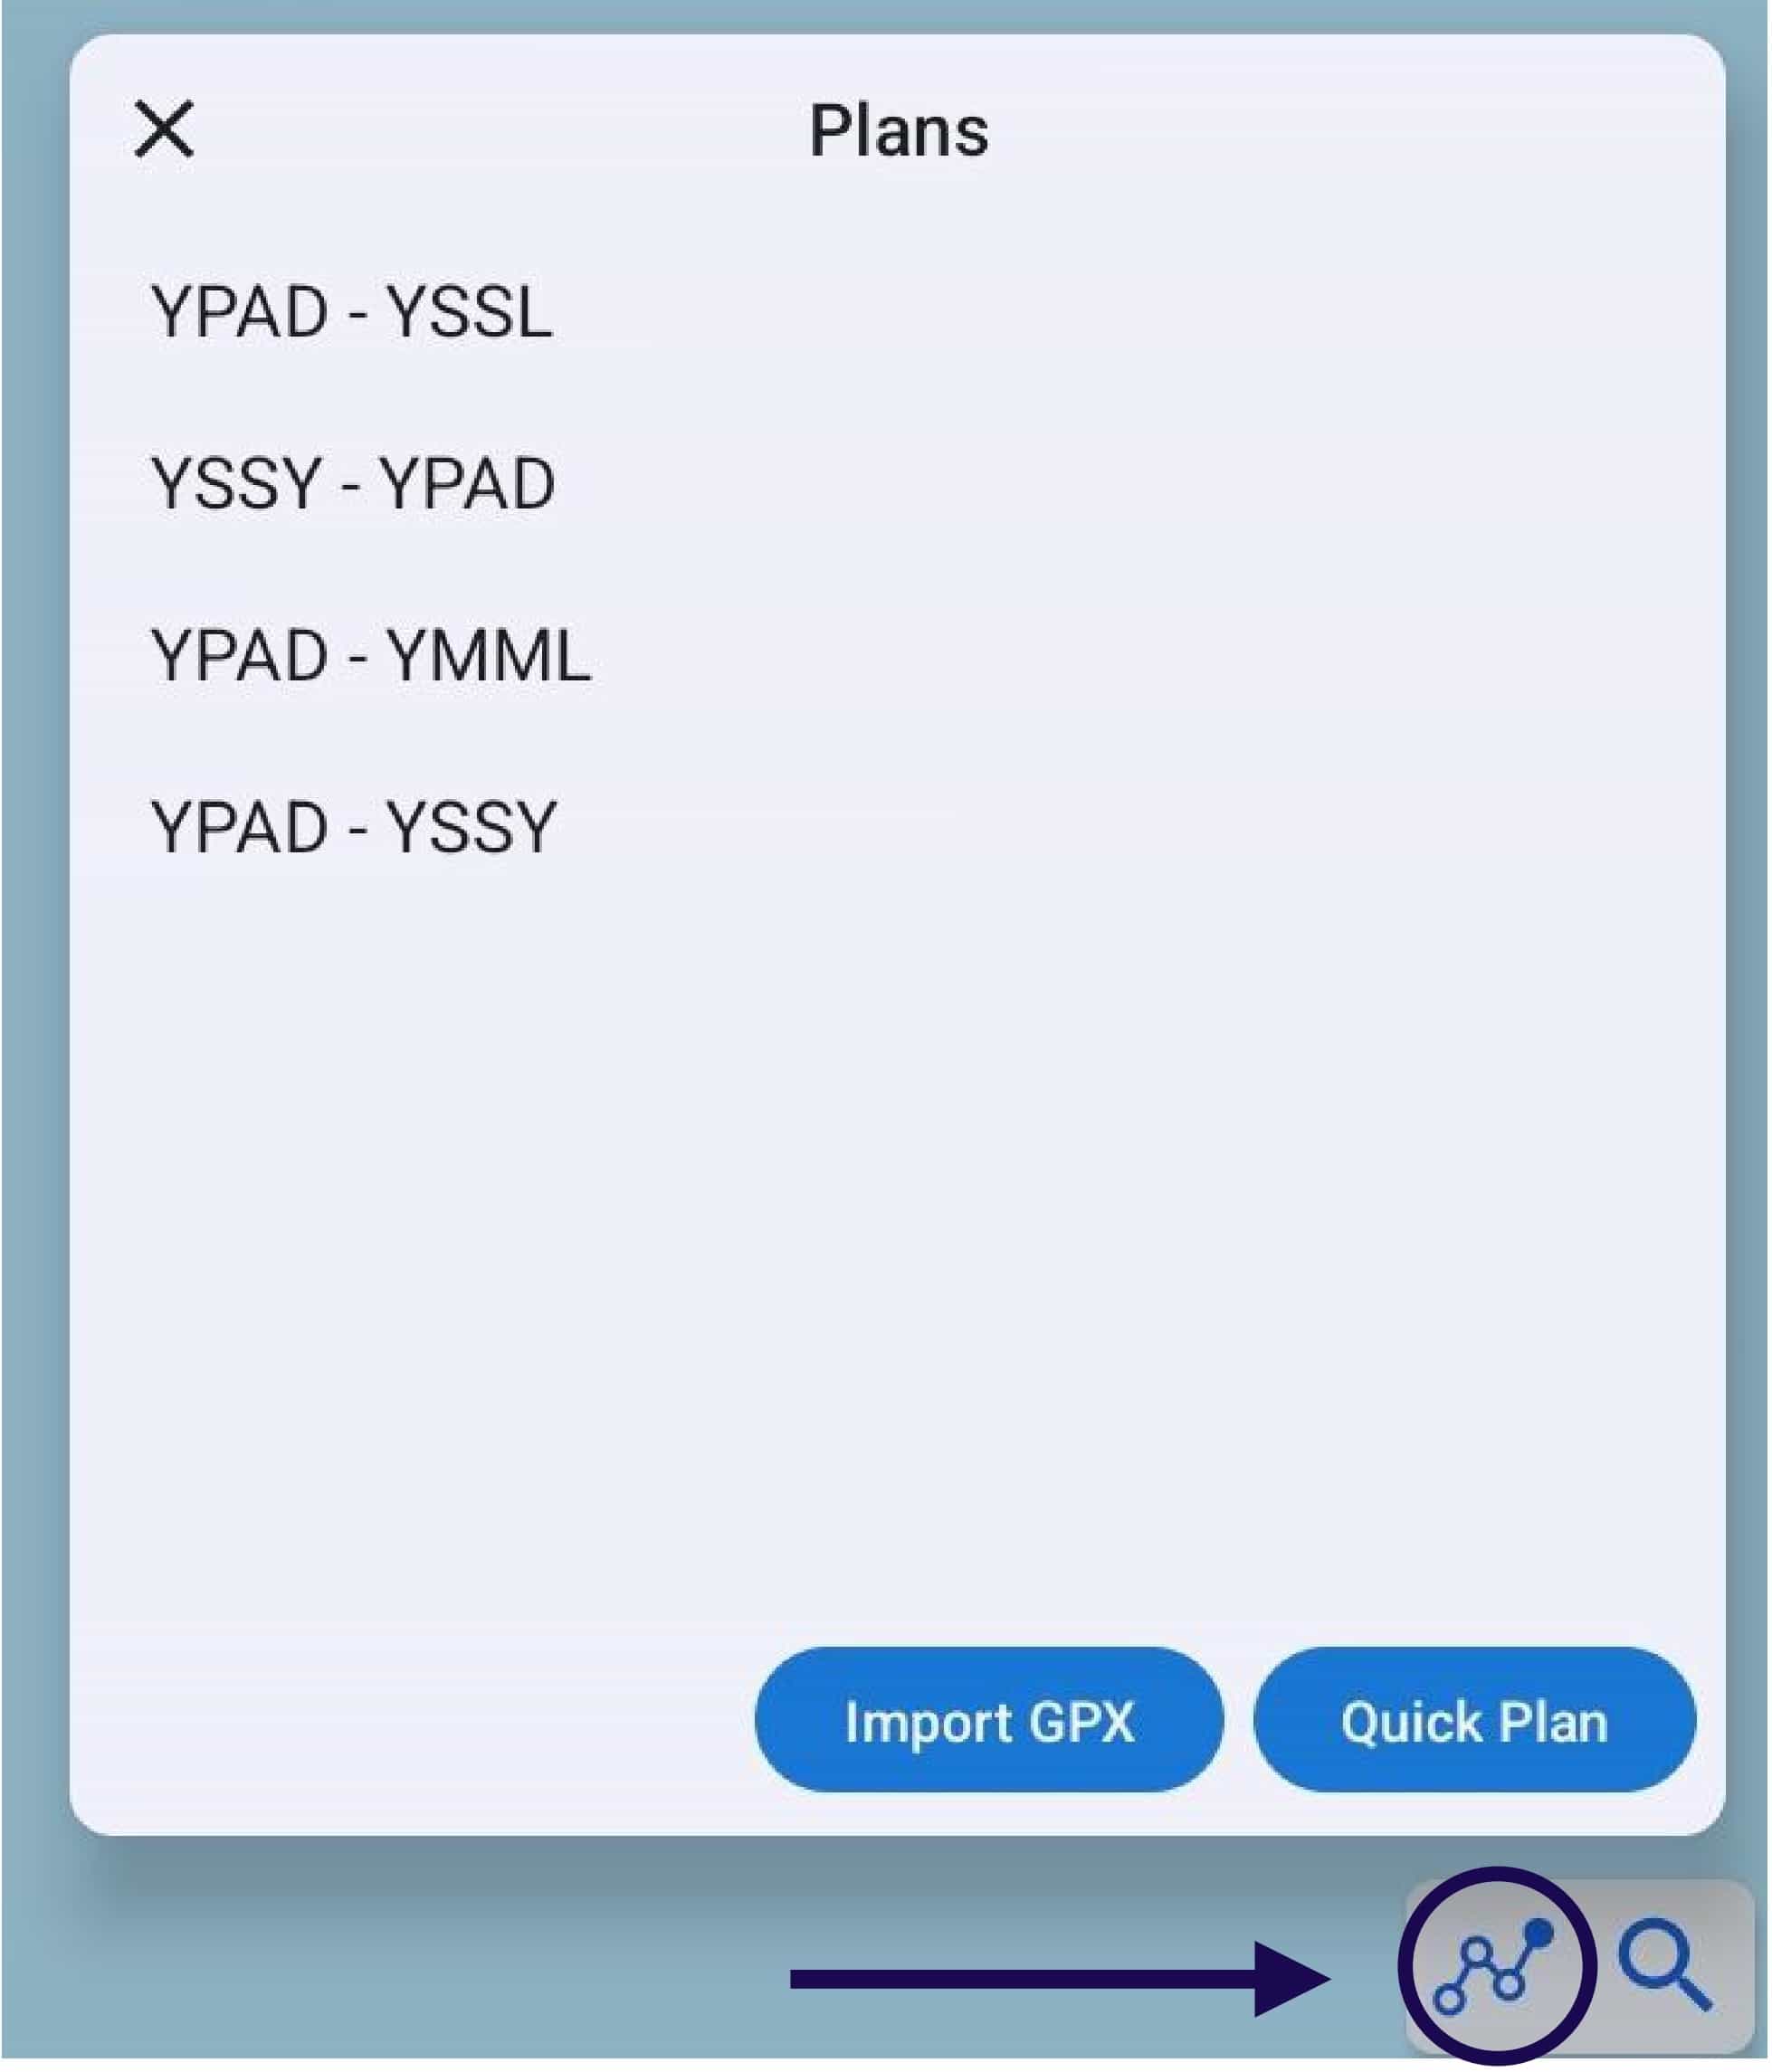
Image 7.3 Plans List
A typical Plans List is shown in Image 7.3. Tap the Plans button / lines and dots icon to open the Plans list. (Note: if a plan is already active tapping the Plans button will open the Plan Details view instead.)
Every time you create a plan it will automatically be stored in the Plans list and will stay there until you delete it.
To delete a plan (or multiple plans), tap and hold any plan, select the plans you would like to delete, then press the bin icon/delete button in the top right corner of the screen.
Tap on a plan to enter the Plan Details view, described below.
7.6. Plan Details
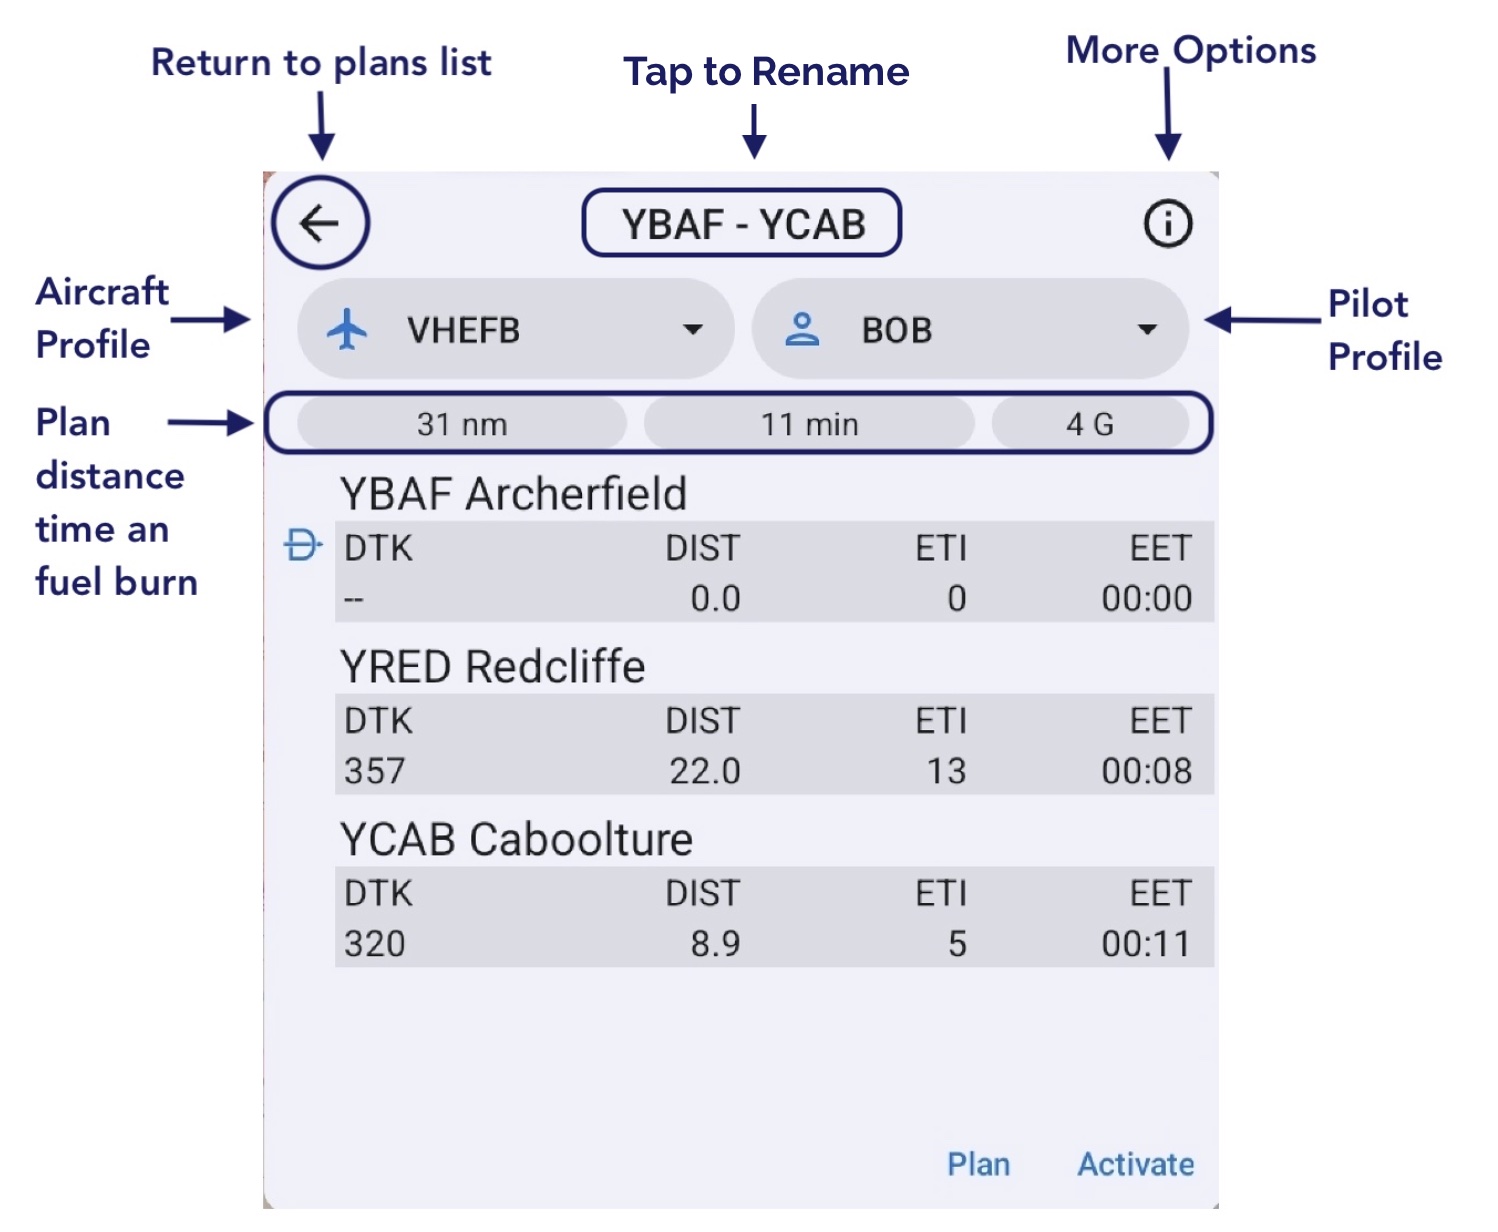
Image 7.4 Plan Details view
The Plan Details view shows all the waypoints in your plan along with the Desired Track (DTK), Ditance (DIST), Estimated Time Interval (ETI), and Estimated Time of Arrival (ETA) for each waypoint. The calculations are based on which aircraft profile is selected for the plan.
Select your aircraft and pilot profile by tapping on the fields. You can also rename the plan by tapping the title and tying the new name.
Tap ‘Activate’ when you are ready to start flying your plan. Once a plan has been activated a second row of GPS HUD boxes will appear on the map page.
Tap on a waypoint in the Plan Details view to reveal more options: insert a waypoint above or below, activate the leg, perform a Direct To, remove the waypoint from the plan, or view more infromation about the waypoint.
Tap the ‘i’ in the top right corner to access more options, described below:

- Sheet
Open the Plan Sheet.
- Delete
Delete the entire plan.
- File
Open a NAIPS/IFIS flight notification form for plan filing.
- Invert
Creates and opens a new plan with the waypoints in reverse order. Return to the Plans list to access the original plan.
- Save GPX
You can save the GPX file to your device for later review.
- Share GPX
Flight plans can be exported as a GPX file, which can then be imported into RWY on another device. GPX files include track, altitude and speed information and can also be imported into Google Earth Pro, and other mapping software.
7.8. Plan Sheet
The Plan Sheet, or navigation log, is accessed by tapping the Plan Sheet button in the bottom right corner of the map page when a plan is active. It can also be accessed by tapping ‘more options’ in the Plan Details view.
The Plan Sheet is shown below in Image 7.5.
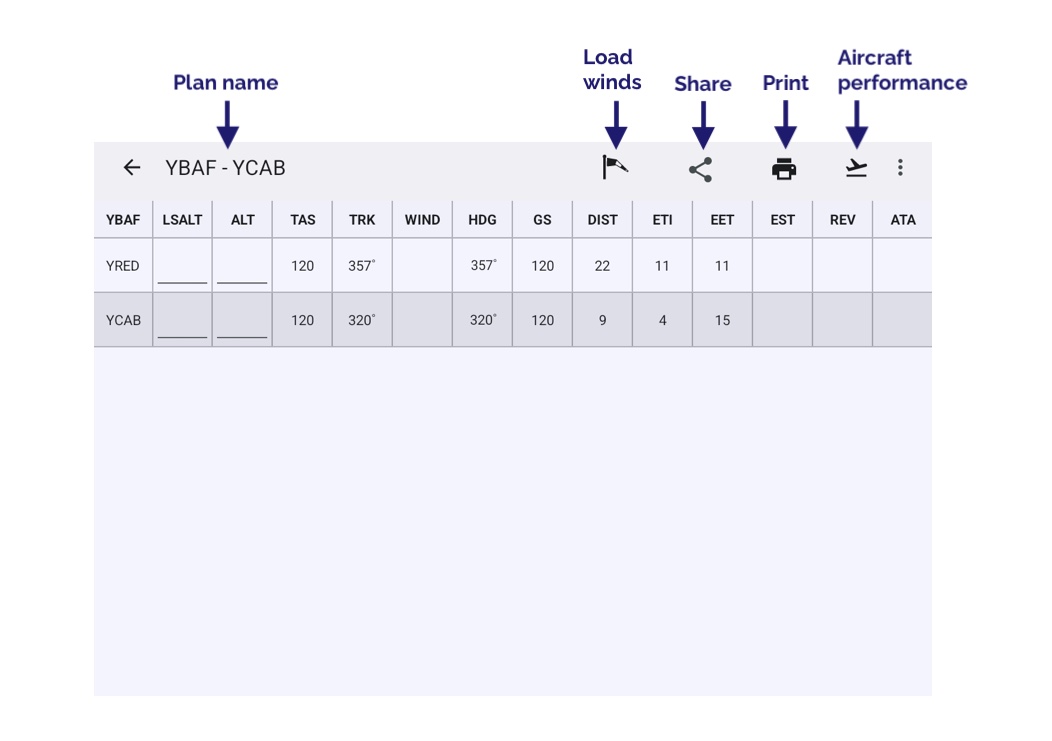
Image 7.5 Plan Sheet
There are a set of buttons across the top and the plan waypoints are listed sequentially down the left of the page. The function of the buttons are as follows:
- Load winds
Automatically load winds into the plan. Choose to load the wind forecast for ‘now’ or in 1, 2, 4 or 12 hours. The wind information is sourced from the Grid Point Wind Temperature low level data (1000ft - FL140), interpolated for altitude and time.
- Share
Share a PDF of the plan sheet to another device.
Print a PDF copy of the plan sheet including all entered values.
- Aircraft performance
Set a TAS and fuel burn rate. Used to calculate groundspeed (GS) on the plan sheet, and approximate fuel burn as displayed in the Plan Details view.
The columns in the Plan Sheet are described below.
Waypoints
The waypoints in your plan, beginning with your origin point.
LSALT (Lowest Safe Altitude)
Tap to manually enter an LSALT value.
ALT (Altitude)
Tap to enter desired altitude. 1000 = 1000ft, 20000 = FL200 etc.
TAS (True Airspeed)
TAS as set in Aircraft Performance
TRK (Track)
Track is displayed in degrees Magnetic (ºM) for the appropriate leg.
Wind
Winds are entered & displayed in degrees True (ºT). RWY converts to degrees Magnetic (ºM) for all calculations. Wind can be manually set for each leg (tap to enter a wind value), or auto-fill all winds by tapping the Windsock / Load Winds icon.
HDG (Heading)
HDG required to ‘make good’ planned track. Shown in degrees Magnetic (ºM).
GS (Groundspeed)
The groundspeed which has been calculated for a leg, including wind.
DIST (Distance)
Distance of the leg, in NM.
ETI (Estimated Time Interval)
Estimated Time Interval of the leg (i.e. the length of time the leg will take to fly). Display is in minutes.
EET (Estimated Elapsed Time)
The elapsed time (cumulative time) of the plan to that waypoint in minutes.
EST (Estimated Time of Arrival)
For use when printing the plan sheet.
REV (Revised ETA)
For use when printing the plan sheet.
ATA (Actual Time Of Arrival)
For use when printing the plan sheet.