2. Maps Page
2.1. Basic Interaction
Firstly, there are a number of things you can do on the map page and likely, while en-route flying, you will spend most of your time here. For this reason, it is important to familiarise yourself with the diverse capabilities provided on this page. Some functionality is available simply by tapping, swiping, pinching or pressing on the map. Other functionality is available via buttons at the top, side and bottom of the screen.
The operations available are:
- Pan map
Press, hold and drag your finger on the screen.
- Zoom
‘Pinch zoom’ is achieved by placing your thumb and forefinger on the screen at the same time and pressing, holding (briefly) and moving them apart (zoom in) or together (zoom out).
OR
Double tap to zoom: tap twice and on the second tap leave your finger in contact with the screen, then move your finger down to zoom out or up to zoom in.
- Measure
As for zoom but press and hold your thumb and forefinger until a ruler appears. Then while keeping your finger tips contacting the screen manipulate them to adjust the position of the ruler.
- Enter a plan
See the Planning chapter.
- Get the weather
Tap near an airfield → tap on the airfield in the subsequent popup → tap Quick Briefing (more on this below).
- Enter a Custom or User Waypoint
Tap on the location where you want to create a waypoint → tap on the ‘+’ in the top right corner in the subsequent popup → enter the required details then tap ‘Save’.
- Find your GPS location
Follow your progress as you fly (moving map mode) – see GPS button later in this chapter.
2.2. Map Interaction
Tap once on the map and the ‘Closest Waypoints’ popup will appear (Image 2.1). This list shows the waypoints closest to where you tapped on the map. Below and beside each item in the list is some information about the waypoint. If you have tapped near an aerodrome then it will be prioritised and appear as the first entry in the list, and some more quick actions are associated with it.
For easy reference, the runway displayed on this page is appropriately coloured to reflect the surface type. The colours are: brown = dirt/gravel, green = grass, grey = tarmac. Where available, there is a small diagram of the runway layout and a windsock next to the airfield name. The windsock changes direction based on the current METAR wind to give you a quick indication of which runway might be in use.
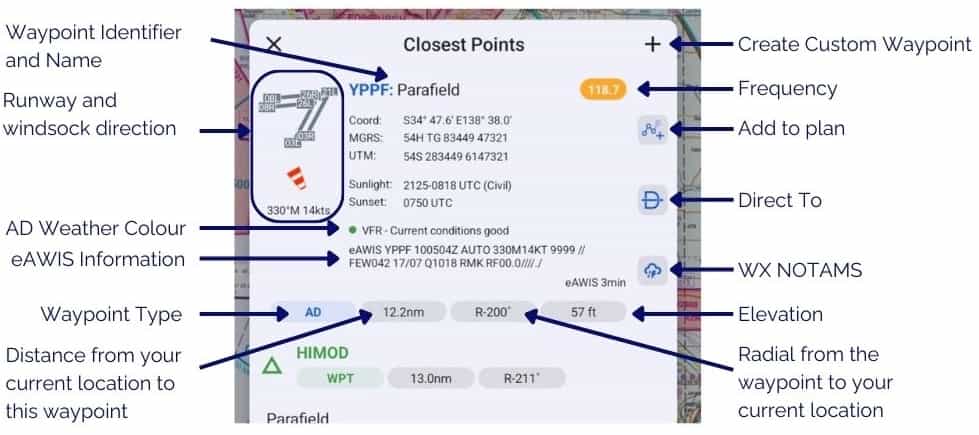
Image 2.1 Closest Waypoints popup
Note
You can control which types of waypoints that appear in the Closest Waypoints popup in Settings → Preferences → Waypoint Sub-Types.
Tap on a waypoint for more options (as shown in Image 2.2). The options are described below.
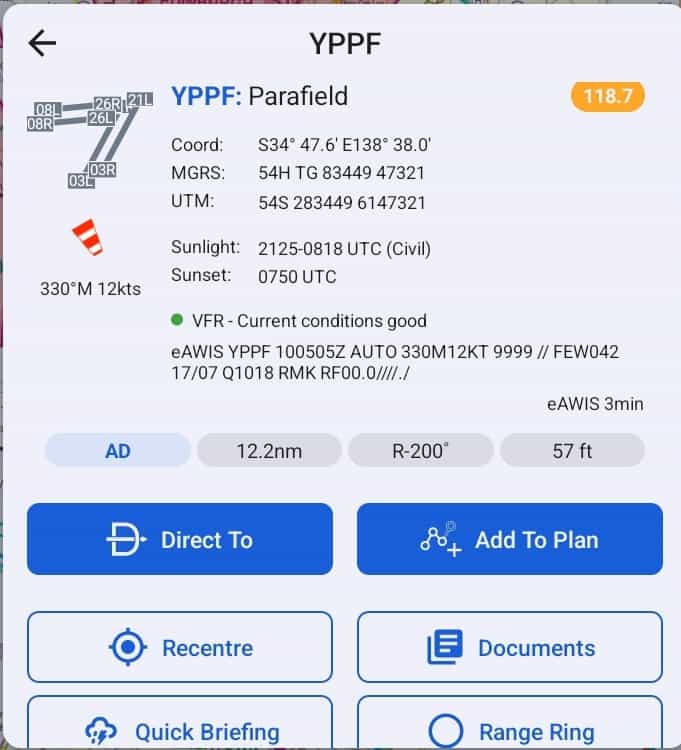
Image 2.2 Parafield (YPPF) waypoint options
- Direct To
When you select ‘Direct To’ the app immediately drops a user waypoint at your current position and then constructs a plan from that position to the selected waypoint. If you were already in a plan, that plan is terminated and the Direct To plan initiated. Direct To plans will not be saved after use.
If you want to resume your previous plan, cancel the Direct To plan → Open the plan popup → Select the previous plan. You can of course insert a waypoint into your current plan to effect a Direct To without terminating your current plan. For more details see Planning.
‘Direct To’ is a handy option for a quick change of plan, e.g. a diversion. There are better ways to create an actual flight plan, these methods are described in the chapter on Planning
- Add To Plan
Tapping ‘Add To Plan’ creates a flight plan with the selected waypoint as the initial point in the plan, or, if you have an existing plan open it will add this waypoint to the end of that plan.
- Recentre
Positions the screen with the selected waypoint in the centre.
- Documents
Tapping on ‘Documents’ will take you straight to the relevant airfield documents on the Airfields page.
- Quick Briefing
Tapping on ‘Quick Briefing’ results in a screen showing the NAIPS Location Briefing, this includes the aerodrome TAF, METAR, Area QNH, and NOTAMs (if available) A Charts button is available on this page to access the GAF and GPWT charts.
- Edit (only shown on Custom/User Waypoints)
‘Edit’ is used to change the details of a User Waypoint (custom waypoint).
- Range Ring
Range rings can be set on any waypoint. Tap near a waypoint on the map, select the waypoint in the resulting Closest Points popup, then tap ‘Range Ring’. Turn on the Show / Hide Range Ring toggle and select your distance and colour options. An example is shown below in (Image 2.3).
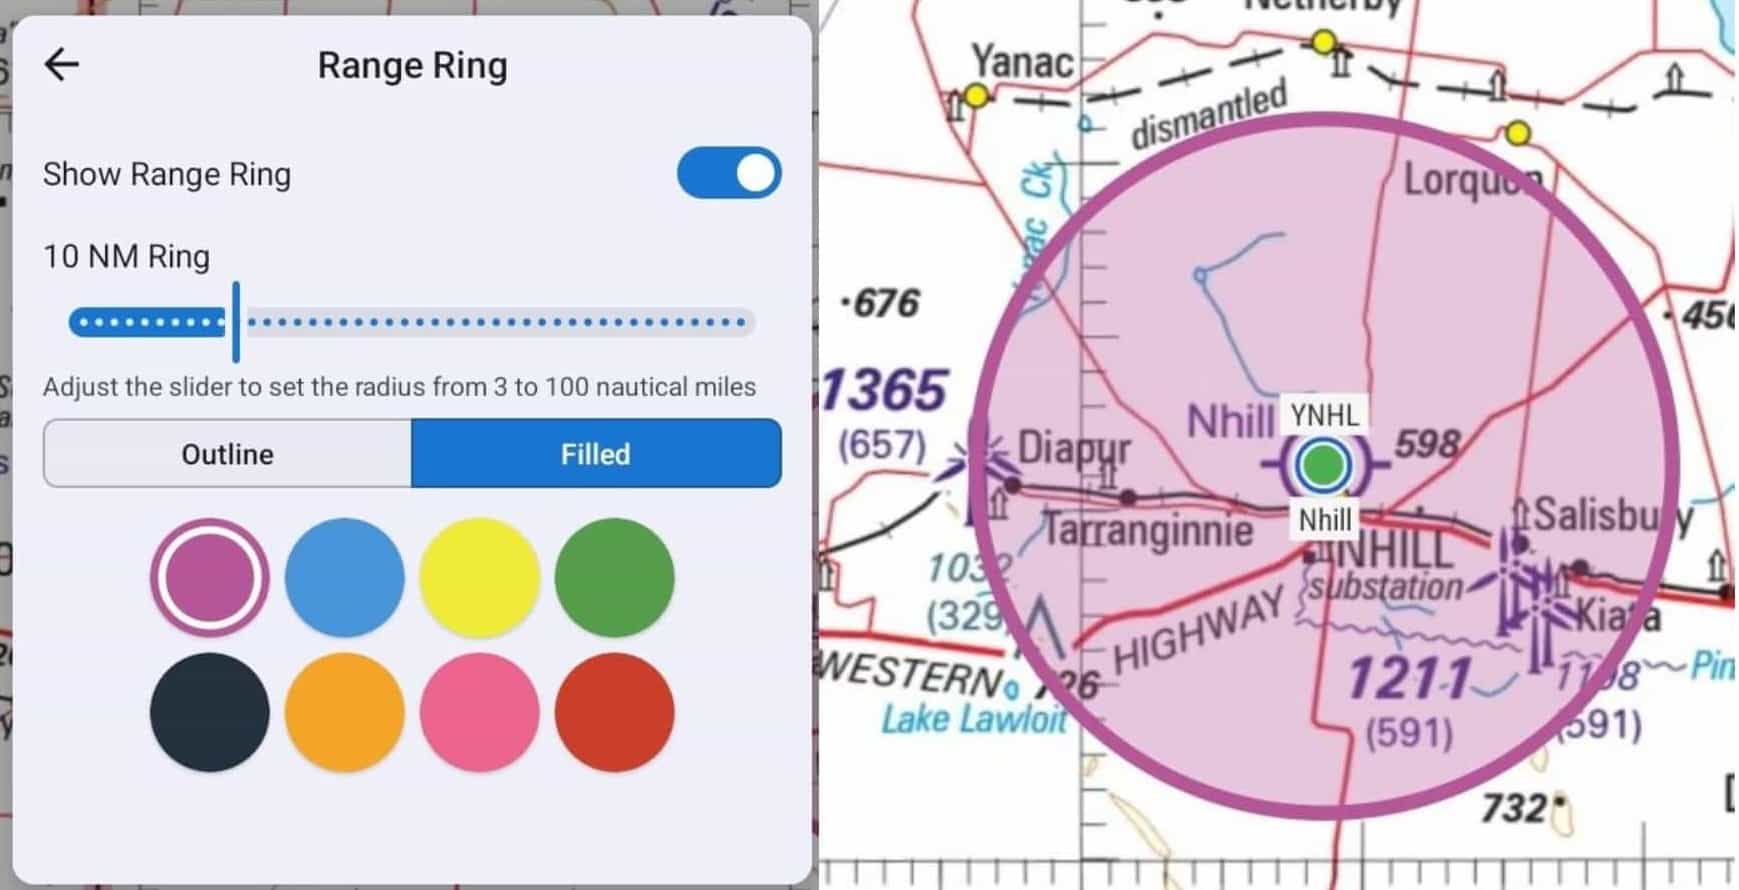
Image 2.3 Range Ring
2.3. Left Sidebar (Overlays)
The Left Sidebar (also known as the Overlays Bar) controls the display of the waypoint overlay symbols, weather radar overlay, and graphic overlays/KMLs.
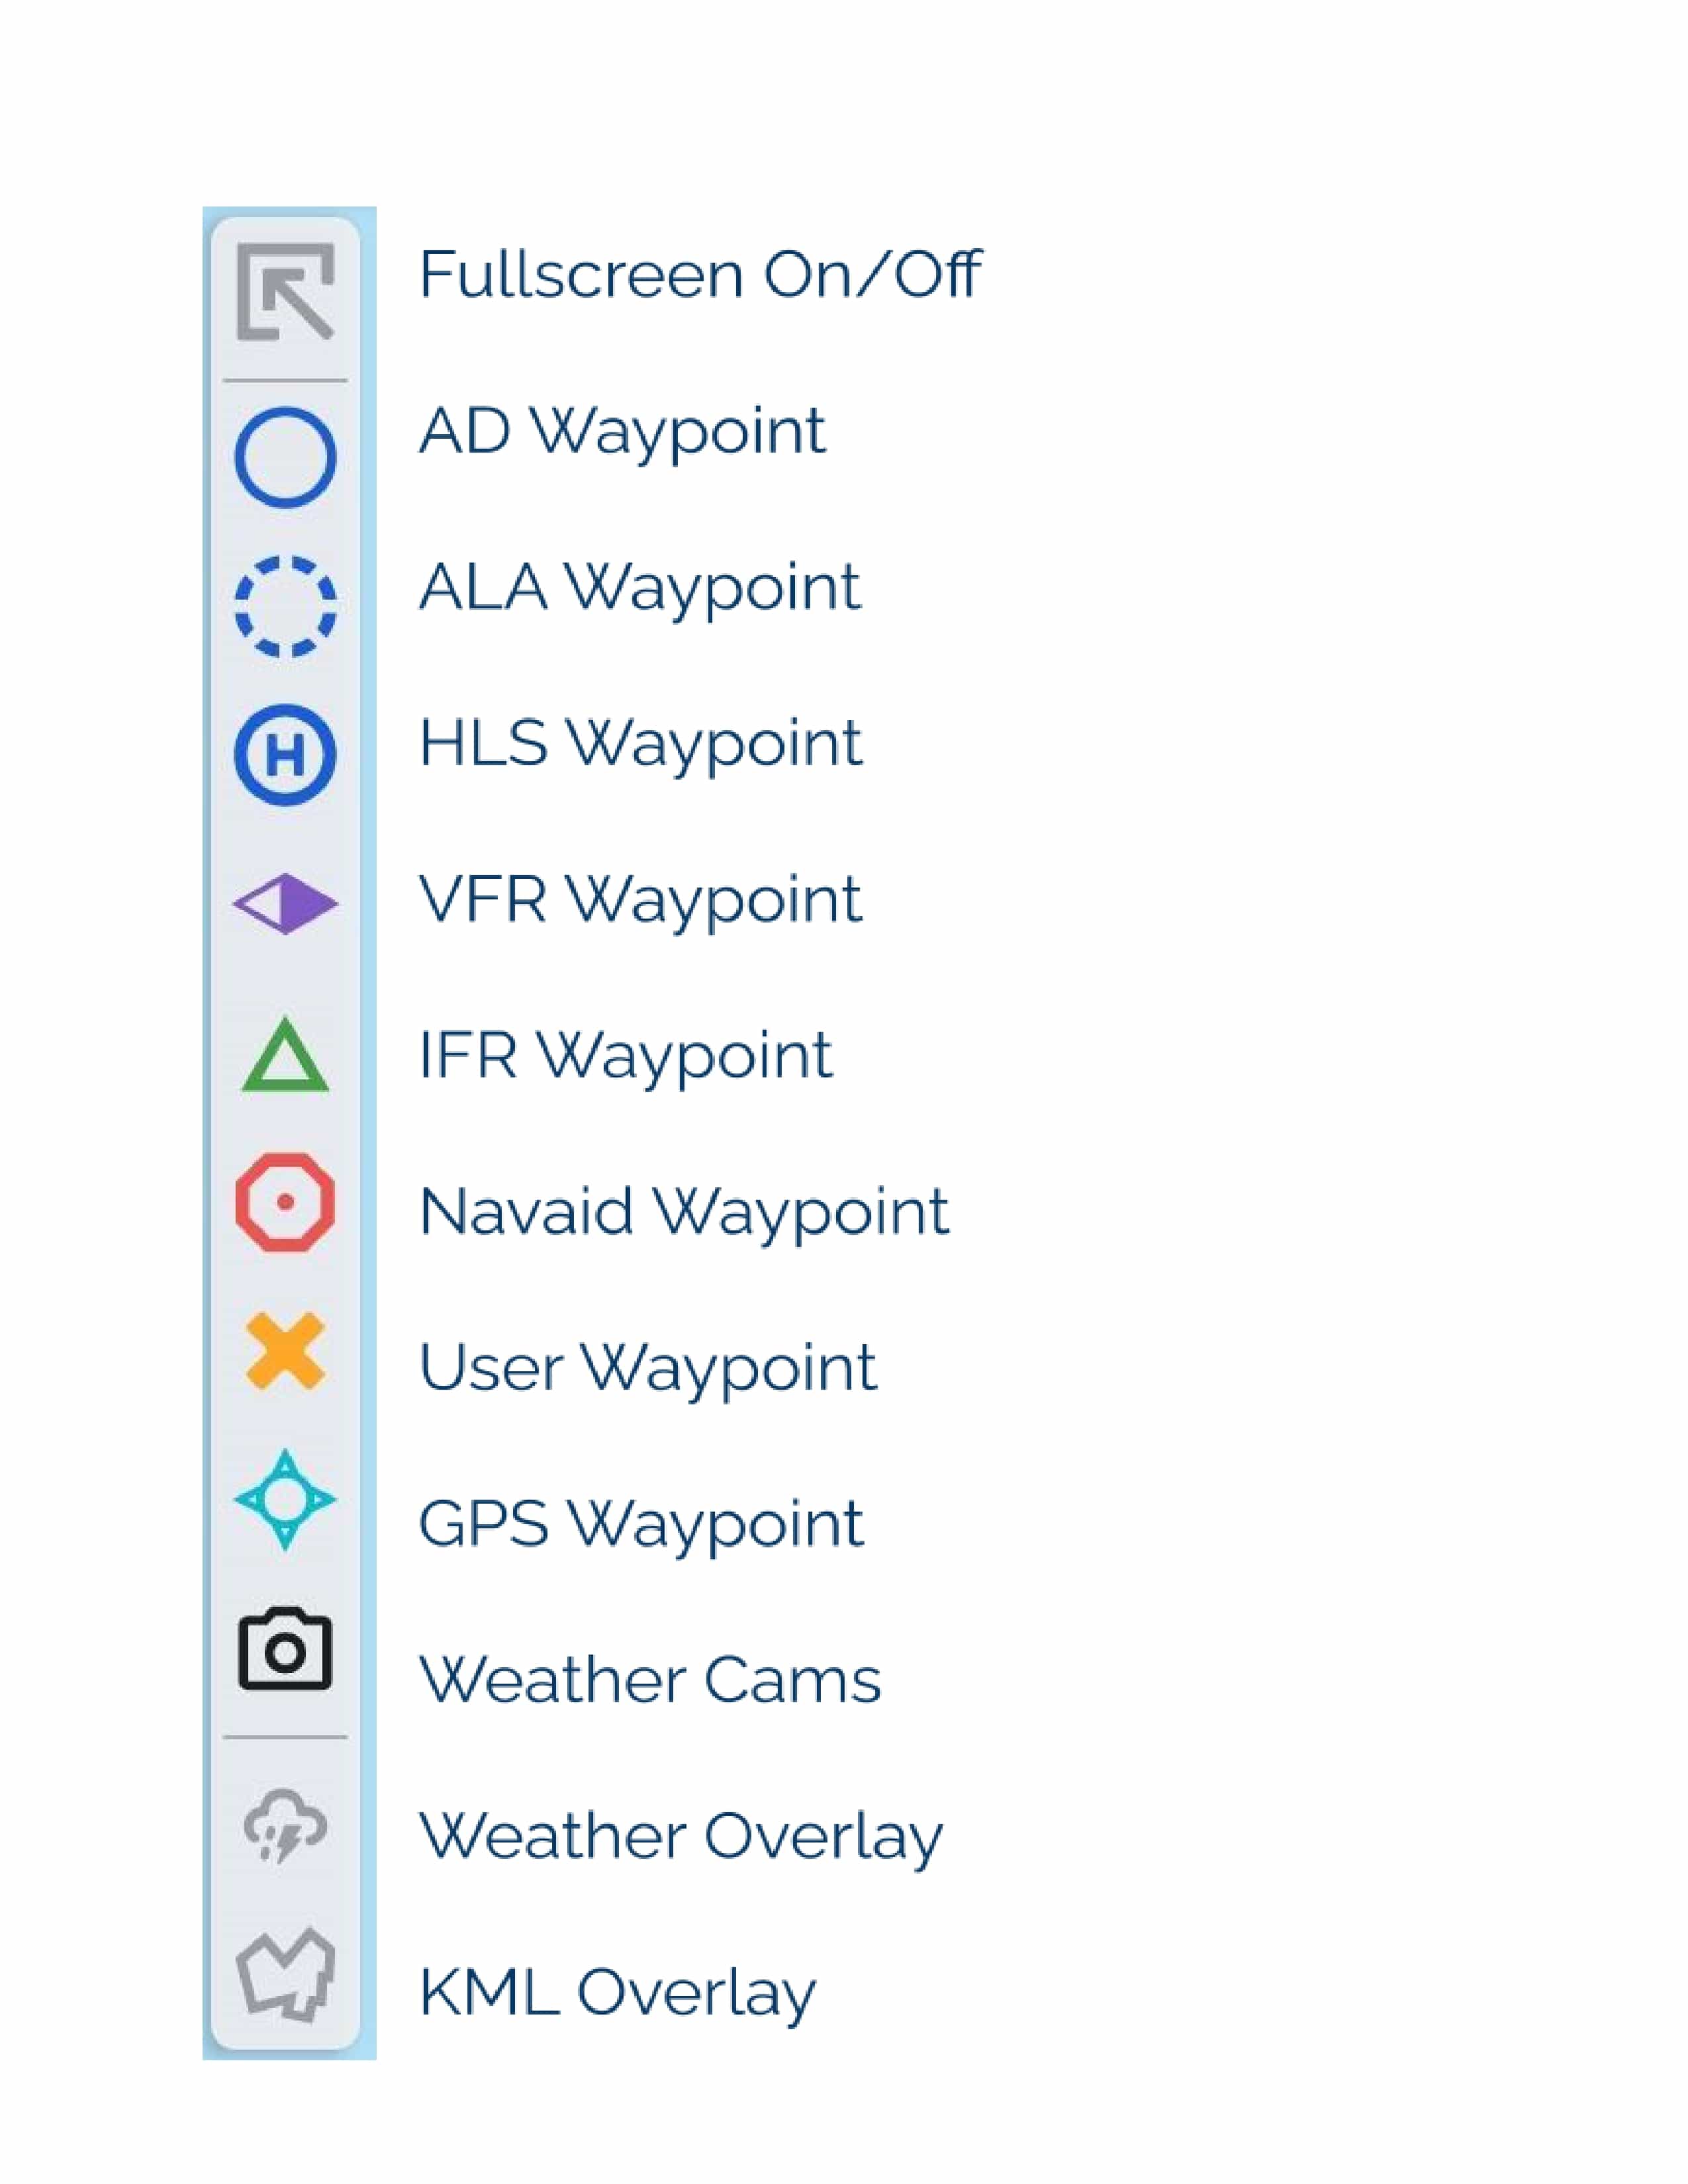
Tap the Fullscreen On/Off button to enter or exit full screen mode. To select which screen elements remain visible in Full Screen mode see Map View Options
Tap an icon to turn the respective overlay on/off.
Weather Overlay

Tap the Weather Overlay button to switch the weather radar overlay on/off. The icon is green when the Weather Overlay is switched on, and grey when switched off.
Further infromation about the Weather Overlay is available in the Weather chapter.
KML Overlays
This button is only shown if you have imported a KML overlay, or if you have regional KML overlays available with your subscription. For more information see Graphic Overlays. When any KML Overlay is turned on, the icon is green. When no KML Overlays are turned on the icon is grey.
2.4. Right Sidebar
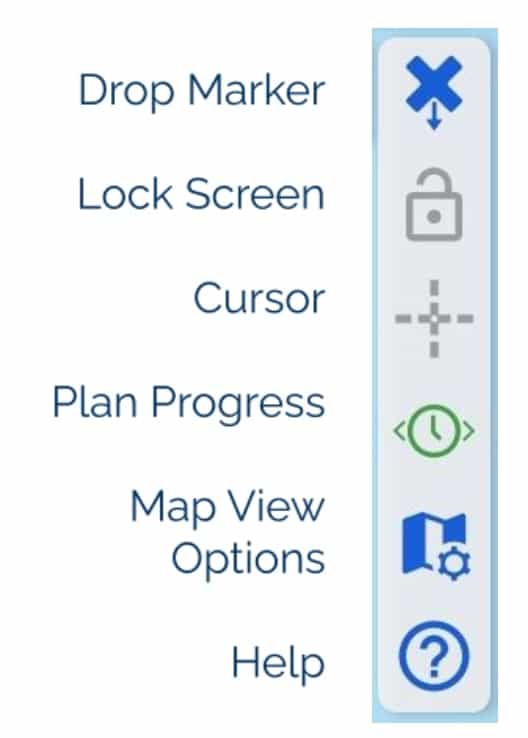
Drop Marker (Man Overboard)
Tap the Drop Marker button to drop a User Waypoint at your current GPS location. While User Waypoints can be added by tapping on the screen, the Drop Marker button gives the most accurate and fast way of adding a waypoint at your current location, and includes a timestamp (handy for recording visual position fixes!).
Screen Lock
Tapping Screen Lock will prevent any interaction with the map page and remove non-critical menu buttons. The padlock closes and turns green when the screen is locked. Tap again to unlock. This is useful in turbulence when you don’t want extraneous taps being registered. If the screen lock is switched on and you try to tap the screen, a message will appear reminding you that the screen has been locked. Tap the padlock to unlock.
Cursor
Switches the cursor on/off. The cursor is a horizontal and vertical dashed line intersecting in the middle of the map screen. When the cursor is switched on, the coordinates and elevation at the centre of the cursor appear in a box on the right hand edge of the screen. The cursor can be used as an aid to verify coordinates or to assist in adding accurate User Waypoints. Tap once on the coordinates box to change coordinate/elevation units, or tap and hold to copy the coordinates only to the clipboard. When creating a User Waypoint with the cursor switched on, the waypoint location will be the centre of the cursor (otherwise it is added where you tap your finger).
The icon is green when the Cursor is switched on, and grey when switched off.
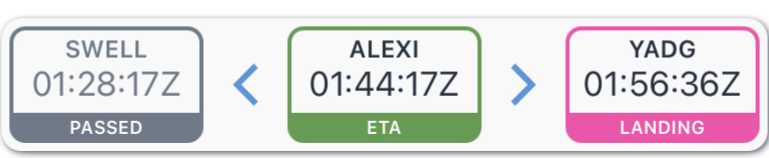
Plan Progress (only shown when in a plan)
From left to right the Plan Progress box displays: the last passed waypoint & time, ETA to the active waypoint, and next landing point ETA. Tap the left arrow to sequence the plan back one waypoint, tap the right arrow to sequence the plan forward one waypoint. Press and drag the box to move it around the screen.
Map View Options

Map View Options contains settings and controls for various elements around the map screen, as described below.
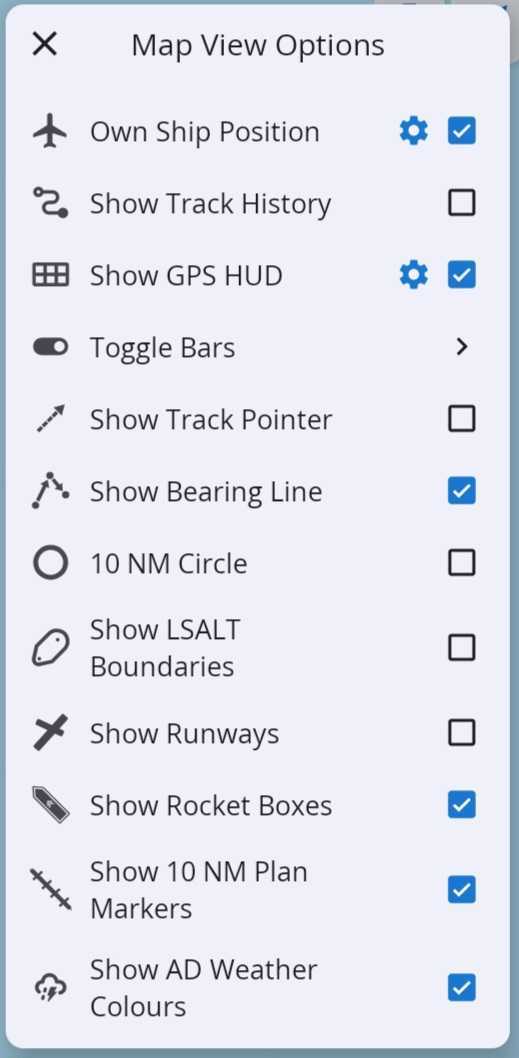
- Own Ship Position
This switches on/off the aircraft symbol which indicates your position. Tap the cog to access more settings - you can change the colour and size of the icon, and switch between different icon images e.g. rotary wing, turboprop, jet.
- Show Track History
Controls the ‘cookie crumbs’ left behind your path across the map (as a set of coloured crosses). Tap the settings symbol to change the colour and size of the track history markers.
- Show GPS HUD
Switches the GPS HUD on/off. The cog takes you to the settings for the GPS HUD appearance such as size and number of columns.
- Toggle Bars
Settings to adjust the size and transparency of the menu bars around the screen. Select which bars and other screen elements are hidden when pressing the show/hide button (at the top of the Left Sidebar).
- Show Track Pointer
The track pointer automatically displays a 10nm line ahead of the aircraft.
- Show Bearing Line
Switches the bearing line on/off. The bearing line is a green line that leads you to your next waypoint (when a flight plan is open).
- 10NM Circle
Switches on/off the 10NM circle around your aircraft symbol. Tap the cog to adjust the range of the circle (10NM by default).
- Show LSALT Boundaries
Turns the Grid LSALT display on for a selected segment in a plan. A plan must be loaded before the LSALTs will display. Tap on the segment you wish to examine either on the map or on the segment summary popup from the Plans button. The splay for calculating the LSALT is shown around the selected segment. Tap the setting icon to adjust the LSALT splay category.
- Show Runways
Shows the runways (overlaid on the map) for the next destination of the selected segment in a plan. You need a plan selected for this to work. The AD has to have an ERSA entry for the runway(s). In other words, the data for these comes from Airservices Australia.
- Show Rocket Boxes
Enables/disables the ‘rocket boxes’ i.e. the lozenge shaped boxes near the start of the planned track line that show bearing and distance.
- Show 10NM Plan Markers
Show/hide the 10NM markers along the magenta track line.
- Show AD Weather Colours
Show/hide the coloured dots inside waypoint symbols that indicate meteorological conditions based on METAR. The colour criteria is detailed in the image below.

Help
Tapping the Help button reveals labels for all buttons on the map screen. It also provides options for More Help, such as links to our user documentation and support website.
2.5. Bottom Left Bar

Map Mode
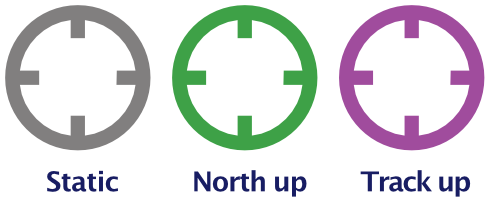
The Map Mode button toggles between static mode (where the map does not move along with you) and moving map modes (where the map tracks along with your GPS position).
There are two moving map modes: North Up and Track Up. Cycle between the modes by tapping on the Map Mode button. Static → North Up → Track Up → Static … etc. etc. The current Map Mode is denoted by the colour of the Map Mode button. It is black in static mode, green in North Up mode, and magenta (or purple) in Track Up mode.
In order for the moving map modes to work, RWY needs to know your GPS position, which means you need to have your device’s Location Services turned on. When you tap the Map Mode button and transition into one of the moving map modes, the map will recenter and place your aircraft symbol in the centre of the screen (North Up mode), or in the bottom third of the screen (Track Up mode).
In Track Up mode, you may pan or zoom the screen to wherever you want and the tracking will continue with the offset and zoom you have selected.
Radar
The Radar Button brings up a popup with three options: the Bureau of Meteorology ‘MetEye’, the national Satview (satview.bom.gov.au), and a Windy.com weather display.
The features in this popup are covered in depth in the chapter on Weather
Choose Map
The ‘Choose Map’ button lets you select the map you wish to display. The maps shown in the list are based on the current location you are viewing on screen.
Image 2.4 shows a typical Choose Map popup in the vicinity of Melbourne.
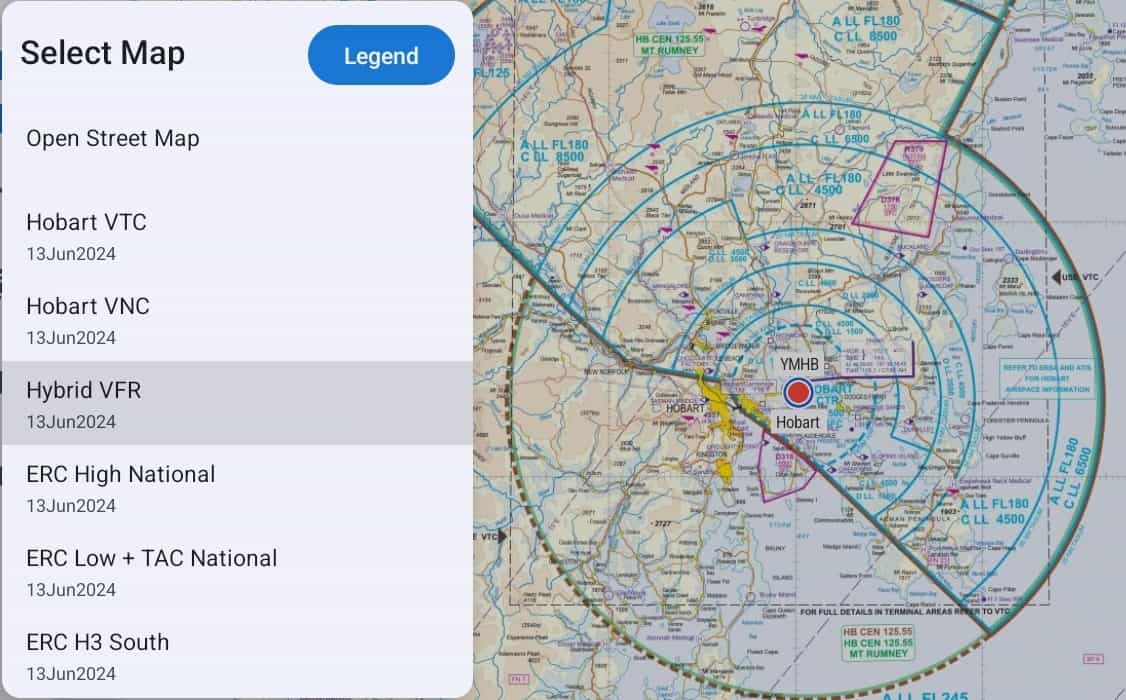
Image 2.4 Choose Map popup
The currently selected map is highlighted blue (e.g. in Image 2.4 the Hybrid VFR is the selected map).
The Hybrid VFR is a map provided for Australia which when zoomed out shows the WAC. As you zoom in, and where they are available, you will see in sequence, the VNC, VTC and inset for the area at which you are looking.
The WAC (AU) is a global map for Australia derived by combining all individual WACs. This means there is no need to select or know the particular WAC you need for a given area. We have similarly created a nation-wide ERC for both Low and High versions (named ERC Low National and ERC High National respectively). However, the individual ERCs are still selectable as on some occasions, the boundary of one ERC may overlay detail on an adjacent ERC that is required. In that case you can swap to the individual ERC in question.
Satellite maps are also available in RWY, providing a detailed, real-world view of terrain and features. Please note that an active internet connection is required for the satellite imagery to load properly.
If a legend is available for the selected map, the word ‘Legend’ will display at the top of the popup, tap to view.
If you have not downloaded a particular map, a ‘cloud’ icon displays next to it on the right. You can tap the cloud to download the map here rather than going to Settings → Downloads. Once tapped, the download progress will be shown. If you want to delete a map, you still have to go to Settings → Downloads → (Country) and perform that action there.
ScratchPad

The ScratchPad page gives you a place on which to take ATC notes, ATIS reports, traffic information, etc.
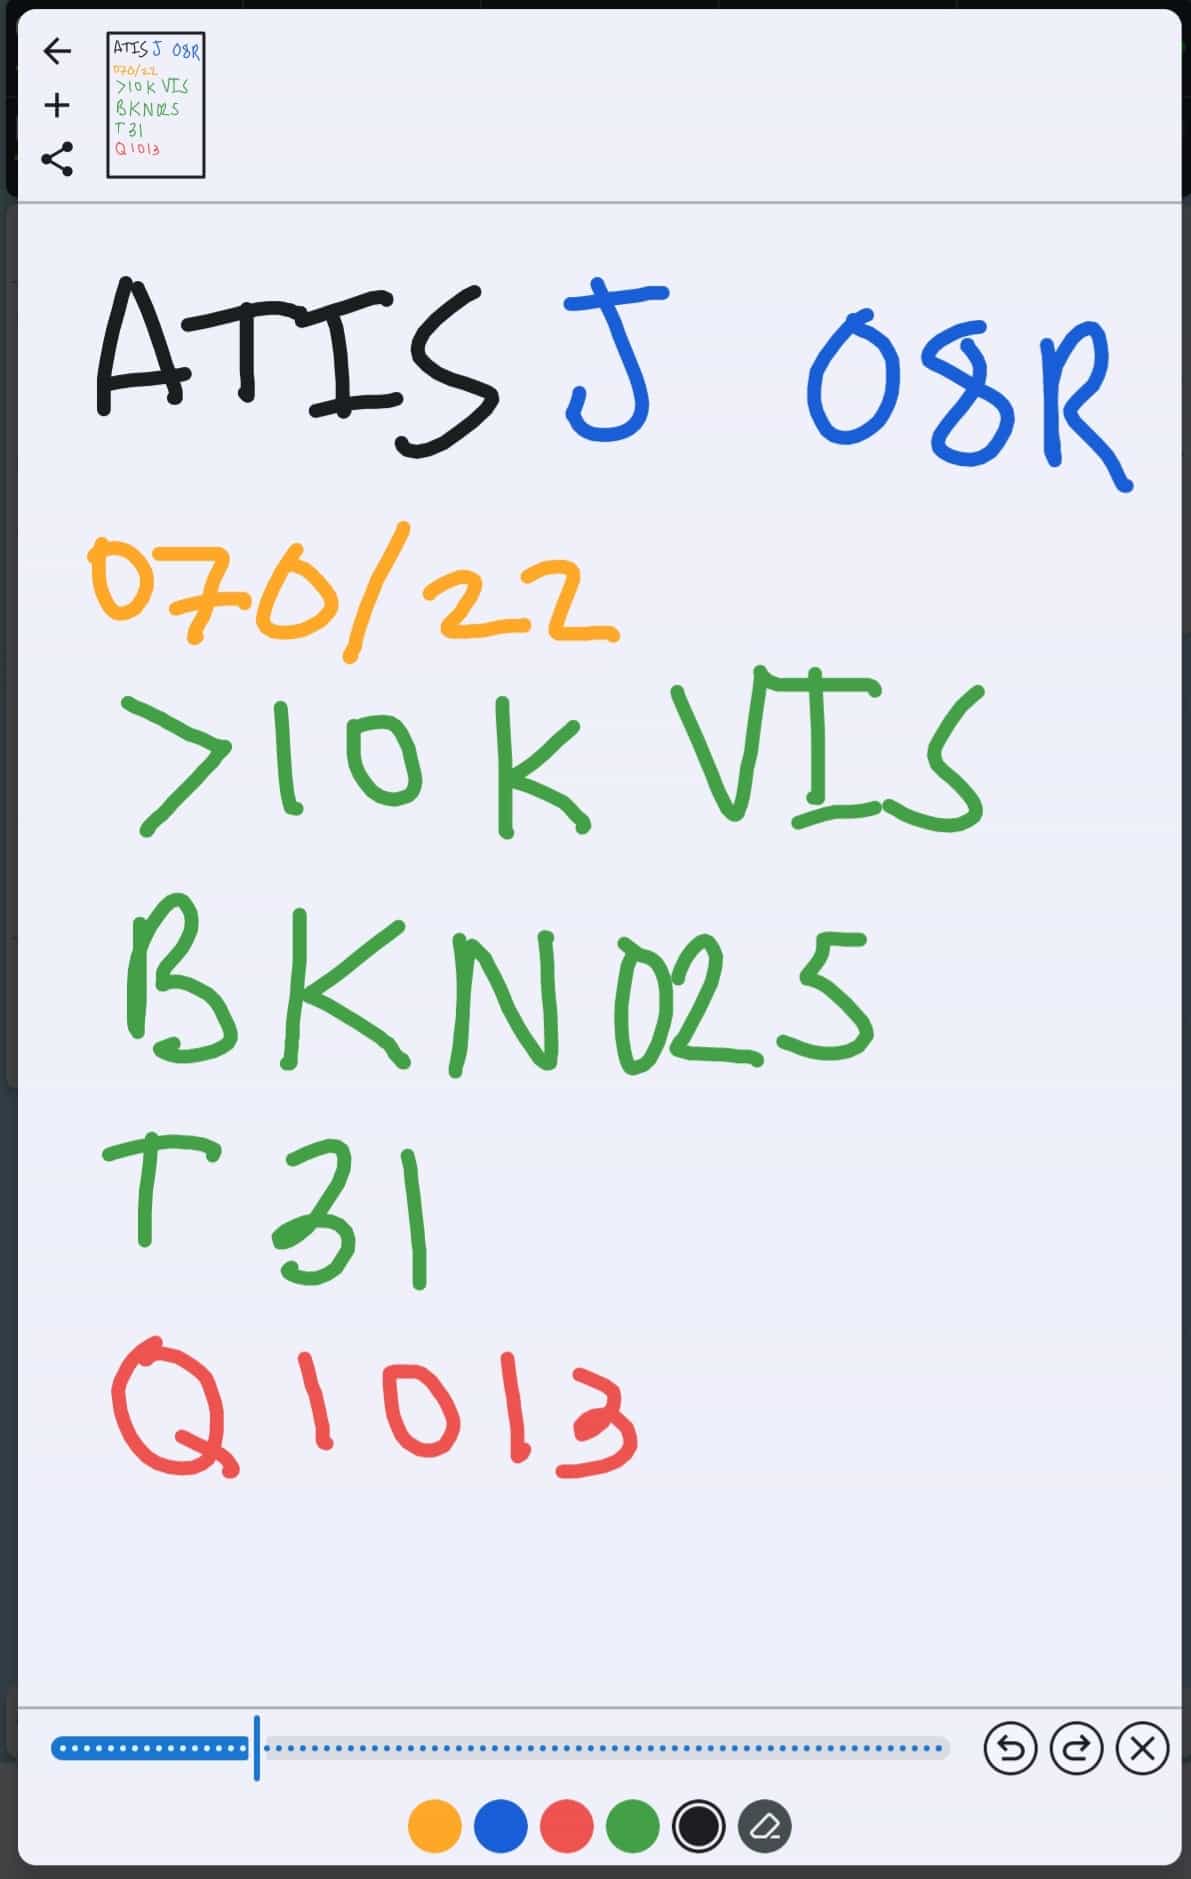
To add a ScratchPad, click on the top left ‘+’ icon.
Use your finger as a pen. Use the colour selector on the bottom of the screen to change the pen colour. The selected colour can be identified by the inner circle. The sliding bar will change the size of the pen strokes.
Erase your strokes by clicking the eraser icon to the right of the colours. The backward arrow is an undo button, it will undo the last stroke (defined as finger on, to finger off.) The forward arrow is a redo button and will redo the last stroke (in case you accidentally hit the undo button.) The ‘X’ clears all content on the current page. Tap and hold on a page in the top bar to either ‘print’ the selected page, or ‘delete’ the selected page.
Tap the backwards arrow in the top left corner to return to the map screen.
2.6. Bottom Right Bar

Tap to open the Plan Sheet for the currently active plan. The function of the Plan Sheet is covered in Planning.
Plans (lines and dots)

Tapping the Plans button will do one of two things:
If no plan is active/open then tapping the Plans button will open a list of previously created plans and provide access to Quick Plan, or
If a plan is active, tapping the Plans button will open the Plan Details
For more information on making a plan and accessing saved plans see the chapter on Planning
Search
The Search function allows to search for an aerodrome or any other waypoint by name, partial name or ICAO code.
2.7. Traffic
Traffic

Single tap on the traffic icon to reveal more options.
When traffic if not turned on, the icon will turn grey in colour and have a diagonal line through it.
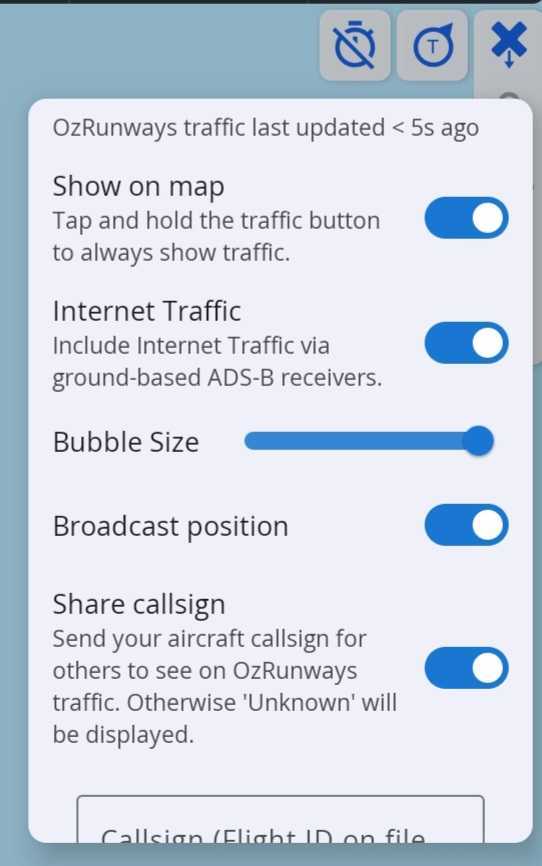
Show on Map - Toggle on/off all traffic bubble.
Internet Traffic - Toggle on/off ADS-B Internet Traffic. (available with an Australia or New Zealand Plus or Ultimate subscription)
Bubble Size - Resize traffic bubbles with the slider.
Broadcast Position - Toggle on/off OzRunways traffic broadcast. (i.e. other users can see your bubble. This must be turned on if you want to see other traffic on the map.)
Share callsign - Send your aircraft callsign for others to see on OzRunways traffic. Otherwise “Unknown” will be displayed.
Callsign - Shows the Callsign broadacasting to other OzRuwnays Traffic users. This will match the Callsign of the Active Aircraft Profile. Alternatively a callsign can be entered manually.
OzRunways Live (web) - Opens OzRunways Traffic website. This site displays all OzRunways devices that are within mobile coverage (with broadcast enables) worldwide. You can send this to your SAR Responsible Person to let them monitor your flight.
2.8. Flight/Fuel Tank Timer
Flight Timer

Tap on the Timer icon to set your Air Switch speed, or select Manual activation.
Once RWY detects that you are travelling faster than your Air Switch speed, the flight timer will automatically begin. When you drop below your Air Switch speed the timer will pause/stop. If you have selected ‘Manual’ you will need to manually activate and deactivate the timer by tapping the Timer icon and selecting ‘Start Flight Timer’ or ‘Stop Flight Timer’ as applicable.
Fuel Tank Timer
The Fuel Tank Timer lets you set reminders to switch your fuel tank. The timer will start automatically once you reach the speed specified in your Air Switch Timer, or you can start it manually by tapping Start when Manual Mode is enabled. When the timer expires, a pulsing “Switch fuel tanks” notification will appear where the flight timer icon was Image 2.5. Tap the popup to reset the timer. You can set the Fuel Tank Timer to expire every 15, 20, or 60 minutes.
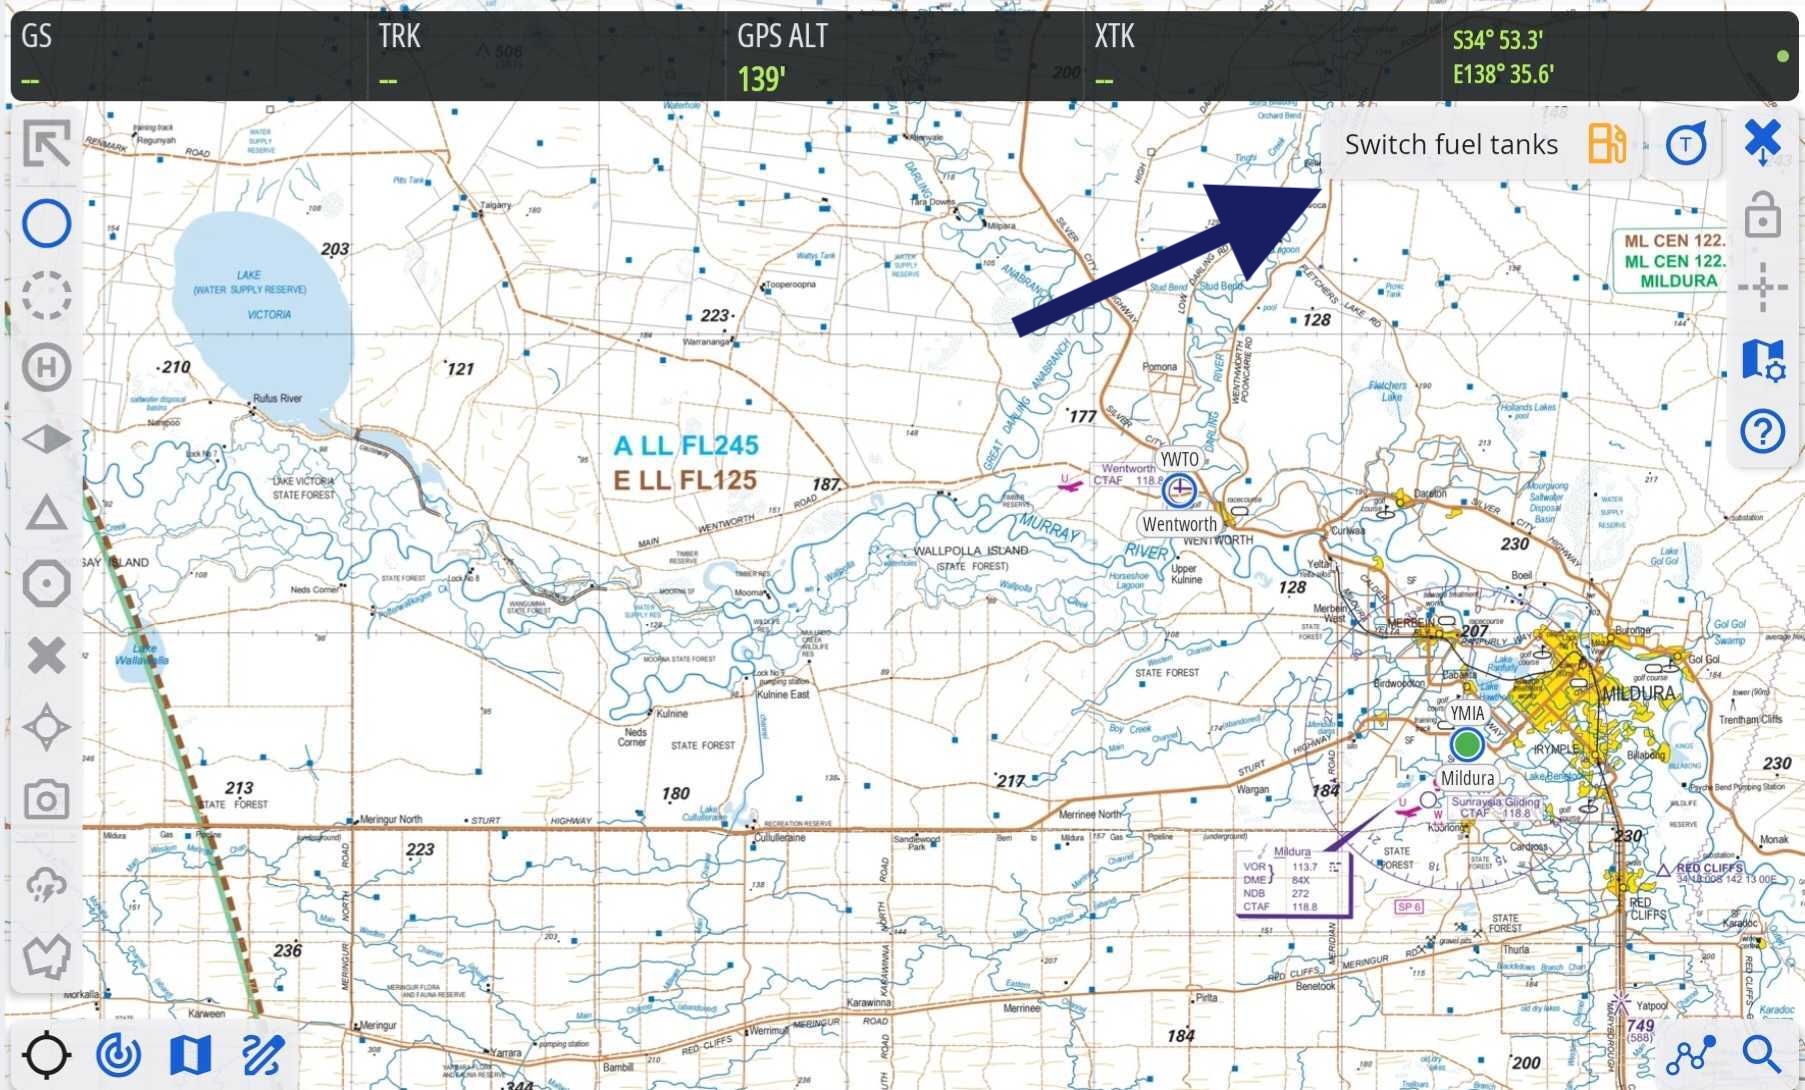
Image 2.5 Switch fuel tanks popup
2.9. User Waypoints (Custom Waypoints)
- To create a User Waypoint, tap on ‘+’ in the Closest Waypoints Popup as shown above in Image 2.1, the resulting screen allows you to do one of three things:
Save the new waypoint as a User Waypoint
Initiate a ‘Direct To’ to the new waypoint location
Add the new waypoint to the end of the current plan
A ‘Direct To’ cancels any current plan and automatically builds a new plan from your current position to the newly created User Waypoint.
Give the waypoint a code and a name. The code appears above the waypoint and is generally just a short identifier e.g. the code for Parafield is ‘YPPF’ and the name is ‘Parafield’
To delete the waypoint, click the rubbish bin icon at the top right corner of the user waypoint popup tab.
User Waypoints can also be created and managed in Settings → User Waypoints.
2.10. Airspace
Image 2.6 shows the result of a long press near YPED. After a long press, an Airspace popup will display in the centre of the screen, with the airspaces in the location of your finger press. A tap on the ‘R234 EDINBURGH’ listing results in the display as shown in Image 2.7. If the ‘Highlight active restricted airspace’ option is enabled, and the device has an internet connection, active restricted airspace (as per the NAIPS RA Briefing) will be coloured red. The red active shading is for situational awareness and the status of airspace should always be verified.
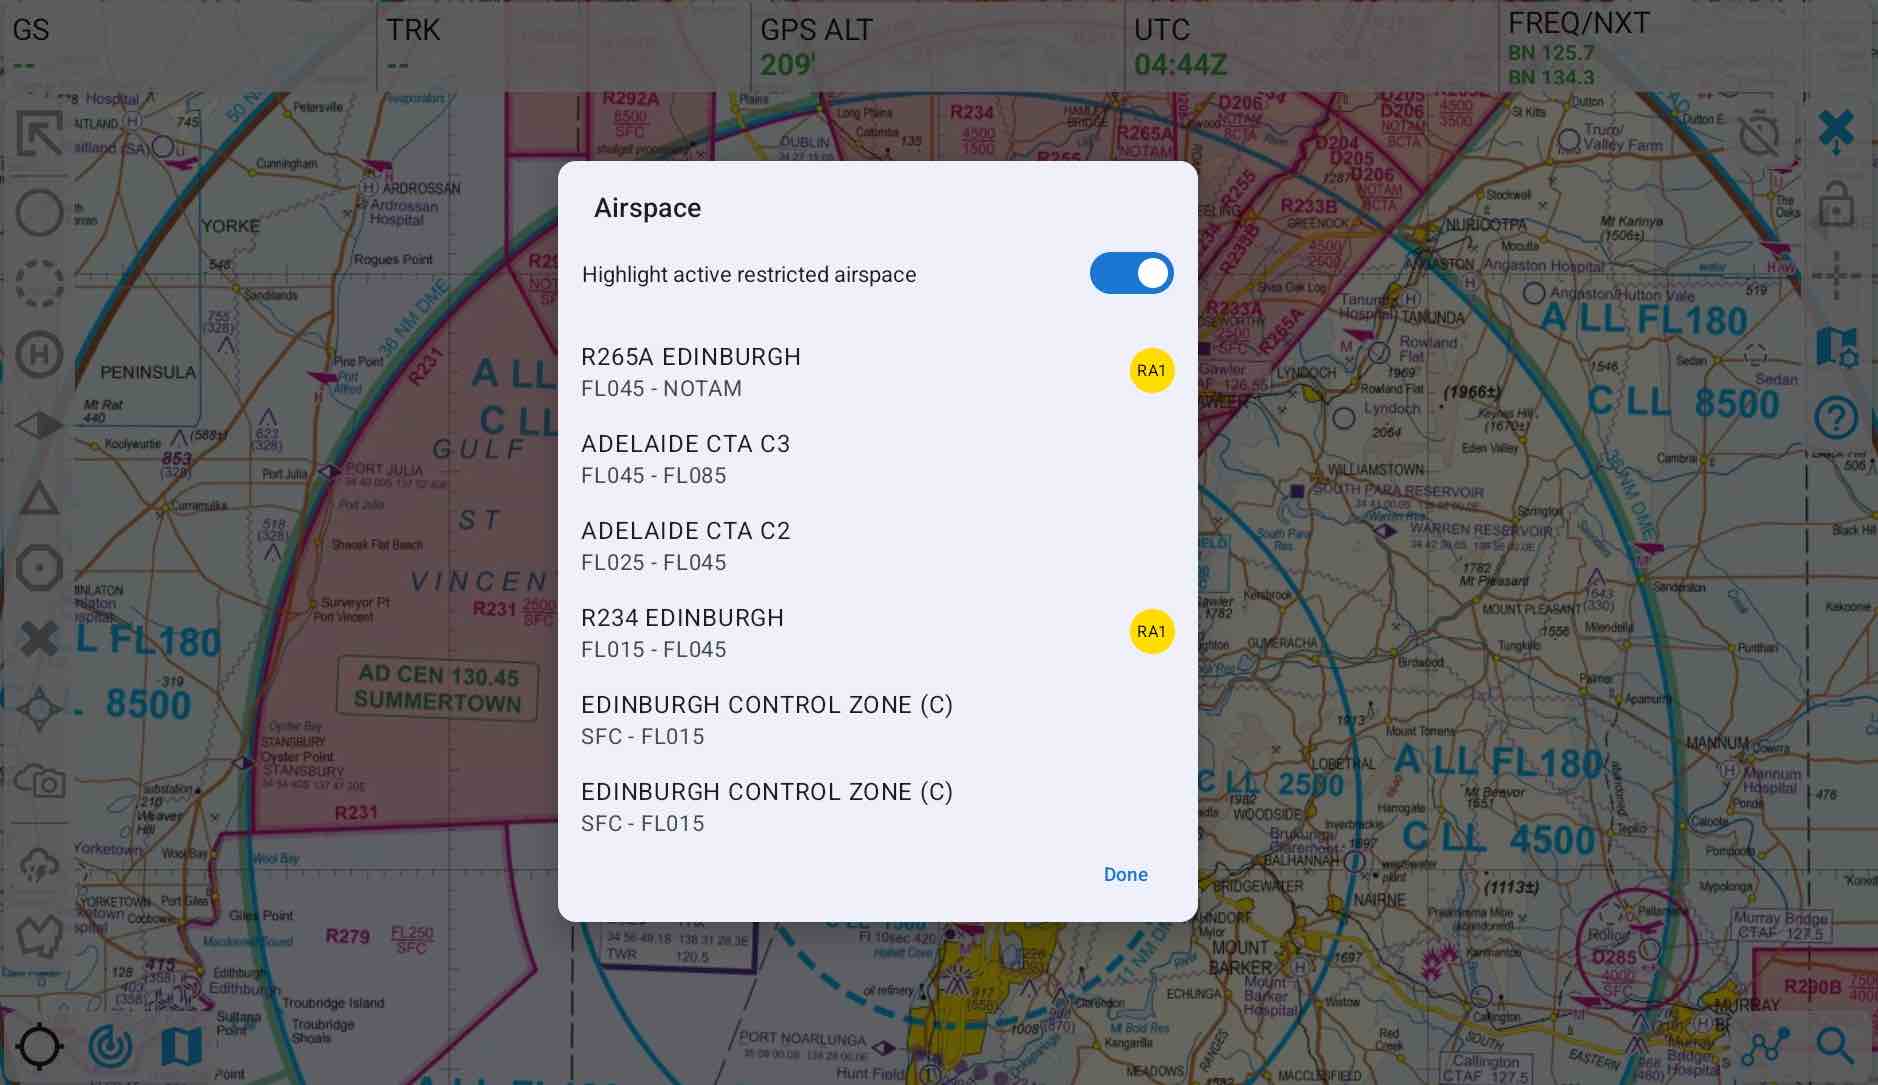
Image 2.6 Long press near YPED
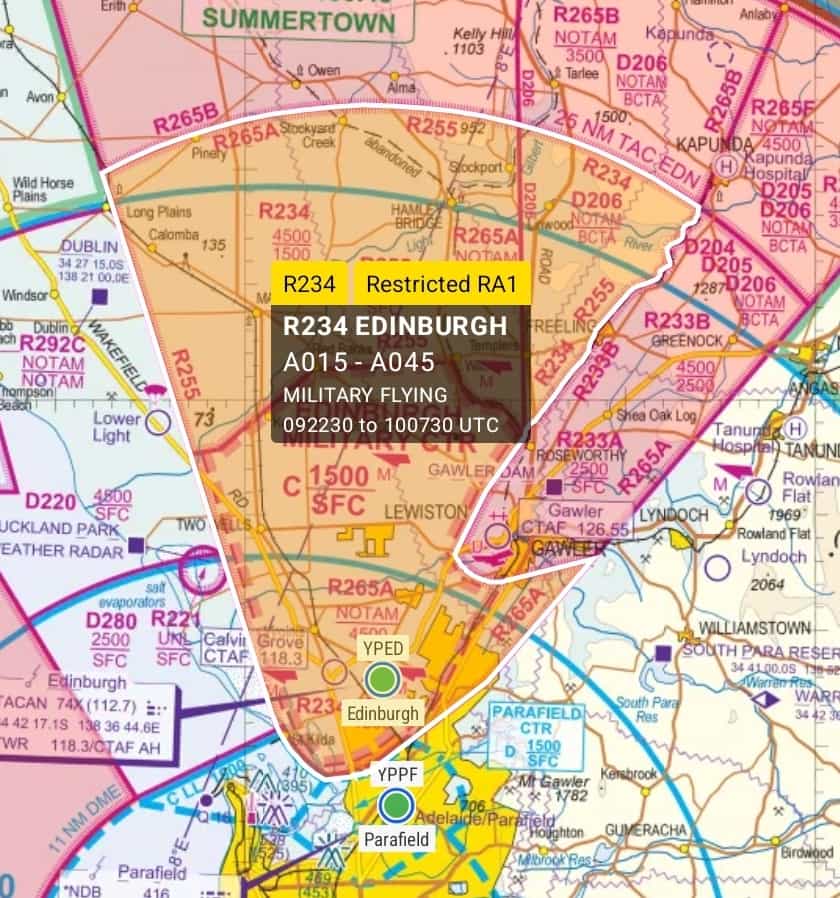
Image 2.7 Selected airspace details